Blender
Download and install
Log in to Web Manager (web dashboard) at https://app.garagefarm.net and download our renderBeamer app for you operating system.
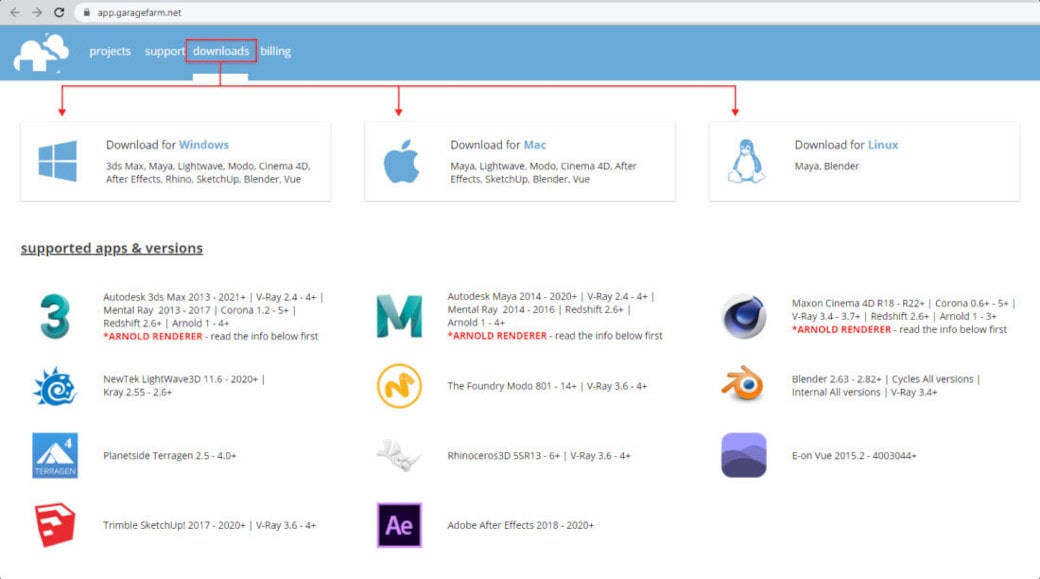
Install the renderBeamer app and start it. Once renderBeamer is done with the installation process, you need to choose the default download directory. This path will be used as the main output place for all your renders. Next, just log in using the account ID you received or your account email. Please keep in mind that the app should always be running in the background whenever uploading a project or downloading rendered frames.

Once renderBeamer is installed and you’re logged in, you’ll see the Plugins panel. Plugins installation panel should automatically open after the first renderBeamer startup. You can also open it anytime you need to install additional plugins for your 3D apps.
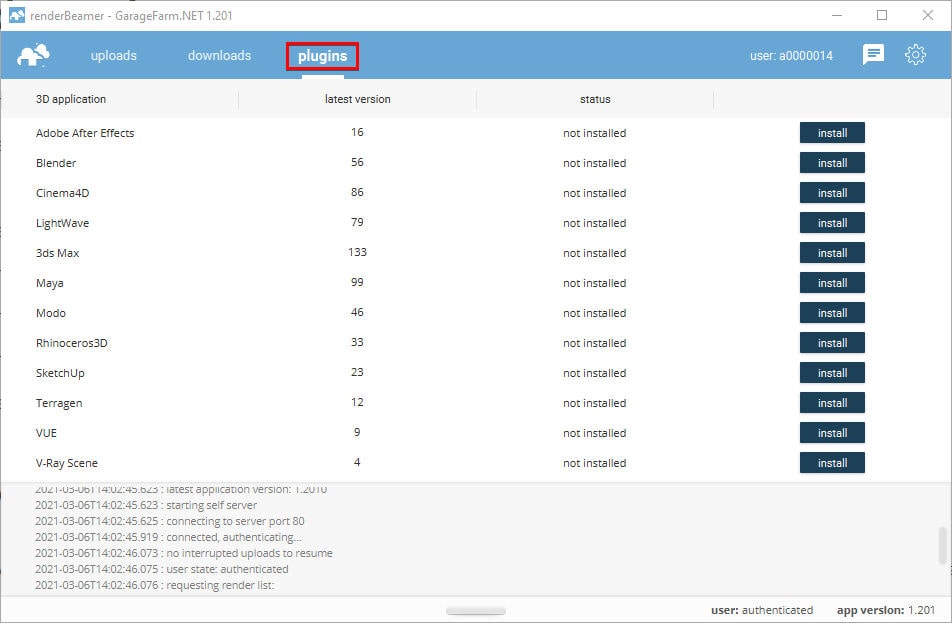
Please keep in mind that each 3D app (DCC) you use needs to have a plugin installed to properly connect to and render on our farm.
After launching renderBeamer, launch Blender and navigate to Preferences. In the addons tab, search for “renderbeamer”. Once renderBeamer is added to Blender UI you can continue with the scene preparation.

By default, our plugin has the "Upload project with packed assets" option disabled - this means that the plugin will automatically prepare the project for uploading in such a way that it will collect all resources that have been linked in the scene and place them next to the scene file in your GarageFarm directory. This workflow is advised because when uploading subsequent scene(s) from the same project, our plugin can detect if the same assets were used in the project and if so, it will not upload them again.
However, if your project contains assets packed into the .blend file and you want to be sure that the structure of the project is kept unchanged and assets not be extracted by our plugin, enable the option: "Upload project with packed assets"
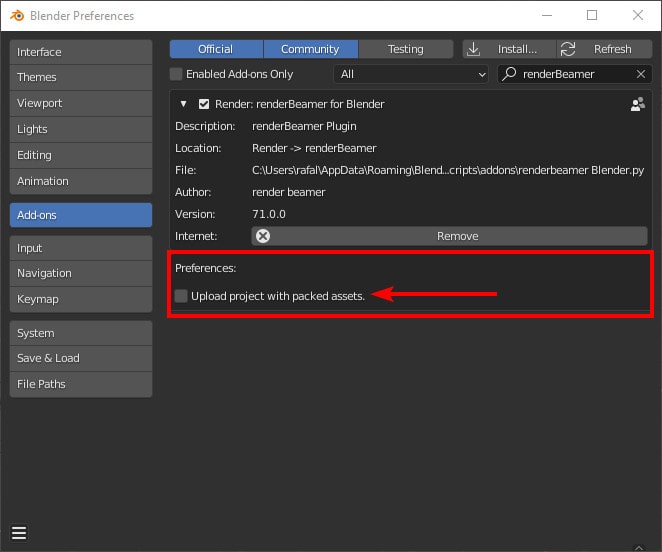
This option is recommended when the default workflow (without selecting this option) does not work properly. When this option is enabled, please bear in mind that the entire project data will have to be uploaded each time you make a revision, in contrary to the standard workflow where assets pertaining to a project are uploaded only once.
Prepare the scene
Open your scene in Blender and prepare it for rendering on a render farm.
- Scene files should be saved in .blend format - version 2.68 and above.
- All assets used by the scene should be accessible for Blender and properly linked. We recommend using relative paths (Assets\Asset.png) instead of absolute paths (like C:\Project1\Assets\Assets.png), but both should work fine.
- Scene should be free of missing assets when submitting to render farm
- Please always remember to check the % bar under the resolution setting. It has to be set to 100% unless you are sure other settings are appropriate.
- Please set the Threads option to Auto-detect to use 100% of CPU power.
- If there are dynamics features / physics simulations used in the scene, you should create a cache file for them and properly link it in the scene. Some physics types can work without external cache, meaning the cache can be saved directly in the scene. Here are general guidelines https://docs.blender.org/manual/en/latest/physics/baking.html.
- Plugins - we support a lot of Blender plugins & addons, however, if you are using some extra add ons, please send us the info. We will check for the plugin availability and purchase options.
- V-Ray for Blender - GI setup should be prepared for multiple machines rendering. If you are not sure about the GI setup - please contact us
- Eevee - rendering is fully supported. To ensure the best results, please run a test job before submitting your final animation.
- Output - Please set a proper file format for rendered frames and set the output path as relative or absolute. Output path for the main output cannot be empty or set as default (tmp). Please select the folder icon and put a path for saving outputs. Otherwise, it won't work with our plugin.
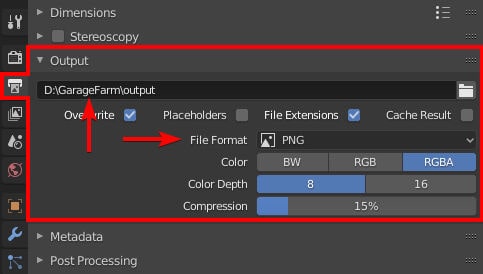
- Please check the Metadata setting, so that a stamp will not be added to frames unless it should be there.
- We do not support the “Auto Run Python Scripts” option by default. If you need this enabled, please contact our support before launching your job.
- We support Optix denoiser only on GPU nodes on our render farm. Additionally, all other denoisers available in Blender are fully supported on both CPU and GPU-based nodes.
Use the plugin
If you haven’t activated our plugin yet, please go to Preferences > Add-ons and look for “renderBeamer”.
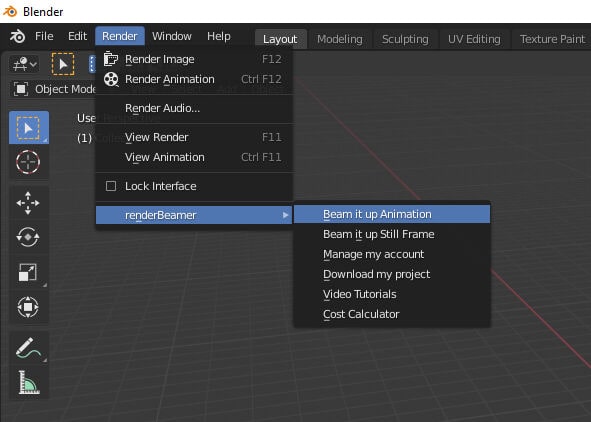
Once your project is prepared, please locate the renderBeamer menu in Blender (in the main "Render" tab). Depending on the project you are going to render, there are two modes to choose from:
- Animation - If you are going to render an animation, the ideal solution is to select the "Beam it up Animation" mode. Our plugin will prepare your project based on the frame range you have set in your scene settings.
- Still frame - If you need to render one single frame in high resolution, select the option: "Beam it up Still Frame". By using this mode, our plugin will prepare your scene and use the active frame in the timeline.
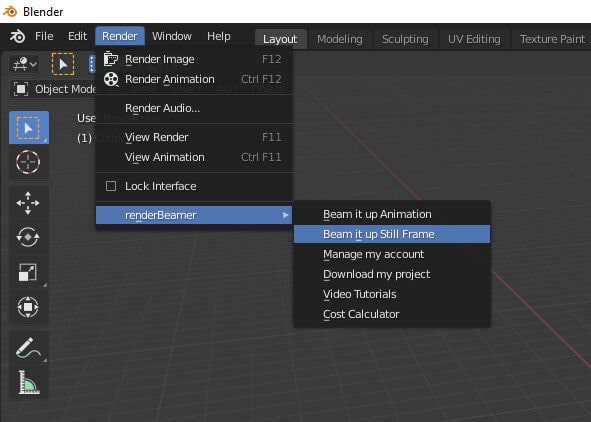
Regardless of the mode you choose, our Blender plugin is a “one button” solution. You don't need any additional setup to render your scene on the farm. Everything including frame range, resolution, quality settings and output format will be rendered just like the settings you have in the scene.
Upload the project
Once our plugin completes the scene export, your project will be redirected to renderBeamer to be uploaded. In a nutshell, renderBeamer is a standalone uploader/downloader application that works in conjunction with our plugins. Simply put, it takes care of the file transfers.
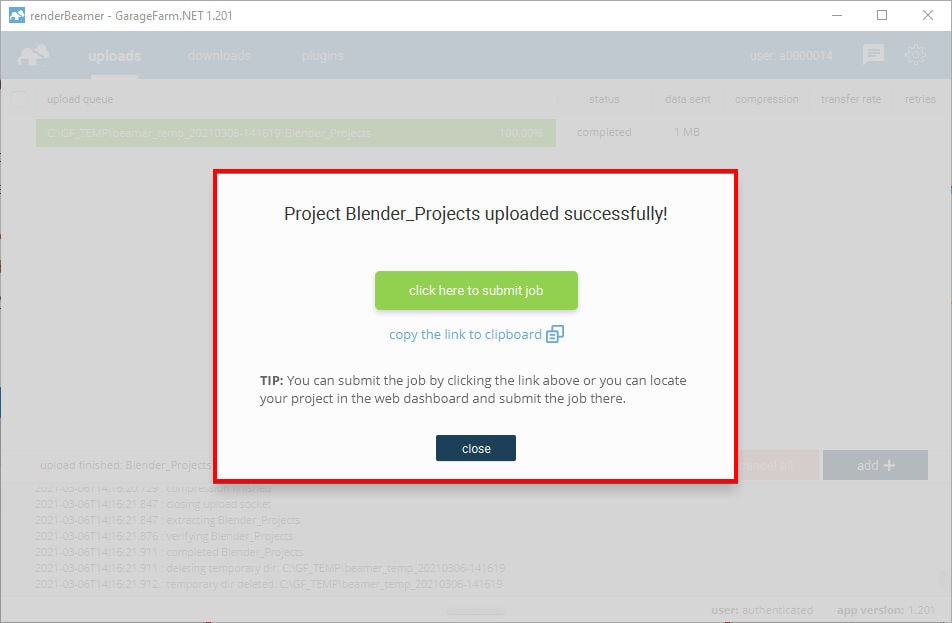
After the scene has been fully uploaded, the app will show you a window with a direct link to your scene on Web Manager (web dashboard). To continue use the click here to submit job button. If for some reason you closed the window with the link or it didn’t work, don’t worry, you can locate your project in the web dashboard and submit your scene by clicking on the scene file any time (more on that in the next step). You can also copy the link to clipboard and manually paste it into your web browser.
Submit the job (add the job to the render queue)
Now that your project is uploaded you will need to follow the final step - creating and submitting a job to render farm. Web Manager is a home to all your projects and render jobs.
If you followed the link generated earlier by renderBeamer, you will now see the job submission window with several fields and settings. If you didn’t follow the link or it didn’t work, you can do it manually by locating your project in the projects panel, finding the scene file within the project folder (in your folder structure look for the folder called “data”, i.e. Project_name/data/SceneName.blend), and clicking on it to open the job window.
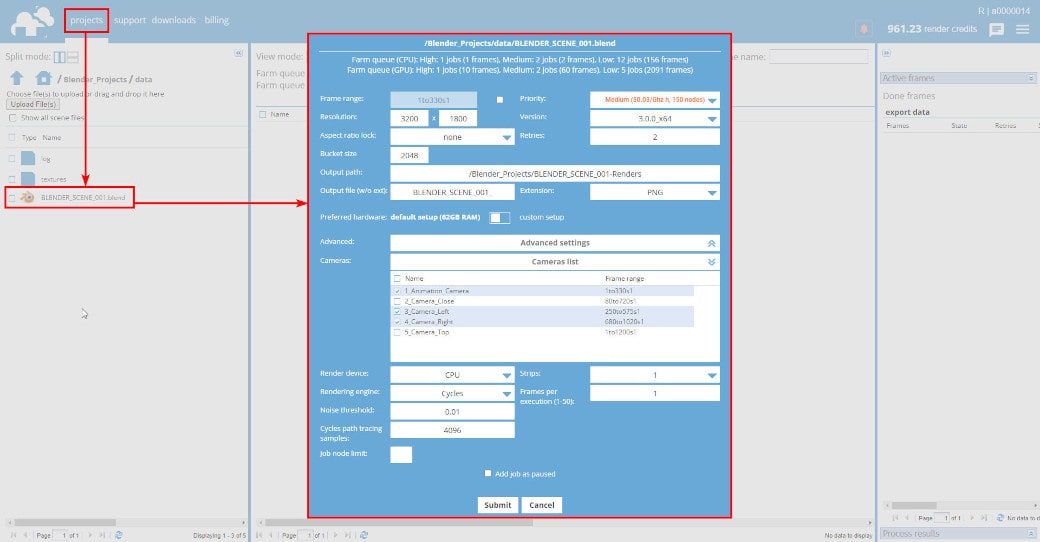
Our system automatically detects your settings in the scene and uses them to render the job. Before submitting the job to the render queue, please make sure that everything is correct and make adjustments if necessary.

test/full job - by default, this switch is enabled (set to the "test job" option) for animation ranges containing more than 5 frames in total. This means that our system automatically sets up your scene's range to render every n-th frame. We always recommend performing a test render before proceeding with the final render. This allows you to identify potential errors and estimate costs. If you want to define the test range manually or want to render the full range without prior testing, simply toggle the switch to the "full Job" option.
For more details on the benefits and usage examples of this option, please refer to a separate article.

Frame range - use this field to put in the frame range you want to render. Frame range example for animations: 1to780s1 - this is a sequence of 780 frames in total and all the frames 1 to 780 will be rendered. The parameter "s1" means that every subsequent frame in the given range will be rendered. If you want to do a test first, set a higher s value, e.g. "s20", which will result in every twentieth frame in the animation range to be rendered. So if you set the range to 1to780s20, then the frames 1,21,41,61,81,101,...,741,761 will be rendered.
If you have multiple cameras in your scene and you’d like to modify the frame range for all of them at once, you need to tick the checkbox to enable the frame range field.
If you only want to render a single frame (still image), you should input a single frame number into the field. For example, 1 will render the frame number 1.
Resolution - here you can set the output resolution in pixels.
Aspect ratio lock - if you need to change the resolution and want to keep a certain aspect ratio, you can use one of the available presets: 4:3; 16:9; 16:10; 21 9; 1:1. Leaving the option as "none" means that you are free to modify the values for the "Resolution" ignoring the aspect ratio.

Bucket X/Y or Bucket size - this option has a different name depending on the Blender version used. For Blender 2.xx it is - Bucket X/Y. These values are automatically set by our system based on your render device and resolution. For Blender 3.0.0 and above, it is named: Bucket size.This value is the same as the one in the scene settings.
The bucket field is an equivalent of the "Tiles" setting available in Blender. You can set a different value here if you believe that the default settings aren’t optimal for your scene.
If you are going to render a still image in high resolution and your scene does not contain any post-production effects, then it’s recommended to use "Strips" to speed up rendering by using multiple nodes simultaneously (see more info below).

Output path - here you can find the default save path for rendered frames in the given job. The default output path is based on the name of your project and scene. You can edit this path if you clone your job and need to render a different range in that project.
Output file (w/o ext) - by default, the frames file name is set based on the name of your scene. If you want to create a unique name and/or you need to customize naming for the output according to your pipeline, you can set your own name for the output file.
Extension - a format for the output file is the same as in your scene settings. However, if you want to change the extension to a different one, you can choose from the available options, i.e: BMP, IRIS, PNG, JPEG, TGA, RAW TGA, CINEON, DPX, MULTILAYER, EXR, HDR, TIFF.

Priority - before adding a job to the render queue, you can decide how you want to prioritize it. Depending on the queue and farm traffic, a higher priority may allow your job to quickly acquire nodes to render your project faster. Each priority has a different rate and gives you a different number of nodes - a detailed list can be found here:https://garagefarm.net/pricing
Version - by default, the version of Blender is set to the same version you have uploaded the project with. However, if you need to use a different version of Blender than the one detected, you can choose a specific version available on the list.
Retries - the value for this option is set to 2 by default. This means that if a rendering process fails or the software crashes, our system will perform two additional rendering attempts. We recommend leaving this option set to default (value 2) as this is the optimal setting to retry rendering in the case of some random 3rd party software errors.

Preferred hardware (node groups) - by default, the system sets the preferred hardware to nodes with 62GB RAM. Depending on the rendering device you choose to render the job with (CPU or GPU), you can also switch the node group button to custom setup and select the particular group of nodes either based on RAM or device:


The full technical specification of nodes can be found here: https://garagefarm.net/pricing#specs
If you know that your scene requires more than 62GB RAM, then when adding a job to the queue select the group with 121 GB RAM or more to render more optimally only on nodes that have more RAM.

Advanced settings
- Job dependencies - if you want this job to start rendering after finishing another job that is in the queue, you can select it here. As a result, the current job will not start until the selected dependency job has finished.
- Custom node version - if you need a different software setup (e.g. custom software version), put here the value you received from our support. Note that inputting a wrong number may cause errors during rendering.
- Custom script - if your job requires a modified environment or adding a custom script (prepared by our support team), e.g. custom plugin installation, select the available script from the list.
The advanced settings above are empty by default, please do not modify them without consulting support first.
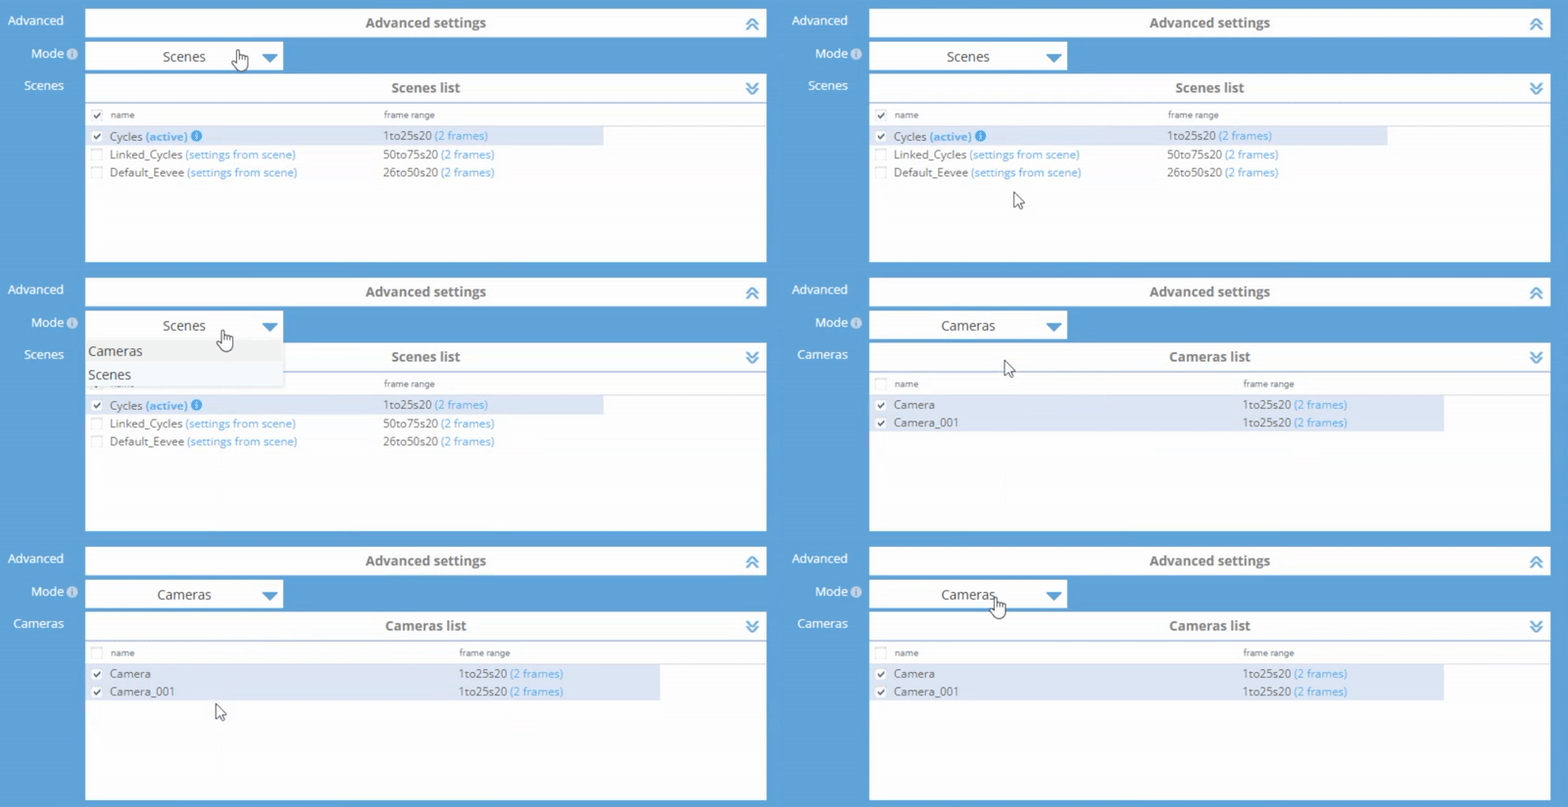
Mode - This option is available when your main .blend file contains multiple cameras and scenes. Depending on what you want to render, cameras or scenes, you can make your choice using the dropdown list. If your project contains only camera(s), this "mode" option is unavailable, and the camera list is displayed by default.

Cameras - in this part of the submit window (cameras list) you can select all the cameras that you want to render, and you can also set an individual frame range for each camera. Each selected camera will be added to the queue and rendered as a separate job.
In case you do not select any of the cameras from the list, then the camera selected in the scene will be used as the default camera for rendering.

Scenes - In this mode, you can see a list of all the scenes contained within the main scene. By default, the scene that was active when using our plugin always will have selected a checkbox.
For each scene, you can define an individual frame range. Each selected scene will be added to the queue and rendered as a separate job.
Scene statuses:
- Active – The scene marked with "Active" status on the list is the one that was active when you used the plugin to submit your project. The editable settings above apply only to this active scene, and you can modify them. Any changes you make will be applied to and used during the rendering of this active scene.
- Settings from scene – The other scenes on the list are marked as "Settings from Scene". This means that all rendering settings will be consistent with the settings when the project was submitted. These settings cannot be viewed or modified in the web dashboard (the settings above are editable only for the active scene). After adding these scenes to the queue, all settings, such as resolution, extension, preferred hardware, noise threshold, and cycles path tracking samples, will be the same as those set in the scene.
Please note, that, at the moment, we do not support multi-camera rendering in scenes mode. For each selected scene from the list, the default active camera in that scene will be rendered. If you want to render multiple cameras for a specific scene, isolate that scene and submit it via our plugin as a separate scene. This way, you will be able to select multiple-cameras you want to render for a given scene.

Render device - depending on the technical requirements of a project, these settings should be detected and set automatically but also you can choose your preferred device between these three options: CPU, GPU or GPU (OptiX). By default GPU option is based on the CUDA library, the other one - GPU (OptiX) is based on the OptiX library.
Rendering engine - our system automatically detects the render engine that you have used in your project. If you need to change this setting, you can do it without the need to upload the project again by changing the engine to one available from the list.
Supported renderers: Cycles, Blender Internal, Blender game, V-Ray, LuxCoreRender, Redshift, ProRender.
Noise threshold - The value of sampling a pixel is set to the same you have in your render settings. You can adjust the value to a lower or higher one. According to Blender Foundation documentation, the typical values should be in the range from 0.1 to 0.001.
Cycles path tracing samples - if you need to increase or decrease the samples, you can do it by changing the value in this field.
By default, the option available in Web Manager is available for Path Tracing because it's more popular. Please note that if you use Branched Path Tracing in your scene, your Branched Path Tracing samples will remain unchanged and will be used on the farm accordingly.
Strips - this is our custom distributed rendering system. It’s designed especially for high-resolution still shots. It works with all rendering engines and for both render devices (CPU and GPU). Depending on the settings you choose, submitting a job with strips enabled creates two jobs: render and merge.
This option allows you to choose the number of strips that will be used when rendering the job. You can choose from options: 4 (2x2); 16 (4x4); 25 (5x5); 64 (8x8). If you leave the value set to 1, then the job/frame will be rendered on one node. Otherwise, each strip (part of your frame) will be assigned to one node. You have to remember that the number of strips is strictly dependent on the resolution you have set. If your resolution does not have many divisors, please try to modify the height/width values of the resolution.
If you are rendering a still shot/one frame in high resolution, we recommend using the "Strips" option - this is our custom distributed rendering system that allows you to render one frame on several nodes at the same time and speed up rendering!
Frames per execution - this option is only available for animations. By default, the value for FPE is set to 1 for projects rendered on CPU. This means that each frame will be rendered as a new execution (a separate task), in other words, the scene will be loaded on each node every time a new frame starts. In the case of projects rendered on GPU, the value for FPE is set to 5 by default. So it means that 5 frames will be rendered in a row on one node.
The FPE (Frames Per Execution) option allows you to render several frames (the value you put in) in a row without the need to reload the scene on a render node, and potentially may improve rendering efficiency. If your scene has a long loading time but a short rendering time, you can set FPE to a higher value (for example 4). If the loading time is not long but the rendering time is long, leave the default value or set it to 1.
Detailed information on the use and examples of the FPE option in practice can be found in our dedicated guide: https://garagefarm.net/documentation/how-to-use-and-optimize-frame-per-execution-fpe

Job node limit - by default, the value for this option is empty and so the nodes are assigned automatically depending on the job priority and nodes availability on the farm. Nevertheless, if you want to limit the number of nodes for the given job, please put here the value of the maximum number of nodes you want to be used during rendering.

Add job as paused - if you tick this option and then submit your job, it will be added with the status “paused”. This means that it will not start rendering automatically. It is useful to use this option if you intend to add the job to the queue, but you do not intend to render it at the moment. After adding a "paused" job, you can resume it at any time by selecting the "resume job" option (right-click on the job).
Submit - when you press this button, the system will immediately add the job to the render queue. Please remember to check all settings before submitting a job!
Cancel - if you do not want to add the current job to the render queue or you want to reset your settings and add the scene again, you can use this option. The submission window with the settings for the given job will be closed and all changes will be cancelled.

Create video sequence from output frames - You can create animated video outputs right after rendering frames. Select “Create video sequence from output frames” switch and set all desired video output settings. With the switch ON, the farm will run an additional job to render the frames sequence to a single video output.

More info about the settings available in the "video sequence job" you can find in our dedicated article.
Monitor render progress
After giving your render settings a final check and choosing your preferred priority hit Submit to add your job to the render queue. If you’re a first time user, you will have received $25 worth of credit to test out our service. The credits should be enough to run a few test jobs and get you familiar with the service.
You can right click on the job to get additional options: change priority, pause job, kill job, clone job, and archive job.
The estimate is based on the currently finished frames, and is an approximation at that point. Rendering a test as prompted in the plugin (using a step i.e. 1to100s10) is highly recommended for more accurate estimates and for detecting potential errors.
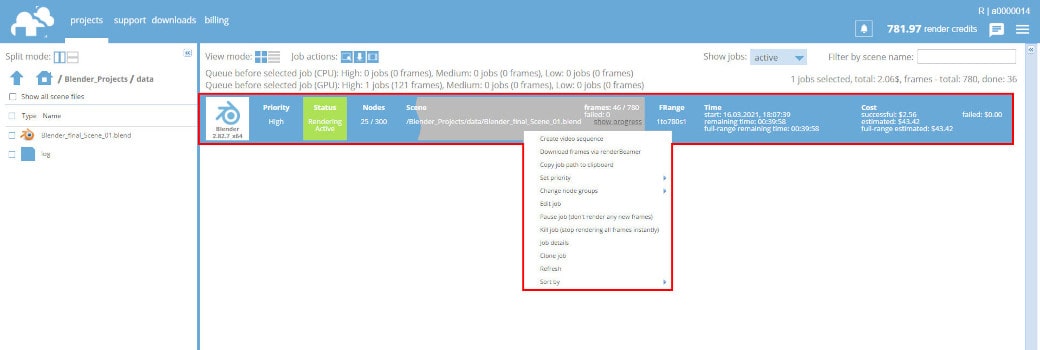
When the job has started rendering, you can check the real-time progress of currently processed frames. To do that, just select the render job from the main project list and then click the arrow on the top right side to open the progress panel.
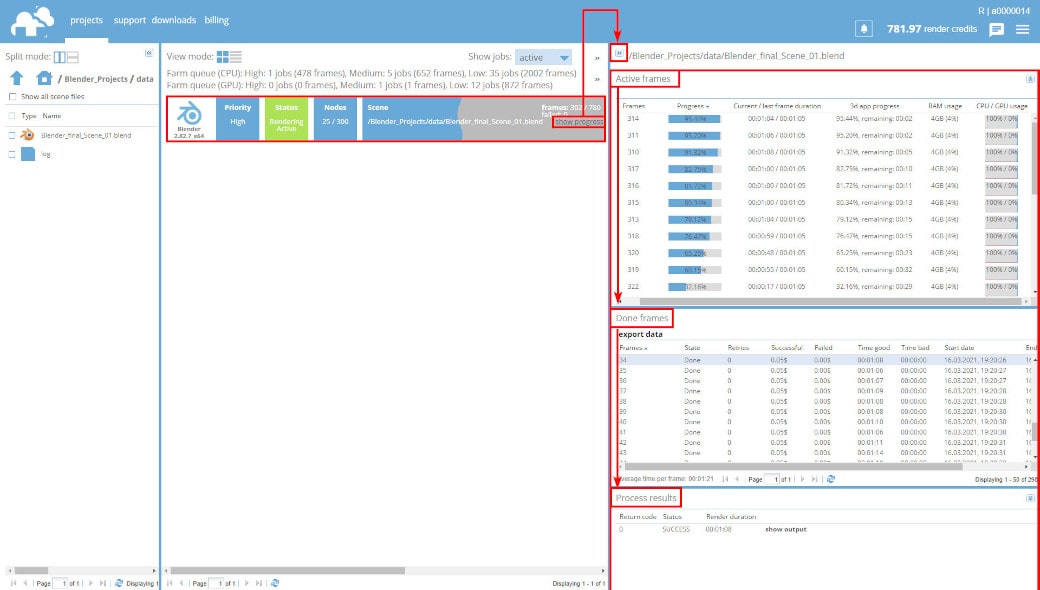
The Progress Panel (the panel on the right side of the screen) will show its content only when any of the jobs is selected. The panel is divided into 3 sections.
Active frames - it shows currently rendering frames. When a frame finishes, it is moved to the second section Done frames. If you select any frame in the Done frames list, you can then access the render output process log in the bottom section called Process results.
When you’re in the Progress Panel and right click on any of the currently rendering frames in the “Active frames” section, you can access the real-time render log from our nodes.
Please keep in mind that if a job has finished rendering, the frames list in the “Active frames” section will be empty because all frames are already rendered and the list is moved to “Done frames”.

Custom methods to upload/submit a project
This option allows you to send your project using an internet browser skipping the plugin setup step (see point 3) and without using our renderBeamer application to upload the prepared project (see point 4).
All you have to do is put a .blend file and choose the correct settings for your scene and add your job to the queue.
Remember that when using this method of uploading and submitting a job, you need to make sure your project is prepared correctly and it is free of errors. Your .blend file must contain all the assets packed into the scene. Otherwise, the render results may be incorrect.
The process of uploading a scene:
- You can upload a scene by selecting the file located on your computer or directly dragging the file onto the Web Dashboard using drag & drop.
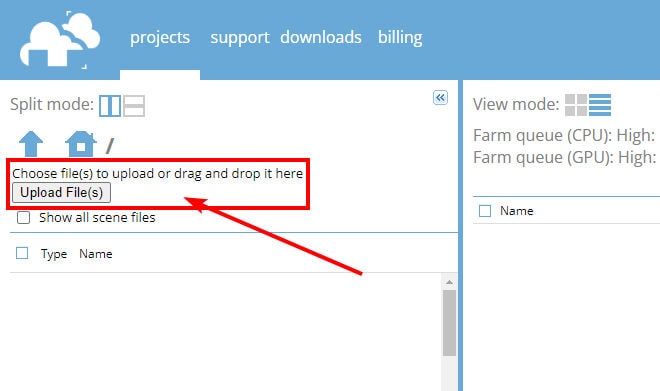
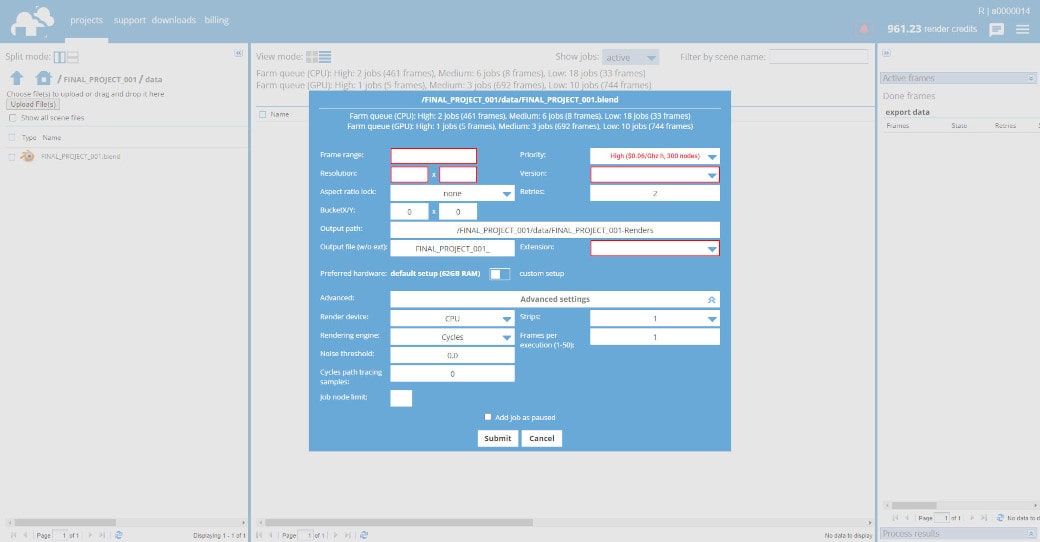
At this point, the process looks the same as the standard workflow when using renderBeamer plugin. To continue, you need to select the required settings for: Frame range, Resolution, Version (of Blender), Extension.
If you want to render more than one camera from the given scene, it won’t be possible when submitting a scene this way because you can render only one camera that is selected as active in the scene.
This is our custom tool designed specifically for advanced users who have hundreds of collections across many files. The tool allows you to merge many variants of the collection from other .blend files into one main scene. You can submit the prepared scene file using our renderBemer plugin (see point 3) and manage your project online with ease.
Due to Blender limitation, a maximum of 25 collections can be merged and uploaded simultaneously.
To use our tool, first, you need to turn it on in Blender Preferences: Edit > Preferences > Add-ons > Collections Merger
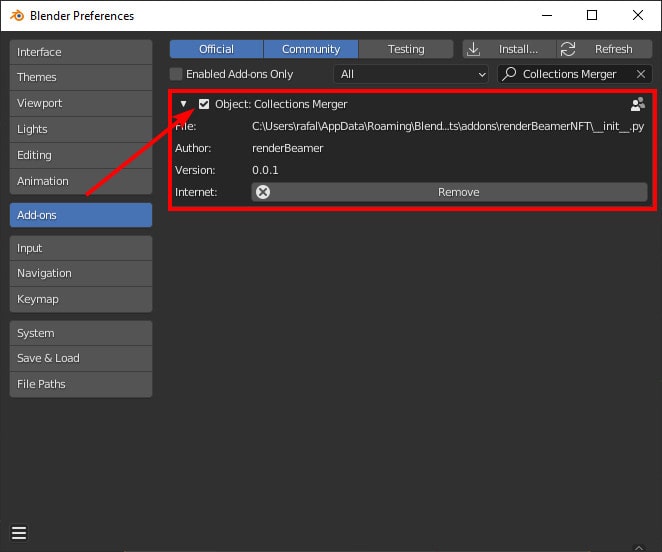
After enabling the Collections Merger (NFT tool), you will find a settings window in Scene Properties > NFT tool:

More information about when to use this tool and how to use - can be found in our video tutorial: TBA
Related post: https://garagefarm.net/blog/how-to-create-a-3d-nft-collection-in-blender
Download and review frames
Each frame that has completed rendering is downloaded automatically to your local drive to a directory you selected in the renderBeamer application. If you’re not sure where your download folder is located, you can double check it or change it in renderBeamer’s settings (click on the cogwheel). Also, make sure you have auto download turned on to get the frames downloaded as soon as they are available. If this box is unchecked, you will have to click on each job in Beamer's "downloads" tab, and manually download the frames.

If you prefer more control over what to download and when, you can also download your frames manually. To do that, just turn off auto download switch in renderBeamer settings and go to the “downloads” tab. Next, select the desired render output using a checkbox, and click the download button.

This kind of workflow will download all rendered frames for the selected job or jobs. However, renderBeamer also gives you an option to download individual frames. To do that, you need to use the list files function under RMB.

Once files for the selected job are listed, just roll down the list and select the files you’d like to download using checkboxes. Next, use the same download button.

Once your frames are downloaded, you can use open directory option under RMB to open the folder where frames are saved.
Please make sure you keep renderBeamer running whenever you have jobs rendering to get the frames downloaded right away. It may happen, however, that your frames aren’t downloading in the given moment, and most likely that’s because our application checks for the files on the server in 15 minute cycles and it is currently in between the cycles. You can click refresh list to force the check without waiting for the next cycle.
Purchase credits
You’ll need to charge your account to continue using the service when you use up all your trial credits. Please note that when your balance goes below $0, you won’t be able to download rendered frames or start new render jobs. You can make payments in the Billing panel in Web Manager. We accept debit cards, credit cards, PayPal, and wire transfer payments. Also, you can purchase credits via Revolut, Zen, P24.
If your rendering needs are high or you plan to render regularly, please make sure to check out our volume discounts.

In case your account balance goes below 0, any current jobs will be paused - all frames/strips that were in the middle of rendering will be completed but any subsequent frames/strips will not start rendering. To download rendered frames, your account balance must be positive or equal to $0.
Contact us anytime
You can talk to the GarageFarm.NET’s tech team any time of the day, any day of the week. We’re here to help you get started, answer your questions, and assist you in any way. Don’t hesitate to give us a shout.
You can contact us through our live chat accessible in the web dashboard or our desktop app when you log in to your account or message us here through the guest chat.
We also recommend checking out our FAQ page which answers most of the questions new users have.
Register Now and Get $50 FREE Credits!

Frequently asked questions
