Explore our newest YouTube guide and master the basics with ease
Need Help?
Modo Native
Download and install
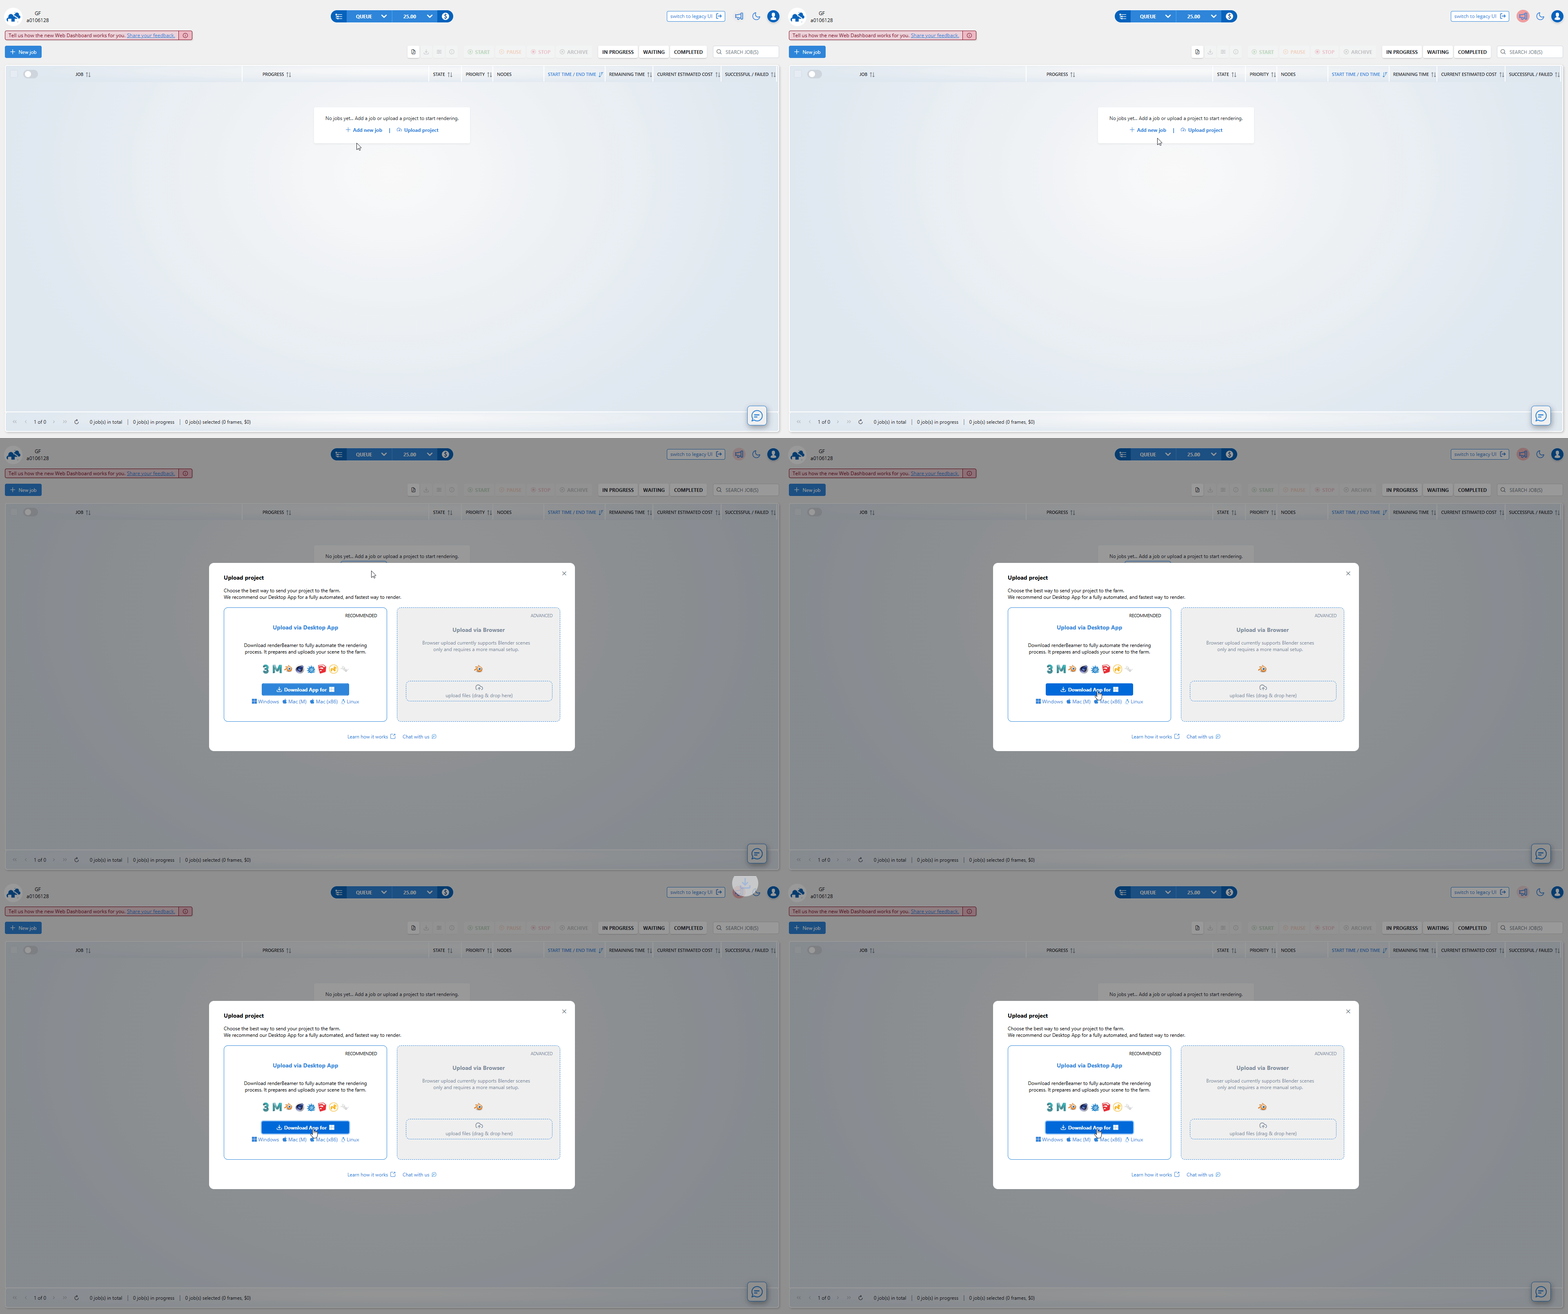
Log in to Web Manager (web dashboard) at https://app.garagefarm.net and download our renderBeamer Desktop App for you operating system.
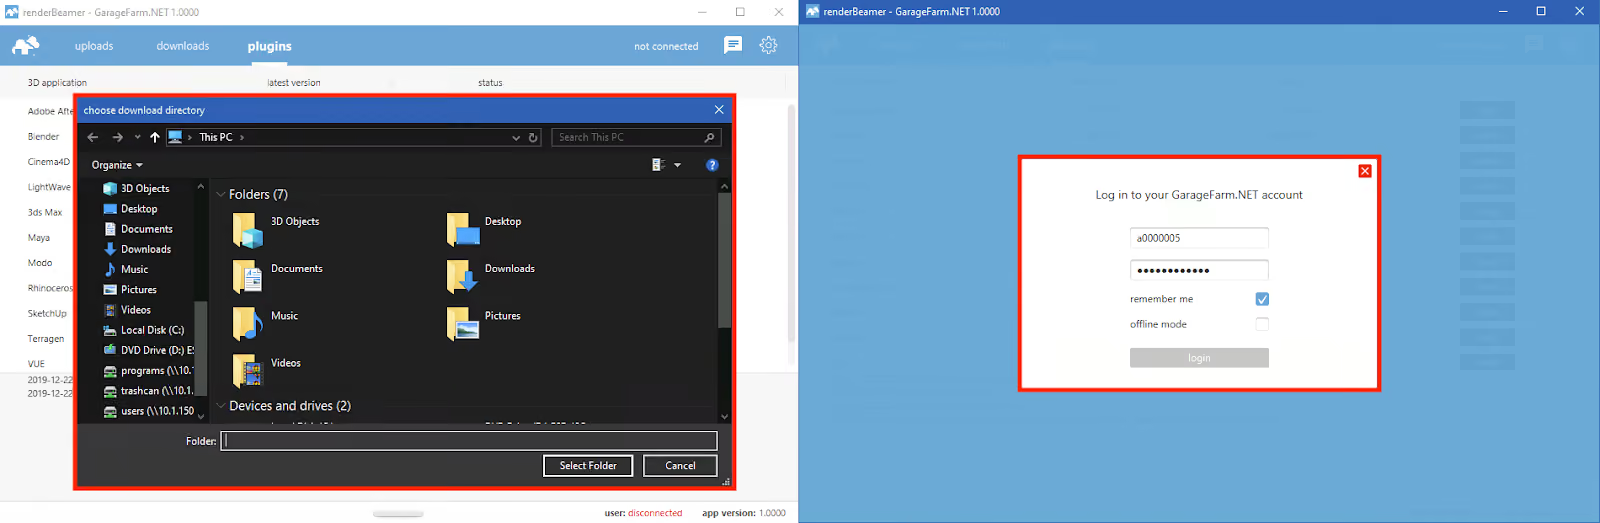
Install the renderBeamer app and start it. Once renderBeamer is done with the installation process, you need to choose the default download directory. This path will be used as the main output place for all your renders. Next, just log in using the account ID you received or your account email. Please keep in mind that the app should always be running in the background whenever uploading a project or downloading rendered frames.
Once renderBeamer is installed, and you’re logged in, you’ll see the Plugins panel. Plugins installation panel should automatically open after the first renderBeamer startup. You can also open it anytime you need to install additional plugins for your 3D apps.
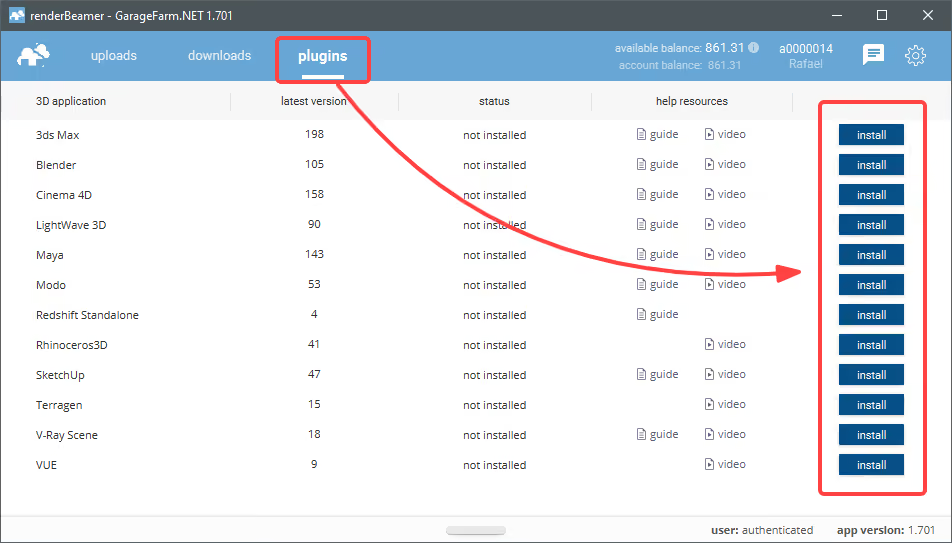
Here in the plugins panel, you can install plugins that allow you to work with our farm. Once you installed the plugin for your 3D app, you can proceed to the next step.
Please keep in mind that each 3D app (DCC) you use needs to have a plugin installed to properly connect to and render on our farm.
Prepare the scene
Open your scene in Modo and prepare it for rendering on a render farm.
- Scene files should be saved in .lxo – base modo format – version 901 and above.
- Our plugin works from 901 version, however, if you are using the older one we can also render it. Just contact us for more details.
- All assets should have correct links in Modo Texture manager. Ideal situation is to have all assets in a folder next to the scene (default modo folder \imported images\ is perfect for that) and linked in Texture manager to that path. Also the scene should be free of missing assets when submitting to render farm. This is a crucial setting because we use modo_cl parser which won’t accept scenes with missing assets.
- Textures – all textures should be copied to \imported_images\ folder in the scene project directory. Also, all links to files should be localized to this path. Animation files (avi/mp4/etc) are not a good option for animated textures, also .mov files cannot be used. Please convert those to frame sequence (jpg\png or so) and connect as an image sequence. If a scene is using Modo default textures – please provide them too.
- GI (Irradiance) – please make sure that your GI doesn’t need to be cached. Modo has a very good GI engine, however when rendering still shots with our distributed strips technique we recommend to cache GI and upload the scene with lxi file connected.
- Render range – set the correct frame range that you’d like to render.
- Render layers & output – should be prepared the same way as when rendering on a local machine.
- Render region – if not used and not needed, should be turned off.
- Render passes – are fully supported. Please configure them the same way as when rendering on a local machine.
- Output pattern – does not matter. We will rename and redirect all output paths to our own: \Scene_name-Renders\Renderlayername\Scene_name.#.xxx
- Scene file name and output paths should not contain any untypical characters like / \ ” % # ? or anything similar.
Use the plugin
Once your project is prepared, please locate our plugin menu called renderBeamer. Our plugin menu contains 3 options – Beam it up, Beam it up Vray, and Cost Calculator. For the internal modo render engine please just use Beam it up option.
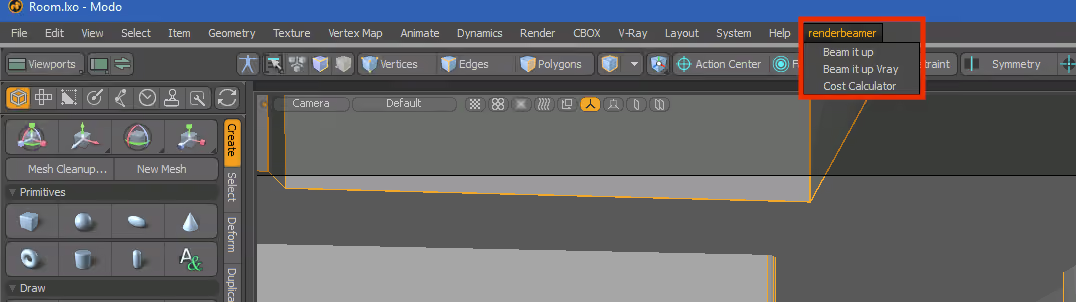
Our modo plugin provides a one button solution, which means – your scene is rendered exactly the same way as when rendering on your local machine. When using Modo internal render engine, you don’t have to set any options in our plugin. The render setup will be available in the later part of the process – after uploading a scene, on your Web Manager account (web dashboard).
Upload the project
Once our plugin completes the scene export, your project will be redirected to renderBeamer to be uploaded. renderBeamer is a standalone uploader/downloader application that works in conjunction with our plugins. Simply put, it takes care of the file transfers.
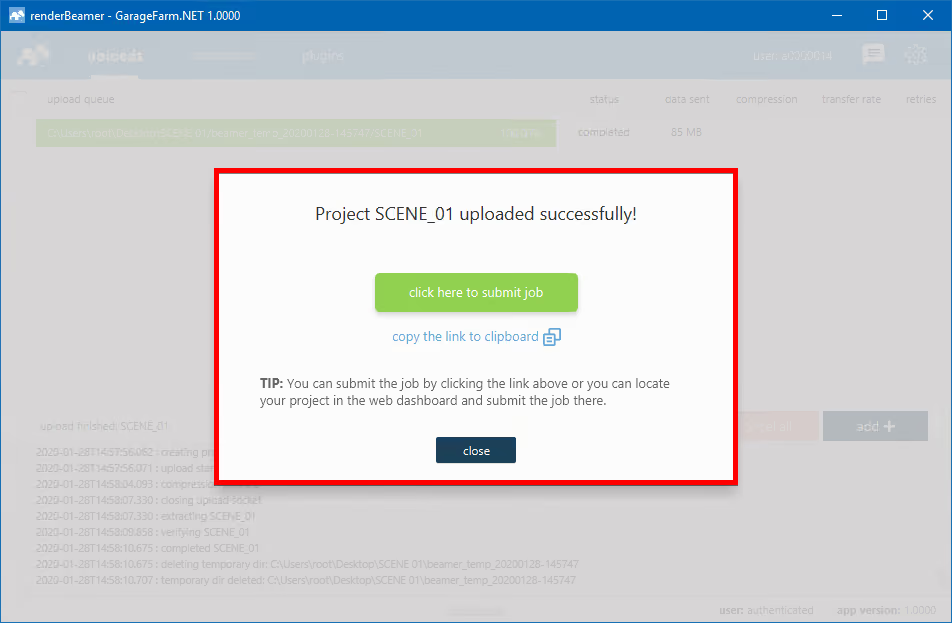
After the scene has been fully uploaded, the app will show you a window with a direct link to your scene on Web Manager (web dashboard). To continue just use click here to submit job button. If for some reason you closed the window with the link or it didn’t work, don’t worry, you can locate your project in the web dashboard and submit your scene by clicking on the scene file later (more on that in the next step). You can also copy link to clipboard and manually paste it into your web browser.
Submit the job (add the job to the render queue)
Now that your project is uploaded you will need to follow the final step - creating and submitting a job to render farm. Web Manager is a home to all your projects and render jobs.
If you followed the link generated earlier by renderBeamer, you will now see the job submission window with several fields and settings. If you didn’t follow the link or it didn’t work, you can do it manually by locating your project in the projects panel, finding the scene file within the project folder (in your folder structure look for the folder called “data”, i.e. Project_name/data/SceneName.lxo), and clicking on it to open the job window.
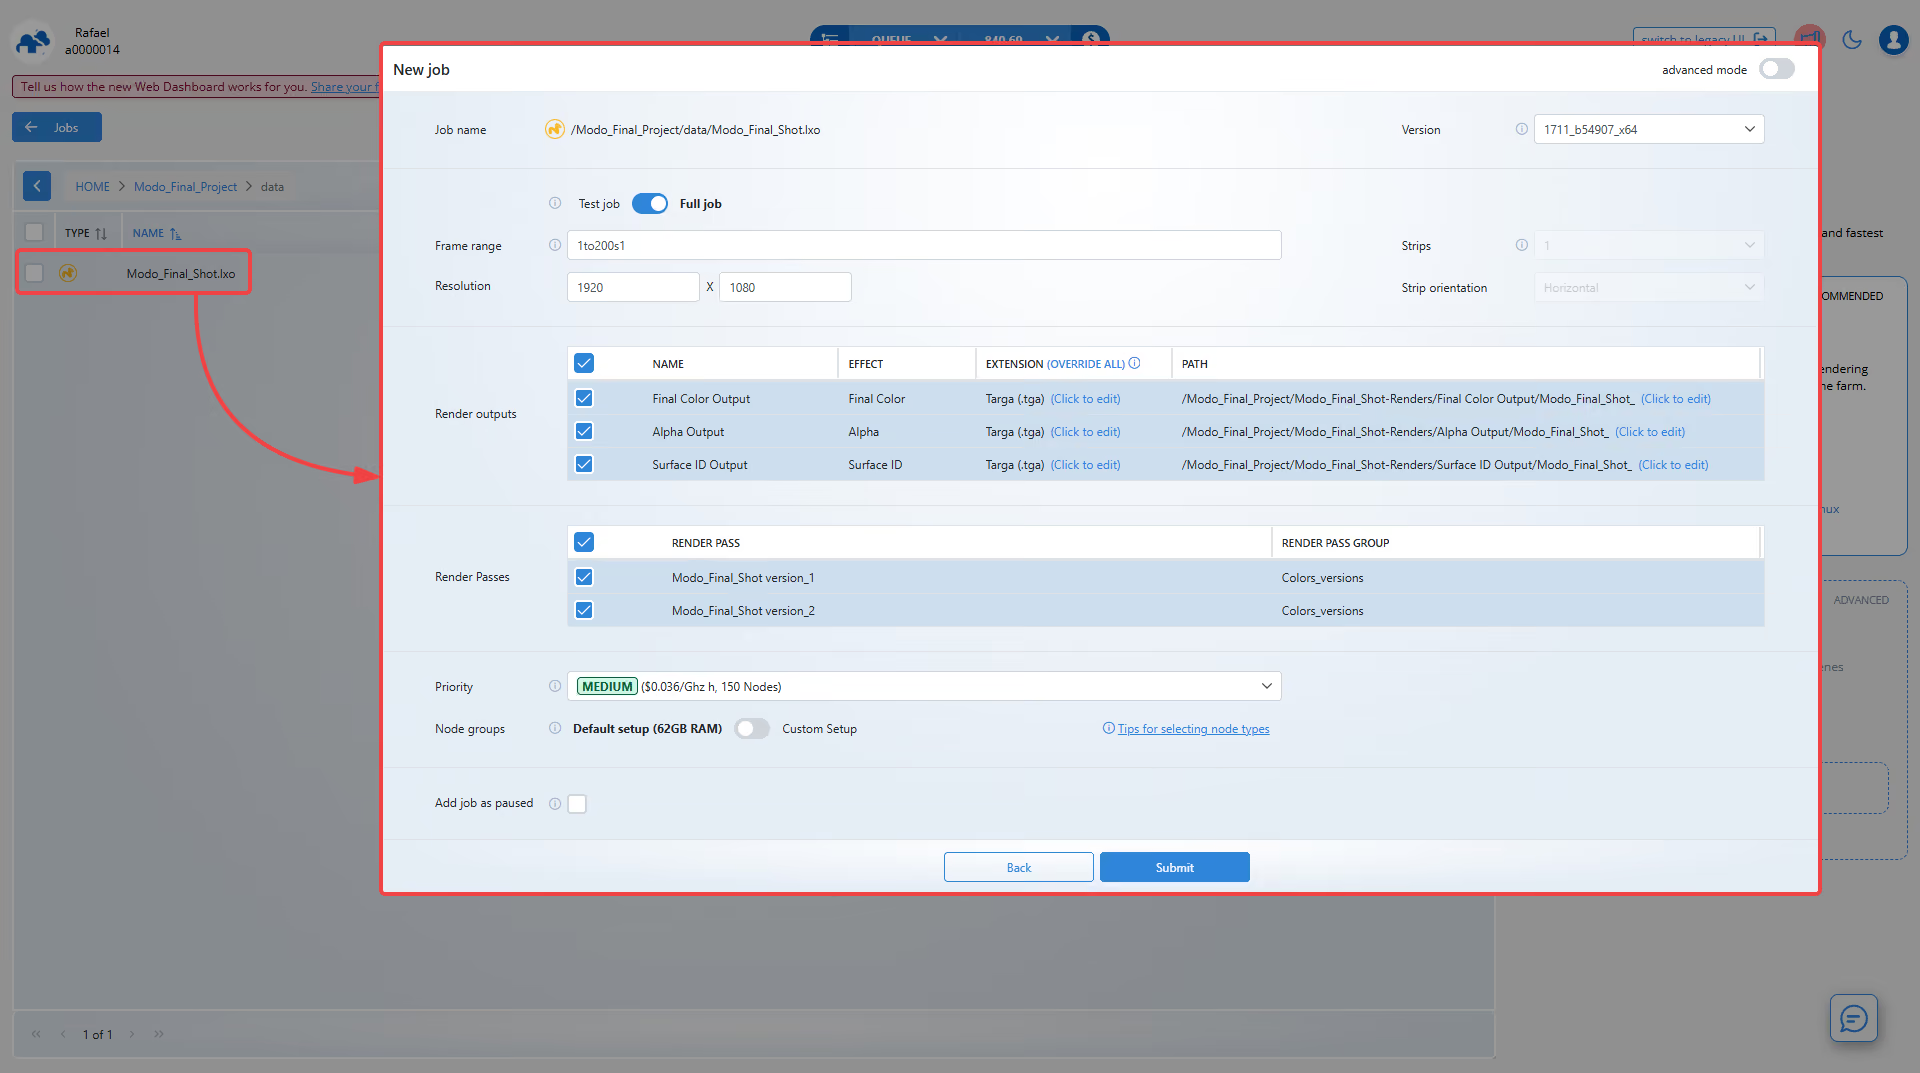
Most render settings are automatically detected and pre-filled based on your scene. Before submitting the job to the render queue, review the options below and make any adjustments required for your specific project.

Advanced mode - located in the top-right corner of the submission window. By default, this mode is disabled to keep the interface simple and focused on the most commonly used settings. Enabling it reveals additional optional settings, including Output Path, Output File Name, Advanced Settings, Retries, and Job Node Limit, Geometry Cache, providing greater control over job submission for advanced workflows.

Job name - displays the name that will be assigned to the submitted job. By default, it is generated automatically based on the project structure and scene file name. This farm-side path helps organize and identify jobs submitted to the render farm. The generated name will be visible in the Web Dashboard and can help you easily identify and manage your render jobs.

Output path - here you can find the default save path for rendered frames in the given job. The default output path is generated based on the name of your project and scene. You can customize this path if needed, for example when rendering multiple versions of the same project or when your workflow requires a specific output structure. This option is available in "Advanced mode".
Output file name (without extension) - by default, the output file name is generated based on the name of your scene. If you need a custom naming convention or want to create a unique output name that better fits your pipeline, you can specify your own file name. This option is available in "Advanced mode".

Version - by default, the version of Modo is set to the same version you have uploaded the project with. However, if you need to use a different version of Modo than the one detected, you can choose a specific version available on the list.

test/full job - by default, this switch is enabled (set to the "test job" option) for animation ranges containing more than 5 frames in total. This means that our system automatically sets up your scene's range to render every n-th frame. We always recommend performing a test render before proceeding with the final render. This allows you to identify potential errors and estimate costs. If you want to define the test range manually or want to render the full range without prior testing, simply toggle the switch to the "full job" option.
For more details on the benefits and usage examples of this option, please refer to a separate article.

Frame range - use this field to specify the frame range you want to render. Frame range example for animations: 1to780s1 - this is a sequence of 780 frames in total, and all frames from 1 to 780 will be rendered. The parameter s1 means that every subsequent frame in the given range will be rendered. If you want to perform a test render first, set a higher step value, for example s20. This will render every twentieth frame in the animation range. For example, if you set the range to 1to780s20, the frames 1, 21, 41, 61, 81, 101, ..., 741, 761 will be rendered.
If the field displays "Using frame range from list below", the selected items are currently using their own frame ranges defined in the list below. You can edit each frame range individually for every camera, scene state, state sets, or other item.
To apply the same frame range to all selected items, enable the override checkbox next to the Frame range field. This will activate the main Frame range input and use its value for all selected items. The individual frame ranges in the list will be overridden accordingly.
If you only want to render a single frame (still image), enter a single frame number into the field. For example, 1 will render frame number 1.
If you are going to render an animation or a still image, we always recommend that you perform a test before the final rendering:
- For animations, the best way to get a cost estimate is to run a test of the scene on the farm with around 20 frames spread evenly across the range. For example, a frame range 1to200s20 will render every 20th frame as a test and based on that our system will produce a cost estimate for the full render.
- For stills, please render the image in 1/5 resolution or any other smaller resolution. In the case of 1/5 resolution test, the cost of full resolution render will be 25 times bigger than the cost of a test. For example, if you want to render an image in resolution 5000x6000, run a test in 1000x1200 res first. If your test costs $1, then the estimated cost for the full res image should be around $25 (5 x 5 = 25). For a 1/4 test it would be $16 (4 x 4 = 16) and so on.
There's more information about running tests and estimating the cost in our documentation.
Resolution - here you can set the output resolution in pixels.
If you are going to render a still image in high resolution and your scene does not contain any post-production effects, then it’s recommended to use "Strips" to speed up rendering by using multiple nodes simultaneously (see more info below).

Frames per execution - this option is only available for animations. By default, the value for FPE is set to 1 for projects rendered on CPU. This means that each frame will be rendered as a new execution (a separate task), in other words, the scene will be loaded on each node every time a new frame starts. In the case of projects rendered on GPU, the value for FPE is set to 5 by default. So it means that 5 frames will be rendered in a row on one node.
The FPE (Frames Per Execution) option allows you to render several frames (the value you put in) in a row without the need to reload the scene on a render node, and potentially may improve rendering efficiency. If your scene has a long loading time but a short rendering time, you can set FPE to a higher value (for example 4). If the loading time is not long but the rendering time is long, leave the default value or set it to 1.
Detailed information on the use and examples of the FPE option in practice can be found in our dedicated guide: https://garagefarm.net/documentation/how-to-use-and-optimize-frame-per-execution-fpe

Strips - is our custom distributed rendering system designed primarily for high-resolution still images. It is compatible with all supported render engines and both CPU and GPU rendering.
When a scene is submitted using Strips mode in the plugin, an additional Strips option becomes available in the Web Dashboard. The number of available strips depends on the scene resolution. By default, the value selected during submission is used.
The Web Dashboard also displays a recommended strips value, calculated automatically by our system to provide the best balance between rendering speed and cost.
You can choose any available strips count based on your priorities. Higher strip counts generally improve rendering speed but may increase the cost. Lower strip counts can be more cost-effective, especially for scenes with long loading times or significant initialization overhead.
If you are rendering a still shot/one frame in high resolution, we recommend using the "Strips" option - this is our custom distributed rendering system that allows you to render one frame on several nodes at the same time and speed up rendering!
Please note that Strips is available only for single-frame renders. If your job contains an animation frame range, the option will be disabled, as distributed rendering can only be used for still images.
Strips Orientation - determines whether strips are rendered horizontally or vertically.
Available strip counts are based on the output resolution and selected orientation. Switching between Horizontal and Vertical modes may provide additional strip count options. For the best balance between speed and cost, consider using the recommended value.

Render outputs - this section displays all output passes detected in the Modo scene. By default, the output configuration matches the original scene settings, including output names, file formats, and output paths.
You can review and modify the output settings before submitting the job for rendering:
- Enabled/disabled - checkbox used to enable or disable individual render outputs. Only enabled outputs will be generated during rendering.
- Name - displays the name of the render output defined in the scene.
- Effect - displays the output type assigned in the Modo scene, such as Final Color, Alpha, Surface ID, etc.
- Extension - specifies the output file format for the selected render output. Click "Click to edit" to change the format. The "Override All" option allows the same file format to be applied to all outputs at once.
- Path - specifies the output directory and file name for the selected render output. Click "Click to edit" to modify the path and file name for that output.
By default, all render output settings are imported directly from the Modo scene. Any changes made in the Web Manager apply only to the current render job and do not modify the original scene.

Render Passes - this section displays all render passes detected in the Modo scene. Render passes can be used to manage different scene variations, render settings, materials, lighting setups, or other project-specific configurations within a single scene file. Before submitting the job, you can review which render passes will be included in the render configuration and disable any passes that should be skipped.
- Enabled/disabled - checkbox used to enable or disable individual render passes. Only enabled render passes will be included in the render job.
- Render Pass - displays the name of the render pass defined in the Modo scene.
- Render Pass Group - displays the render pass group associated with the selected render pass.
By default, all render pass settings are imported directly from the Modo scene. Disabled render passes will be excluded from the render job, while enabled render passes will be processed according to the scene configuration.

Geometry Cache (GB) - specifies the amount of memory allocated for geometry caching during rendering. Increasing this value may improve performance for scenes containing large amounts of geometry, animated meshes, or complex scene data, but it also increases the memory requirements on the render node.

Advanced settings - available after enabling "Advanced mode". This section contains advanced configuration options intended for special workflows and support-assisted setups. In most cases, these settings should be left unchanged unless instructed otherwise by our support team.
- Job dependencies - if you want this job to start rendering only after another job in the queue has finished, you can select that job here. The current job will remain on hold until the selected dependency job is completed.
- Custom script - if your job requires a modified render environment or a custom script prepared by our support team (for example, a custom plugin installation), select the appropriate script from the list.
- Custom node version - if you need a different software setup (e.g. custom software version), put here the value you received from our support. Note that inputting a wrong number may cause errors during rendering.
The options above are intended for advanced use cases and are empty by default. Do not modify them unless instructed to do so by our support team.

Priority - before adding a job to the render queue, you can decide how you want to prioritize it. Depending on the queue and farm traffic, a higher priority may allow your job to quickly acquire nodes to render your project faster. Each priority has a different rate and gives you a different number of nodes - a detailed list can be found here:https://garagefarm.net/pricing Priority - before adding a job to the render queue, you can decide how you want to prioritize it. Depending on the queue and farm traffic, a higher priority may allow your job to quickly acquire nodes to render your project faster. Each priority has a different rate and gives you a different number of nodes - a detailed list can be found here:https://garagefarm.net/pricing

Node groups (preferred hardware) - by default, the system sets the preferred hardware to nodes with 62GB RAM. As we render LightWave projects on a CPU device, you can switch the node group button to a custom setup and select the particular group of nodes either based on CPU cores or RAM:

The full technical specification of nodes can be found here: https://garagefarm.net/pricing#specs
If you know that your scene requires more than 62GB RAM, then when adding a job to the queue select the group with 121 GB RAM or more to render more optimally only on nodes that have more RAM.
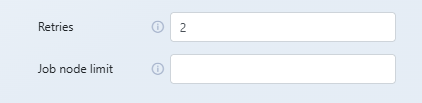
Retries - the value for this option is set to 2 by default. This means that if a rendering process fails or the software crashes, our system will perform two additional rendering attempts. We recommend leaving this option set to default (value 2) as this is the optimal setting to retry rendering in the case of some random 3rd party software errors.
Job node limit - by default, the value for this option is empty and so the nodes are assigned automatically depending on the job priority and nodes availability on the farm. Nevertheless, if you want to limit the number of nodes for the given job, please put here the value of the maximum number of nodes you want to be used during rendering.

Add job as paused - if you tick this option and then submit your job, it will be added with the status “paused”. This means that it will not start rendering automatically. It is useful to use this option if you intend to add the job to the queue, but you do not intend to render it at the moment. After adding a "paused" job, you can resume it at any time by selecting the "resume job" option (right-click on the job).

Back - if you do not want to add the current job to the render queue or you want to reset your settings and add the scene again, you can use this option. The submission window with the settings for the given job will be closed and all changes will be cancelled.
Submit - when you press this button, the system will immediately add the job to the render queue. Please remember to check all settings before submitting a job!
Monitor render progress
After giving your render settings a final check and choosing your preferred priority, hit Submit to add your job to the render queue. If you’re a first-time user, you will have received $25 worth of credit to test out our service. The credits should be enough to run a few test jobs and familiarize you with the service.
You can right-click on the job to get additional options: change priority, pause job, kill job, and archive job.
The estimate is based on the currently finished frames and is approximated at that point. Rendering a test as prompted in the plugin (using a step i.e. 1to100s10) is highly recommended for more accurate estimates and detecting potential errors.

Once the job starts rendering, you can track its overall progress directly from the project list. Each job entry shows the frame range being rendered, the number of completed frames, and the current completion percentage.
For more detailed information, expand the job row and open the Active Frames section to monitor the progress of individual frames in real time.
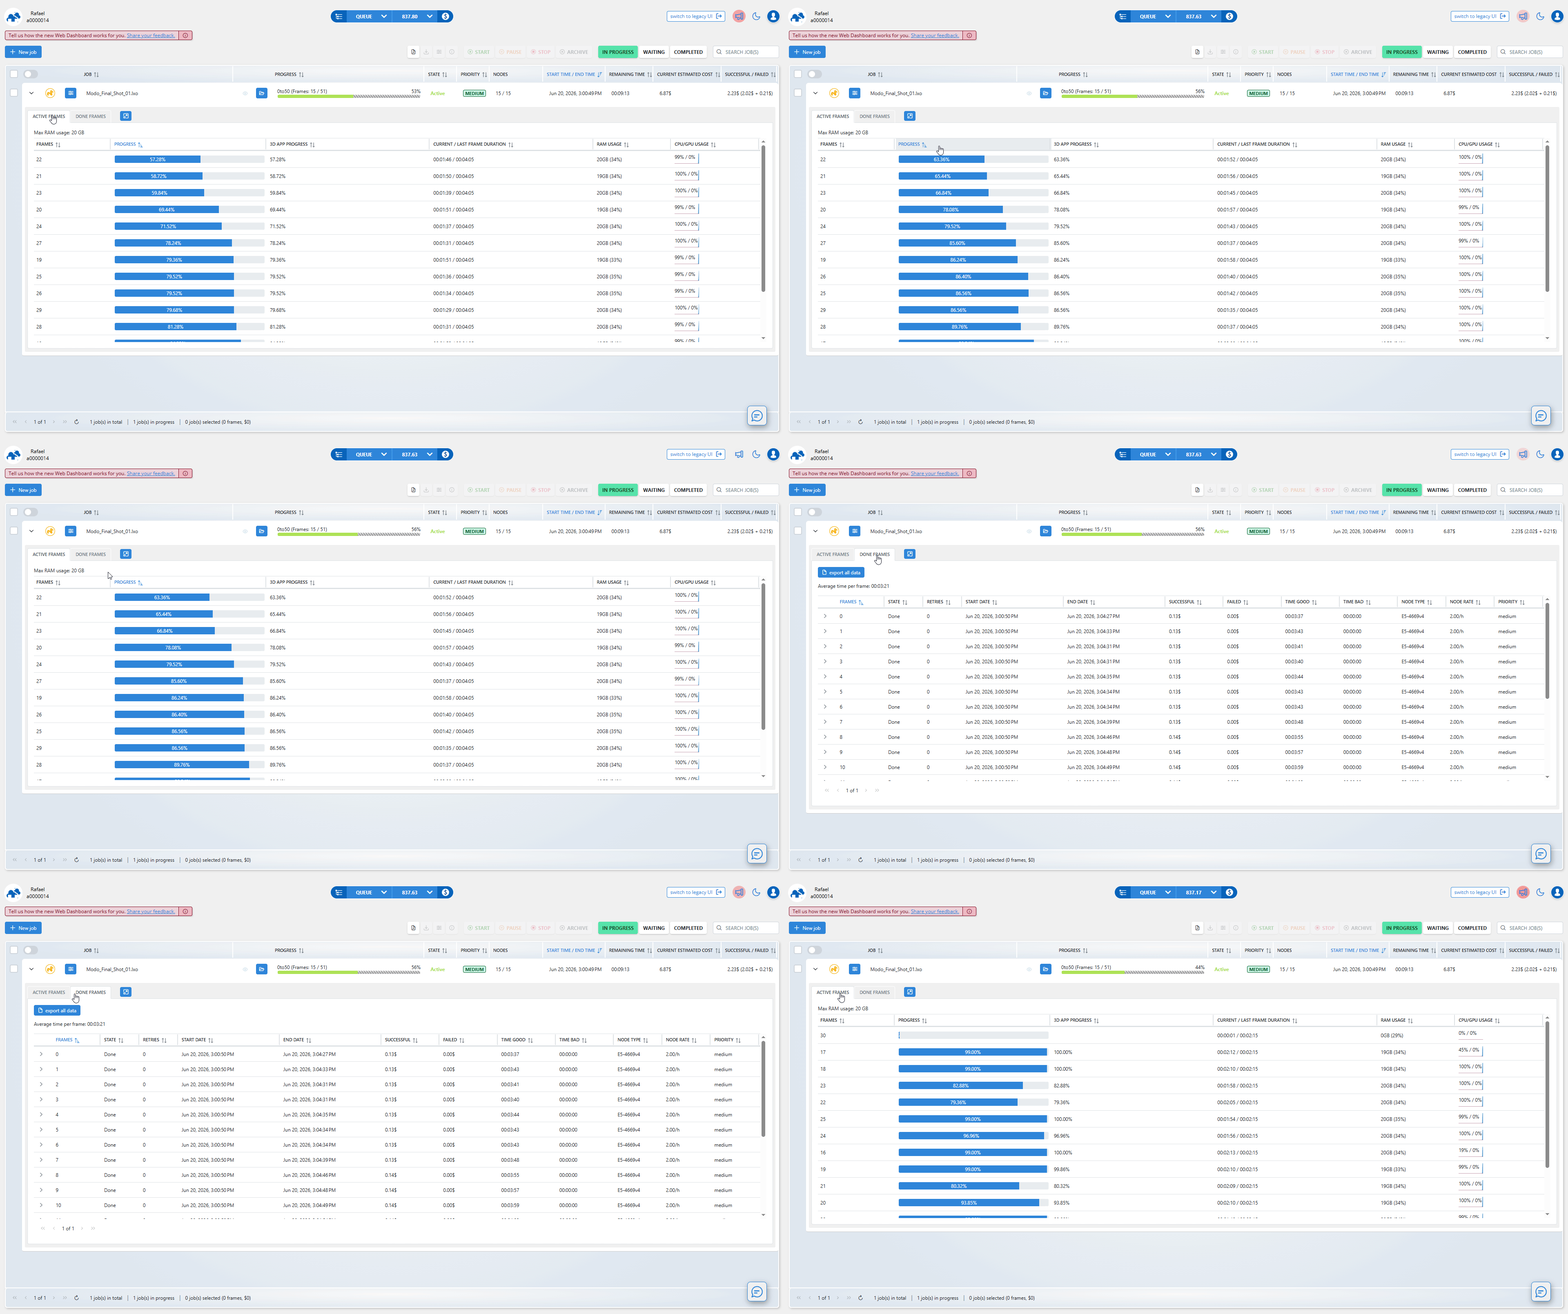
Job details are available directly within the project list. By default, all jobs are collapsed. To view additional information, select a job and expand its row. Each job can be expanded independently to display detailed information and rendering progress.
ACTIVE FRAMES - displays frames that are currently being rendered. Completed frames are automatically moved to the DONE FRAMES section.
DONE FRAMES - contains all completed frames. Here, you can review basic information about each rendered frame, such as render time and cost. Each frame row can also be expanded to access additional details, including information about the render node used, associated subjobs, and execution logs.

Right-click any frame in the ACTIVE FRAMES section (after selecting a job and expanding its row) to access the real-time render log from the node currently rendering that frame.
Please note that after a job completes, the ACTIVE FRAMES section will no longer contain any entries. All rendered frames are automatically moved to the DONE FRAMES section.
Download and review frames
Each frame completed rendering is downloaded automatically to your local drive to a directory you selected in the renderBeamer application. If you’re unsure where your download folder is located, you can double-check it or change it in renderBeamer’s settings (click on the cogwheel). Also, ensure you have auto download turned on to get the frames downloaded as soon as they are available. If this box is unchecked, you will have to click on each job in Beamer's "downloads" tab, and manually download the frames.
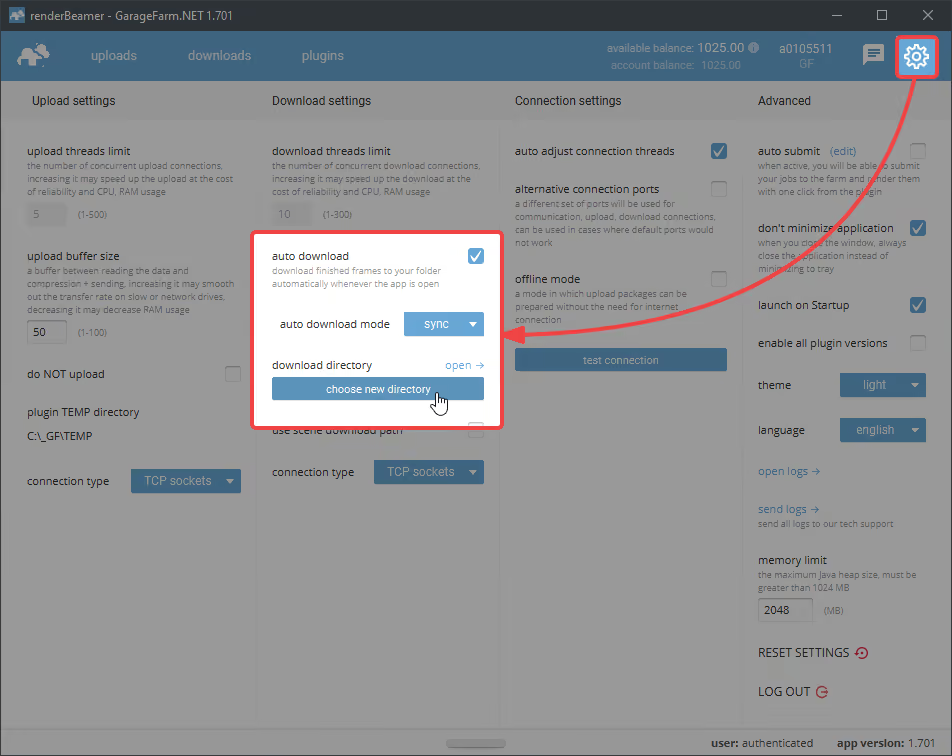
If you prefer more control over what to download and when you can also download your frames manually. To do that, just turn off the auto download switch in renderBeamer settings and go to the “downloads” tab. Next, select the desired render output using a checkbox, and click the download button.
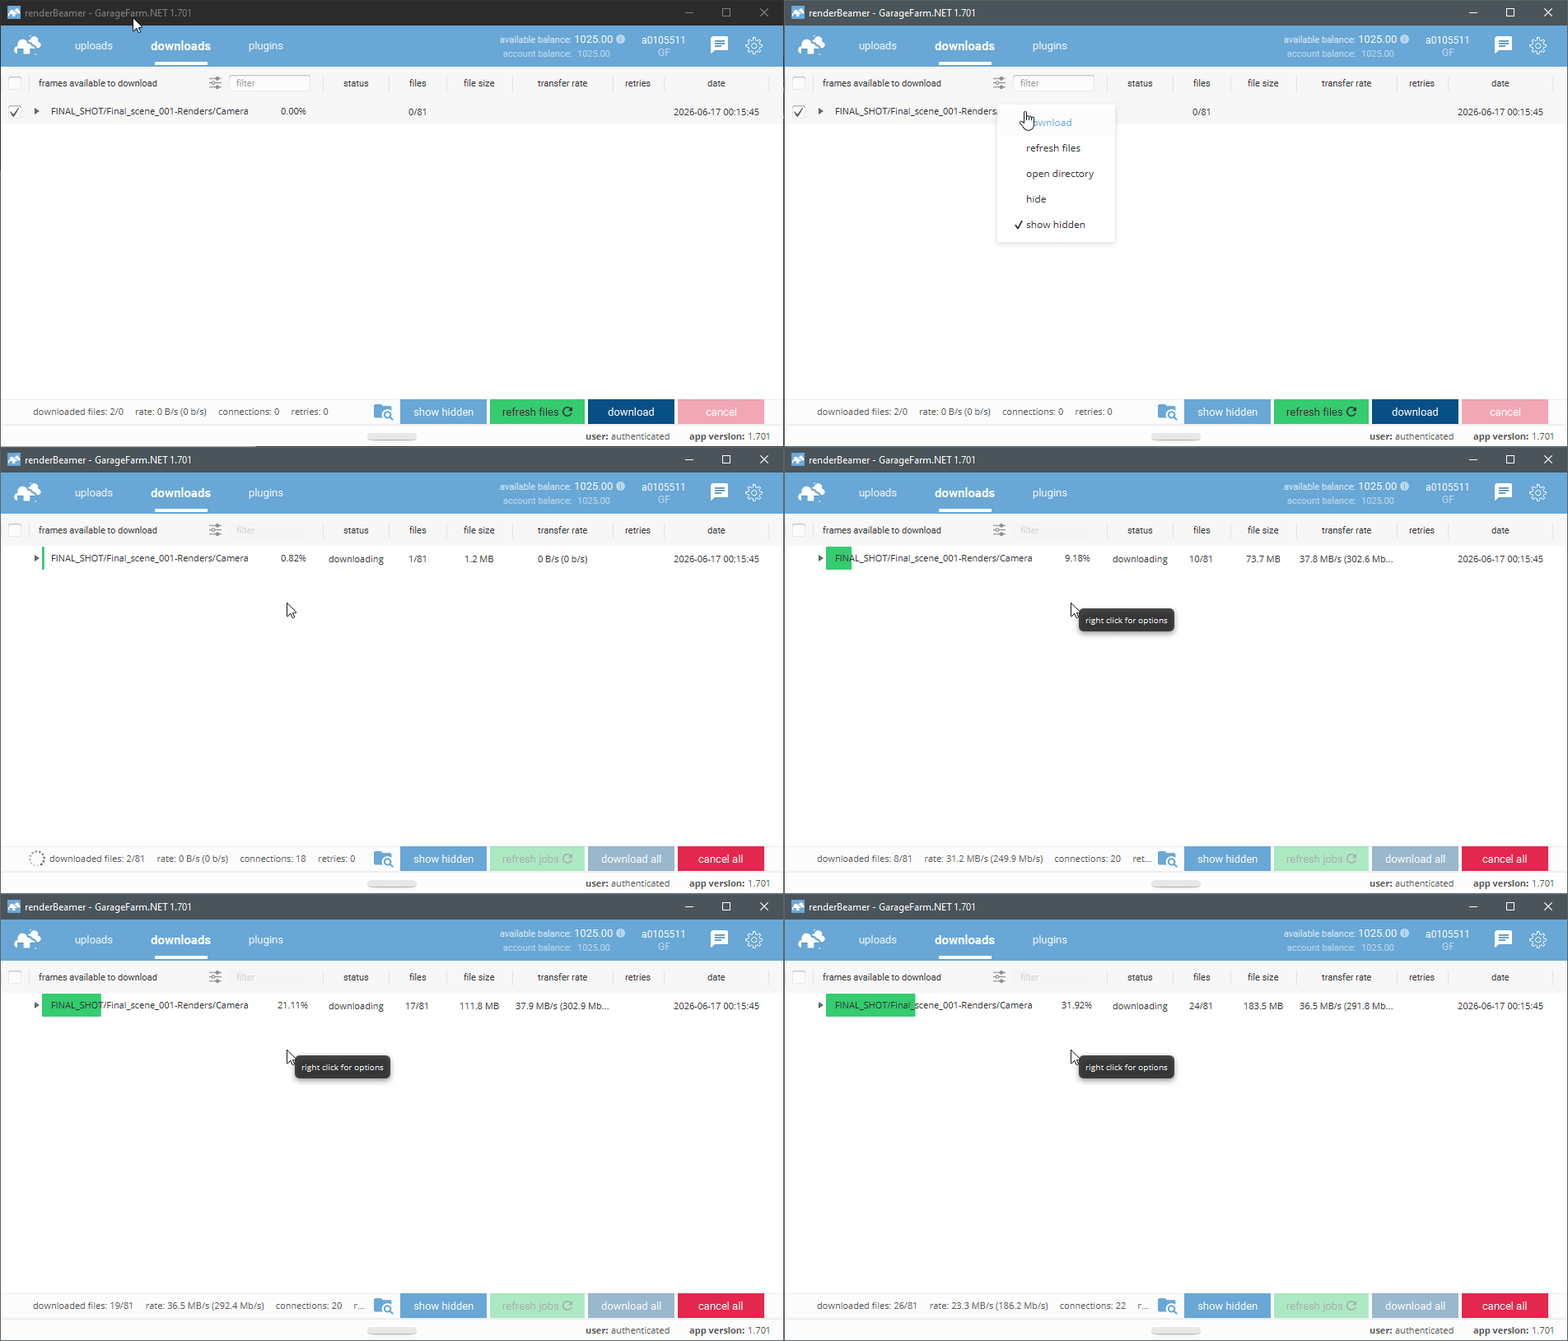
This workflow will download all rendered frames for the selected job or jobs. However, renderBeamer also gives you an option to download individual frames. You need to use the list files function under RMB to do that.
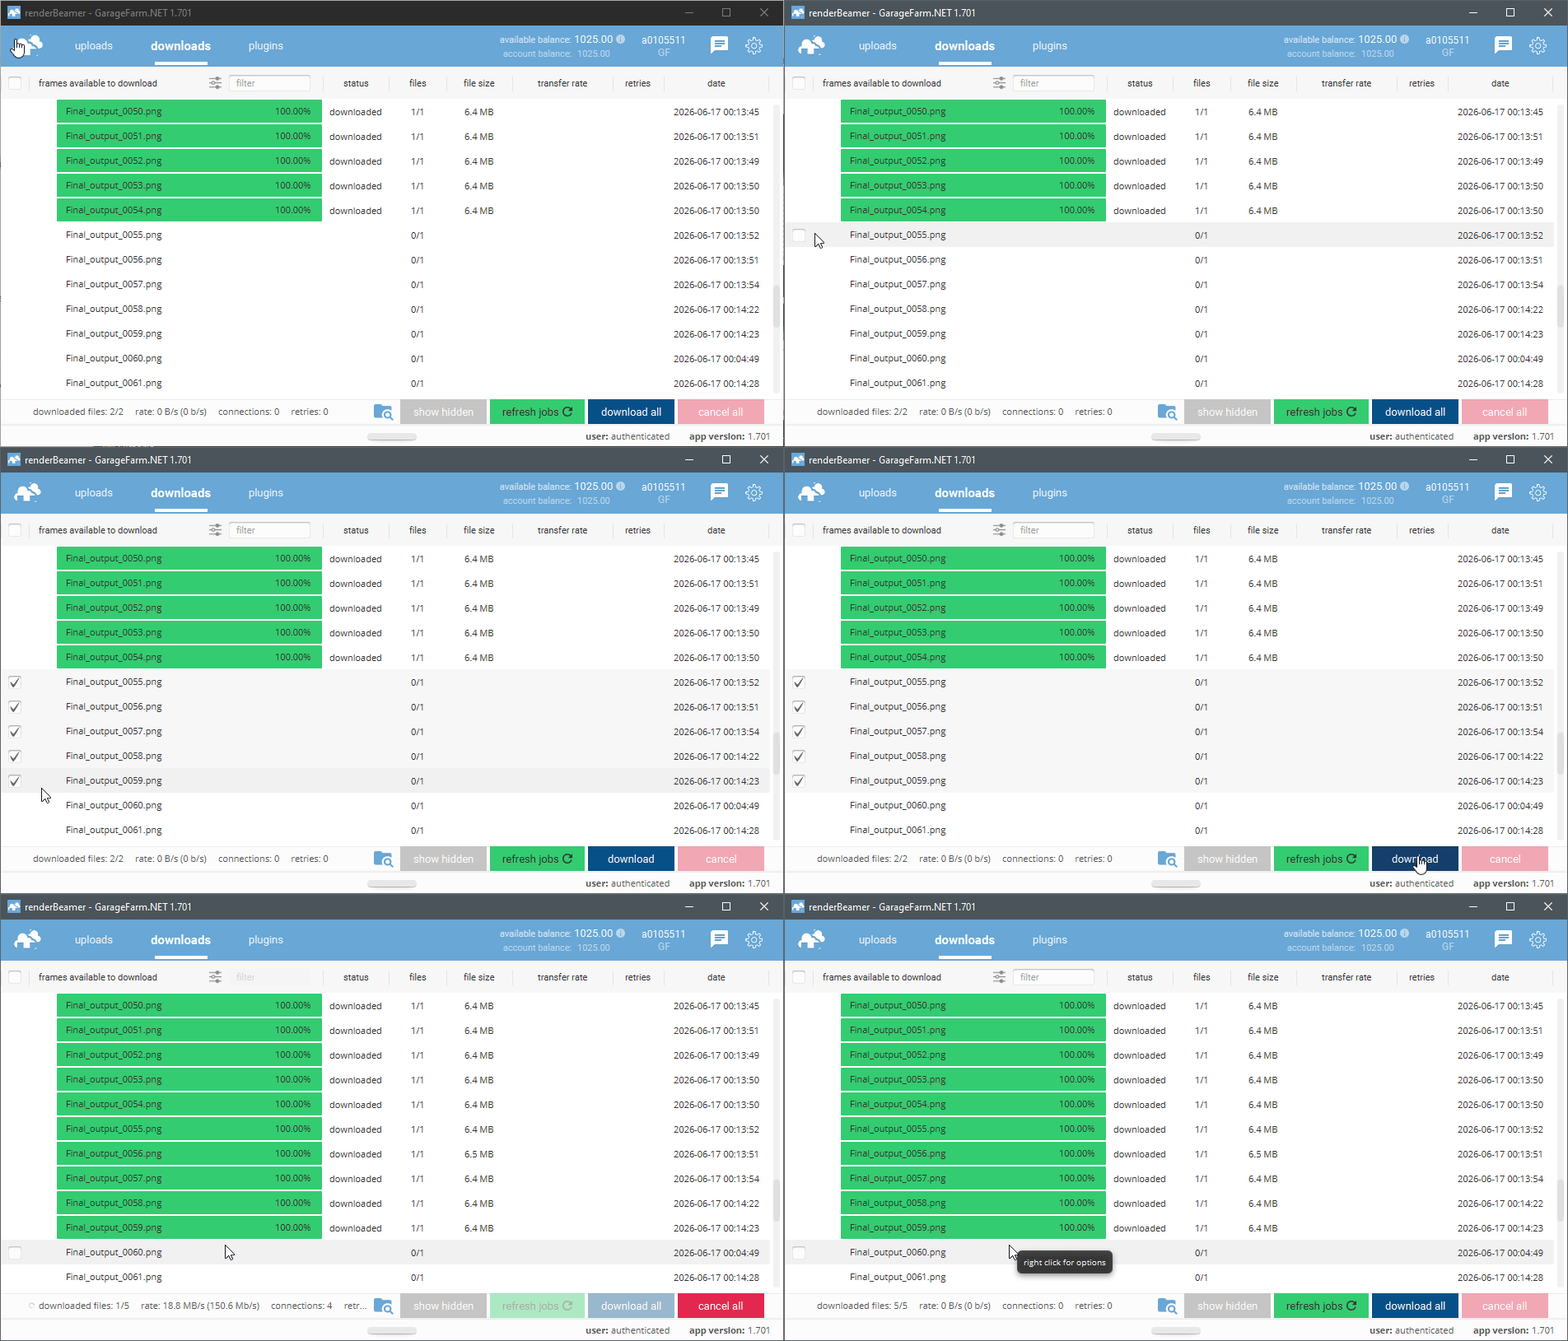
Once files for the selected job are listed, just roll down the list and select the files you’d like to download using checkboxes. Next, use the same download button.
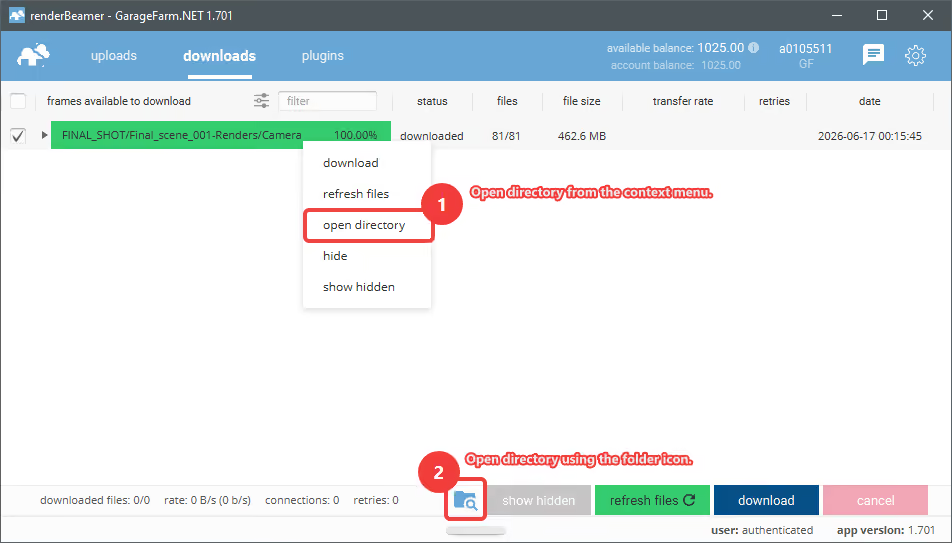
Once your frames are downloaded, you can use the “open directory” option under RMB to open the folder where frames are saved.
Please ensure you keep renderBeamer running whenever you have jobs rendering to get the frames downloaded immediately. It may happen, however, that your frames aren’t downloading at the given moment. It’s likely because our application syncs the files in 15-minute cycles, and it is currently in between the cycles. You can click refresh to force the application to sync.
Purchase credits
You’ll need to charge your account to continue using the service once all trial credits are used up. Please note that when your balance goes below $0, you won’t be able to download rendered frames or start new render jobs.
Credits can be purchased in the Purchase panel available in the Web Dashboard. The default payment method is credit card payment, but you can also use alternative payment methods supporting debit/credit cards, Revolut Pay, and Google Pay. If you prefer paying via bank transfer, detailed wire transfer instructions are also available in the Purchase panel.
You can access the Purchase panel by clicking the $ icon in the main navigation bar next to your account balance, or by selecting “Top up balance” from the Account menu in the top-right corner of the dashboard.
If your rendering needs are high or you plan to render regularly, please make sure to check out our volume discounts.
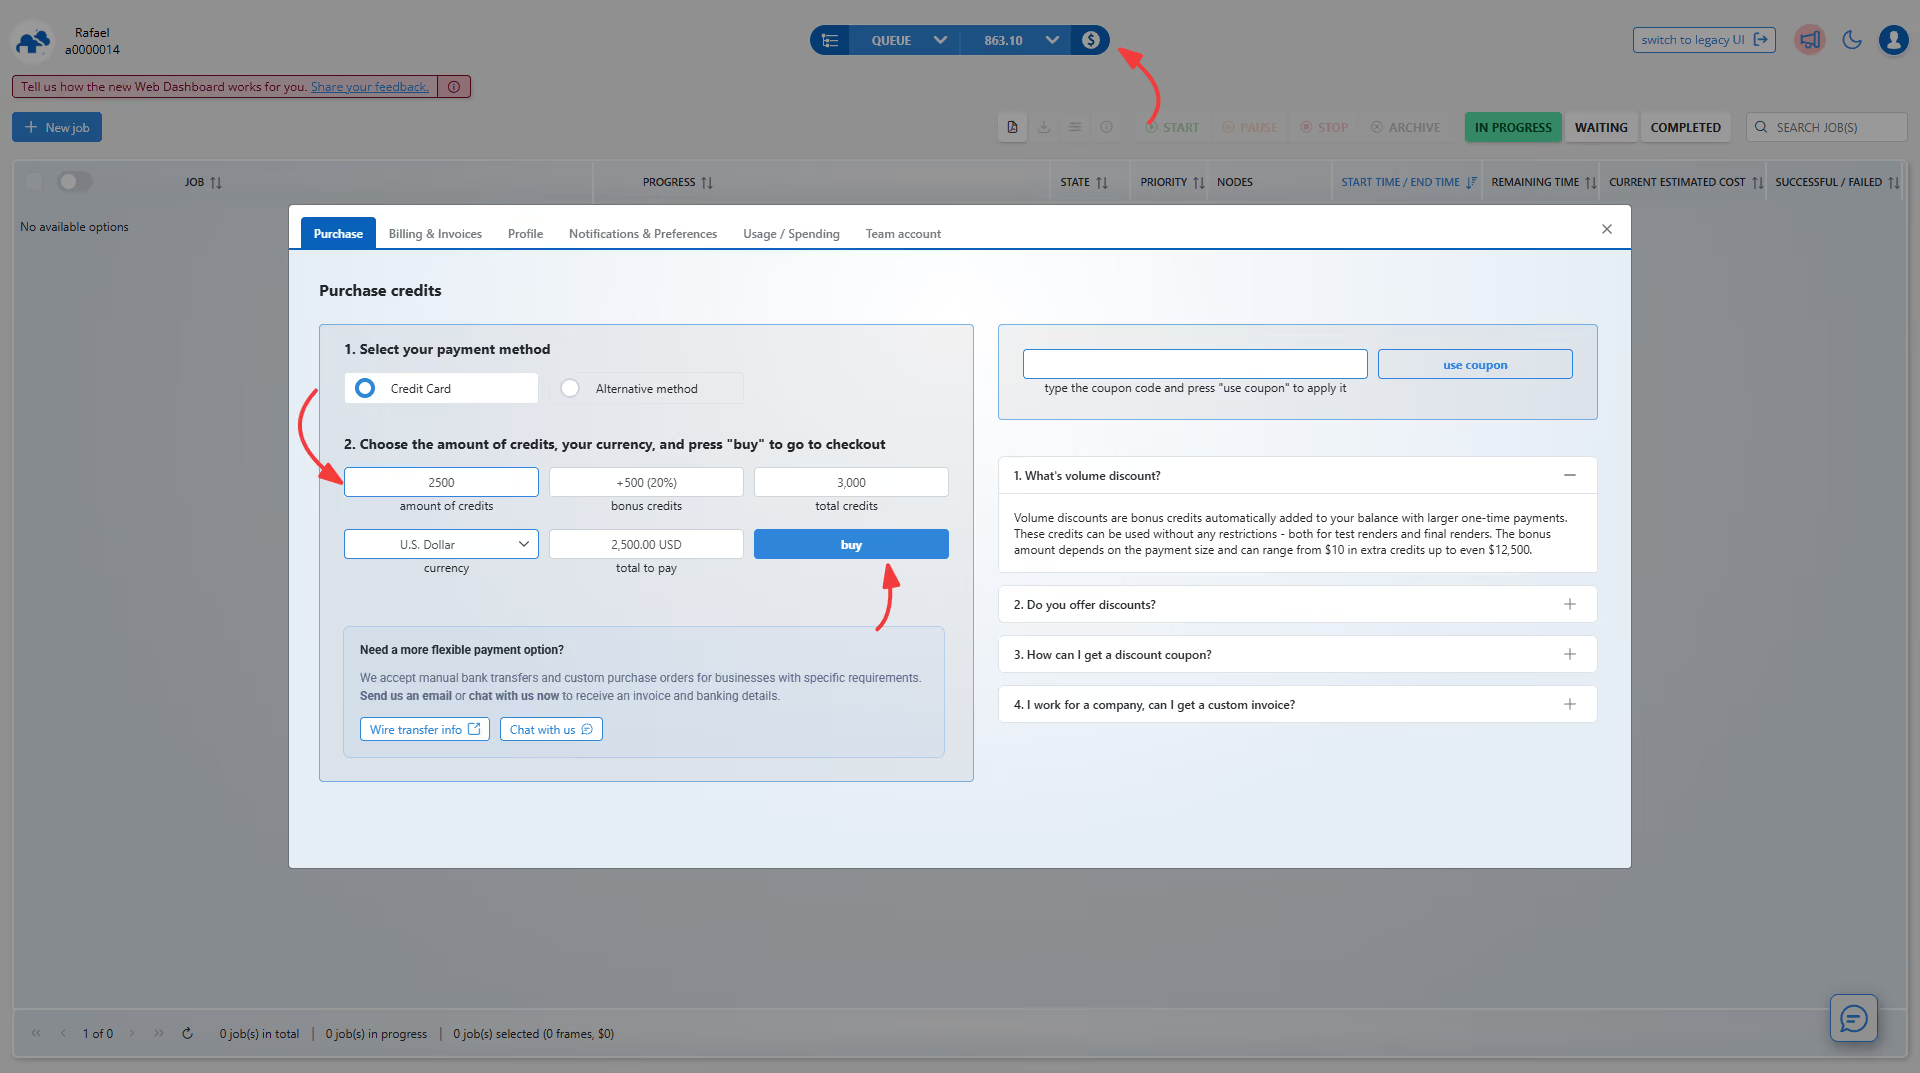
In case your account balance goes below 0, any current jobs will be paused - all frames/strips that were in the middle of rendering will be completed but any subsequent frames/strips will not start rendering. To download rendered frames, your account balance must be positive or equal to $0.
Contact us anytime
You can talk to the GarageFarm.NET’s tech team any time of the day, any day of the week. We’re here to help you get started, answer your questions, and assist you in any way. Don’t hesitate to give us a shout.
You can contact us through our live chat accessible in the web dashboard or our desktop app when you log in to your account or message us here through the guest chat.
We also recommend checking out our FAQ page which answers most of the questions new users have.
Register Now and Get $50 FREE Credits!

Frequently asked questions