Modo V-Ray
Download and install
Log in to Web Manager (web dashboard) at https://app.garagefarm.net and download our renderBeamer app for you operating system.
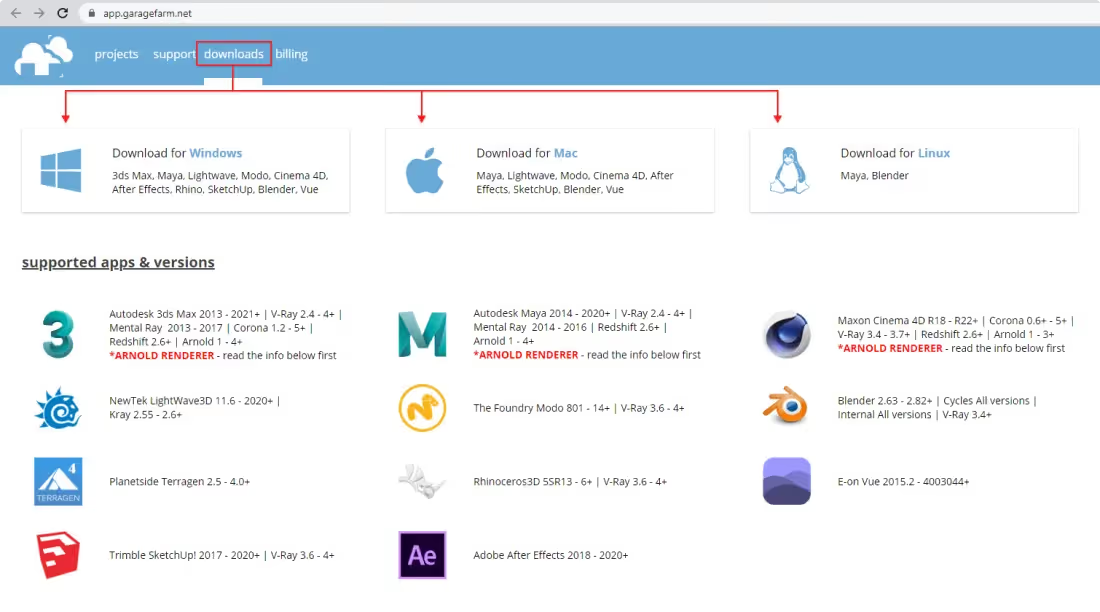
Install the renderBeamer app and start it. Once renderBeamer is done with the installation process, you need to choose the default download directory. This path will be used as the main output place for all your renders. Next, just log in using the account ID you received or your account email. Please keep in mind that the app should always be running in the background whenever uploading a project or downloading rendered frames.

Once renderBeamer is installed and you’re logged in, you’ll see the Plugins panel. Plugins installation panel should automatically open after the first renderBeamer startup. You can also open it anytime you need to install additional plugins for your 3D apps.

Here in the plugins panel, you can install plugins that allow you to work with our farm. Once you installed the plugin for your 3D app, you can proceed to the next step.
Prepare the scene
Open your scene in Modo and prepare it for rendering on a render farm.
- Our plugin works from 901 version, however, if you are using the older one we can also render it. Just contact us for more details.
- V-Ray version required to work with our plugin is 4+
- All assets should have correct links. Ideal situation is to have all assets in a folder next to the scene and linked in Texture manager to that path. Also the scene should be free of missing assets when submitting to render farm.
- Animation files (avi/mp4/etc) are not a good option for animated textures, also .mov files cannot be used. Please convert those to frame sequence (jpg\png or so) and connect as an image sequence. If a scene is using Modo default textures - please provide them too.
- Render range - set the correct frame range that you’d like to render.
- Render layers & output - should be prepared the same way as when rendering on a local machine.
- Render region - if not used and not needed, should be turned off.
- Render passes - are fully supported. Please configure them the same way as when rendering on a local machine.
- Scene file name and output paths should not contain any untypical characters like / \ " % # ? or anything similar.
- If you are using V-Ray render elements, please turn them on in V-Ray render elements panel.
Use the plugin
Once your project is prepared, please locate the renderBeamer menu. Our plugin menu contains 3 options - Beam it up, Beam it up Vray and Cost calculator. For V-Ray scenes please select Beam it up Vray.

Our V-Ray plugin works as a V-Ray scene exporter (to .vrscene file). That means, when using our Modo plugin with the Beam it up V-Ray option, your main modo+V-Ray scene will be exported using V-Ray standalone. Please keep in mind that certain plugins like NPR Kit or similar may not work correctly in V-Ray standalone rendering due to inherent .vrscene limitations. We strongly suggest rendering a small resolution test first when using additional plugins.
In our plugin GUI, first you need to select output format, and then you’ll need to finalize the scene setup using one of the available render modes (Render as is, Full animation, Camera animation, Brute force animation, Still image). Each render mode is specifically designed for a different kind of scene setup, so please make sure that you select a mode suitable for the type of scene you’re going to render. This is crucial because each mode uses different GI and render settings and so selecting an inadequate mode will result in incorrect rendering.
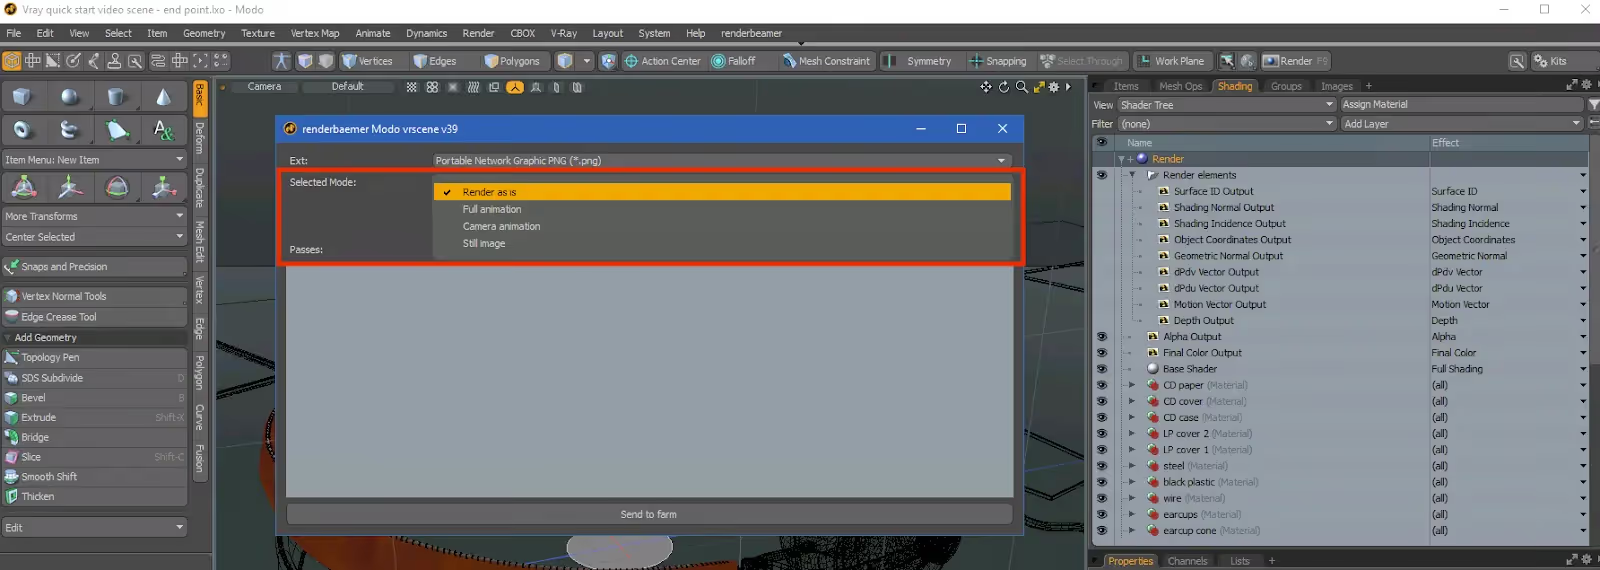
Plugin render modes for V-Ray render engine:
- Render as is - In this mode your scene renders "as it is". It's useful for scenes with already pre-cached GI or for shots which do not need GI caching. Also, it can be used for scene testing purposes or for atypical GI setups like Brute Force. We do not provide any GI caching options in this mode.
- Full Animation - This mode should be used for fully animated scenes which include objects animations, materials changes, camera or light movement. Generally, if your scene contains more than an animated camera, you should use Full Animation mode. Our plugin creates two jobs in this mode. The first one for the GI caching - called the "bake" scene. The second job is the rendering scene. The rendering scene uses pre-cached GI maps from the first job. With full animation mode, GI is cached for each frame in the selected render range so if your scene is starting at 0 and ending at frame 100, you will receive 101 GI map files. Each GI map is calculated on a separate node, so the process is very fast and stable. Full animation mode works only with Irradiance map & Light Cache. Before using Full Animation mode please make sure that your GI setup is set to Irradiance Map & Light cache! Otherwise please use the Render as is mode.
- Camera Animation - bake and render - This mode should be used for scenes where camera is the only animated object. Camera Animation mode works only with Irradiance map & Light Cache. This mode will create 2 jobs - a GI cache, and a render job. The first job is for the GI caching - called the "bake" scene. The GI cache is calculated using the selected "bake step" parameter. For the GI cache job, we switch your current Irradiance map mode type to “add to current map” and Light cache mode type to “flythrough”. For render jobs, we use both GI engines in the “from file” mode. GI caching is done using the bake step and bake jobs parameters. The default baking step value is 10, so if your scene is starting at 0 and ending at frame 100, you will receive 11 frames cached (including the first and last frame) into one .vrmap (Irradiance Map cache) file. Before using Camera Animation please make sure that your GI setup is set to Irradiance Map & Light cache! Otherwise please use the “Render as is” mode.
- Still Image - render / bake and render - This is our custom distributed rendering system. It’s designed especially for high-resolution still shots. It works with all kind of GI setups. Depending on which settings you choose, submitting your scene with this mode creates two or three jobs - GI cache, render and merge. If you already have pre-cached GI, you can turn off the bake switch, and connect your GI maps via the“from file” modes. They will be uploaded with your scene and used for rendering. Turning off bake will force our plugin to forward 2 jobs to the farm render queue - render and merge. When the bake switch is on you will receive 3 jobs - GI cache, render and merge. Still Image mode renders your scene with “strips” (horizontal or vertical render regions). After the strip render jobs are completed, strips are then stitched to one final resolution frame in a merge job. With Still Image mode, GI can be cached with all kind of Irradiance maps and Light Cache combinations (like IR+LC, IR only, LC+LC, LC only and so on). GI setups like Brute Force + Brute Force cannot be cached. Please keep in mind that the usage of non-cacheable GI setting sometimes can cause issues with GI rendering. For example, with BR+BR setup you can receive visible seams where the strips connect as each of the render nodes will be calculating GI from scratch when rendering the strip.
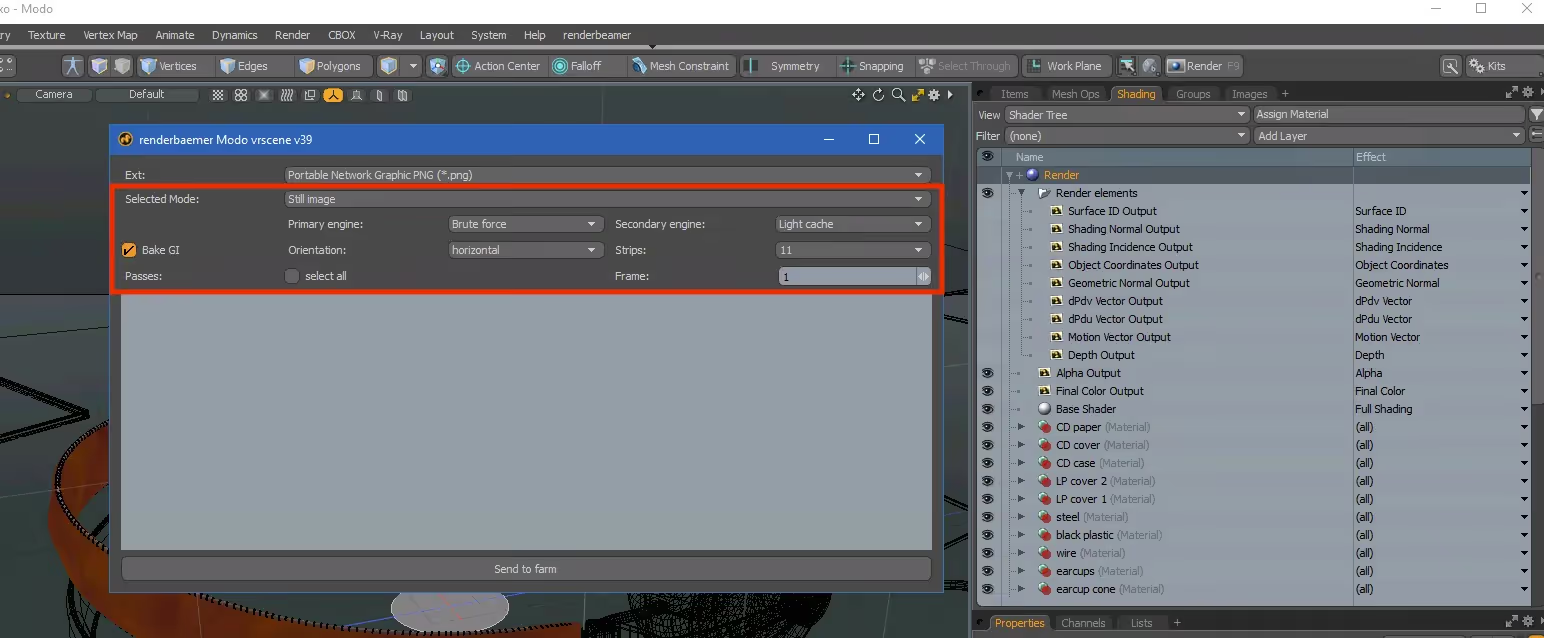
Once you select your desired render mode, just click the “Send to farm” button. Now, you scene will be exported to .vrscene format, relinked and forwarded to renderBeamer app. Depending on scene size this process can take a minute or longer. We strongly suggest not touching modo GUI while the scene is exported by V-Ray.
Upload the project
Once our plugin completes the scene export, your project will be redirected to renderBeamer to be uploaded. renderBeamer is a standalone uploader/downloader application that works in conjunction with our plugins. Simply put, it takes care of the file transfers.
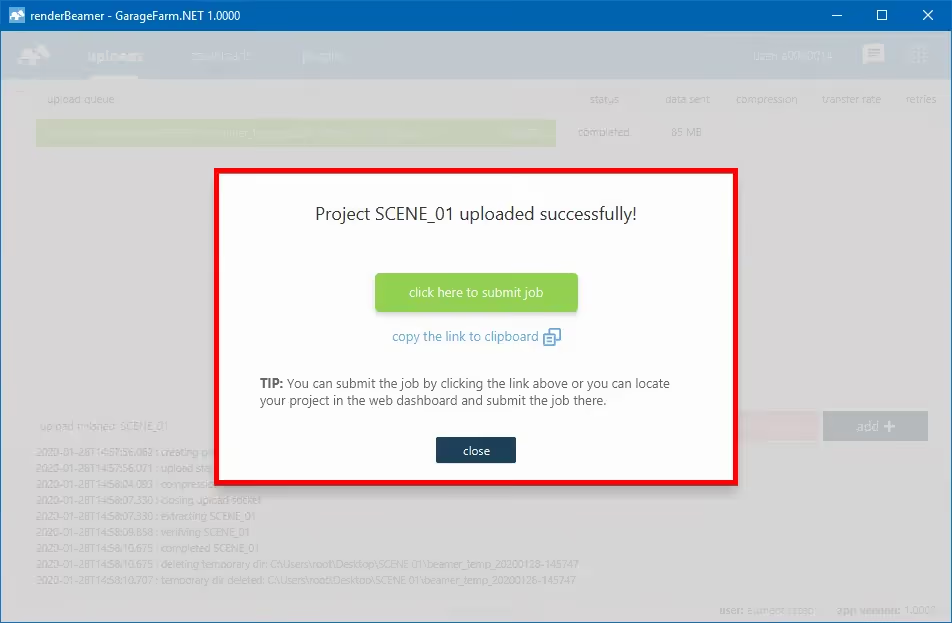
After the scene has been fully uploaded, the app will show you a window with a direct link to your scene on Web Manager (web dashboard). To continue just use click here to submit job button. If for some reason you closed the window with the link or it didn’t work, don’t worry, you can locate your project in the web dashboard and submit your scene by clicking on the scene file later (more on that in the next step). You can also copy link to clipboard and manually paste it into your web browser.
Submit the job & monitor render progress
Now that your project is uploaded you will need to follow the final step - creating and submitting a job to render farm. Web Manager is where all your projects and render jobs reside.
If you followed the link generated earlier by renderBeamer, you will now see the job submission window with several fields and settings. If you didn’t follow the link or it didn’t work, you can do it manually by locating your project in the Projects panel, finding the scene file within the project folder (in your folder structure look for the folder called “data”, i.e. Project_name/data/SceneName.max), and clicking on it to open the job window.
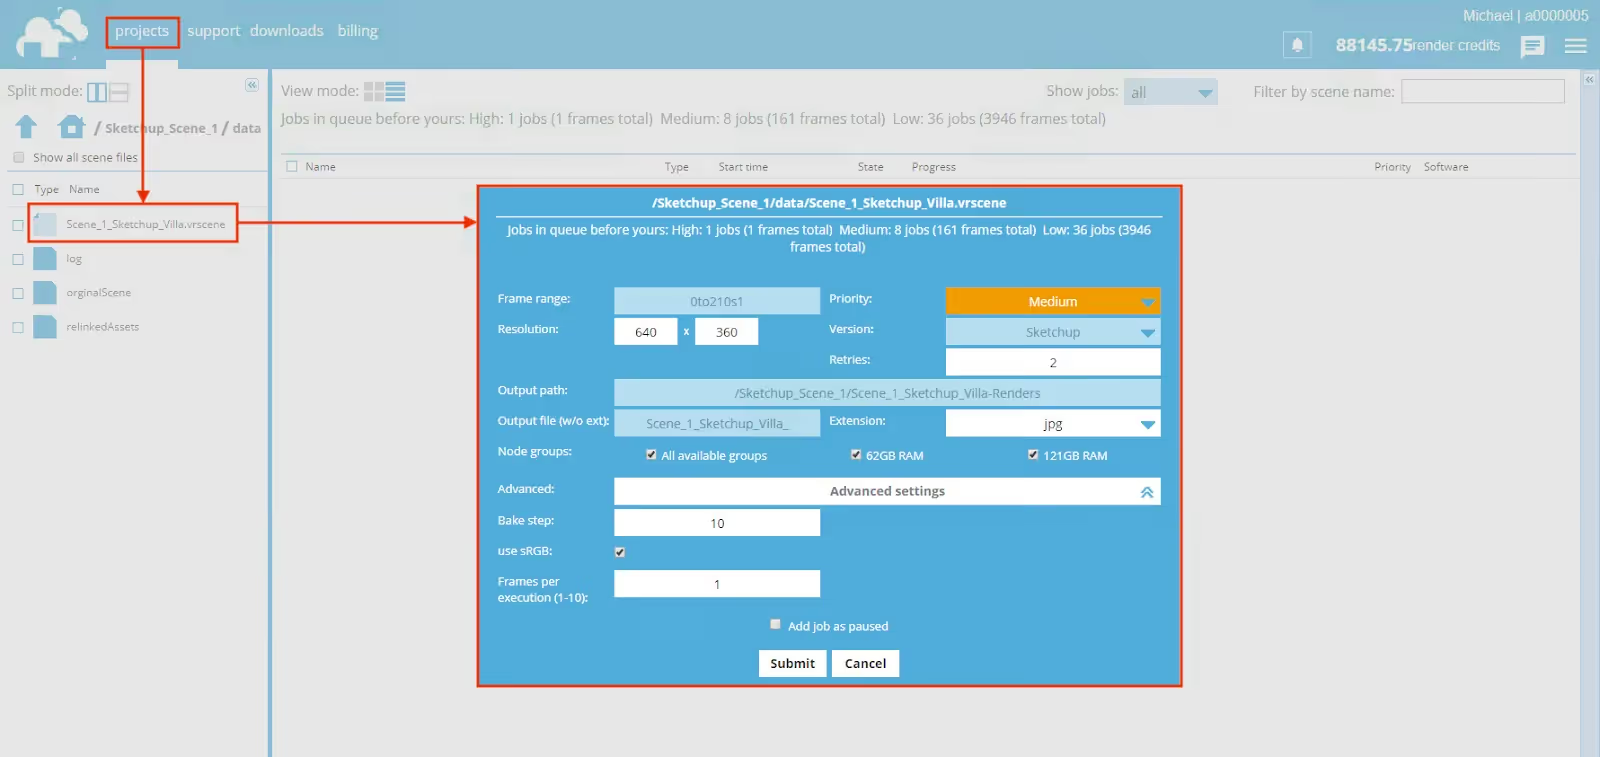
You can choose between three priorities when submitting a job: High, Medium, and Low (more info on Pricing page and FAQ page). You can also view the current queue on the farm, which should help you inform your decision about selecting the priority.
After giving your render settings a final check and choosing your preferred priority hit Submit to add your job to the render queue. If you’re a first time user, you will have received $25 worth of credit to test out our service. The credits should be enough to run a few test jobs and get you familiar with the service.
You can right click on the job to get additional options: change priority, pause job, kill job, and archive job.
The estimate is based on the currently finished frames, and is an approximation at that point. Rendering a test as prompted in the plugin (using a step i.e. 1to100s10) is highly recommended for more accurate estimates and for detecting potential errors.

When the job has started rendering, you can check the real-time progress of currently processed frames. To do that, just select the render job from the main project list and then click the arrow on the top right side to open the progress panel.

Active frames - it shows currently rendering frames. When a frame finishes, it is moved to the second section Done frames. If you select any frame in the Done frames list, you can then access the render output process log in the bottom section called Process results.
When you’re in the Progress Panel and right-click on any of the currently rendering frames in the “Active frames” section, you can access the real-time render log from our nodes.
Please keep in mind that if a job has finished rendering, the frames list in the “Active frames” section will be empty because all frames are already rendered and the list is moved to “Done frames”.
Download and review frames
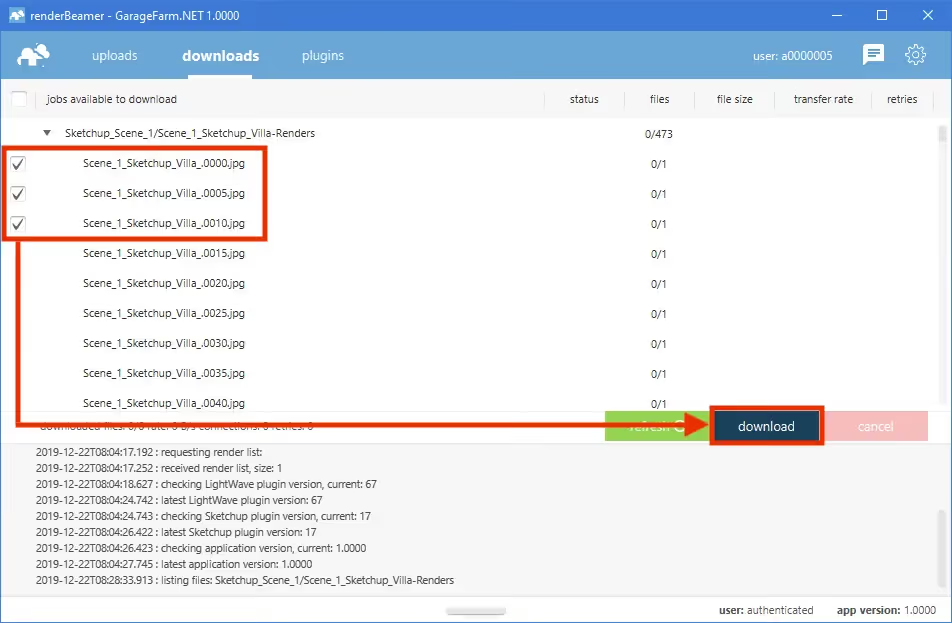
Each frame that has completed rendering is downloaded automatically to your local drive to a directory you selected in the renderBeamer application. If you’re not sure where your download folder is located, you can double check it or change it in renderBeamer’s settings (click on the cogwheel). Also, make sure you have auto download turned on to get the frames downloaded as soon as they are available. If this box is unchecked, you will have to click on each job and manually download the frames.
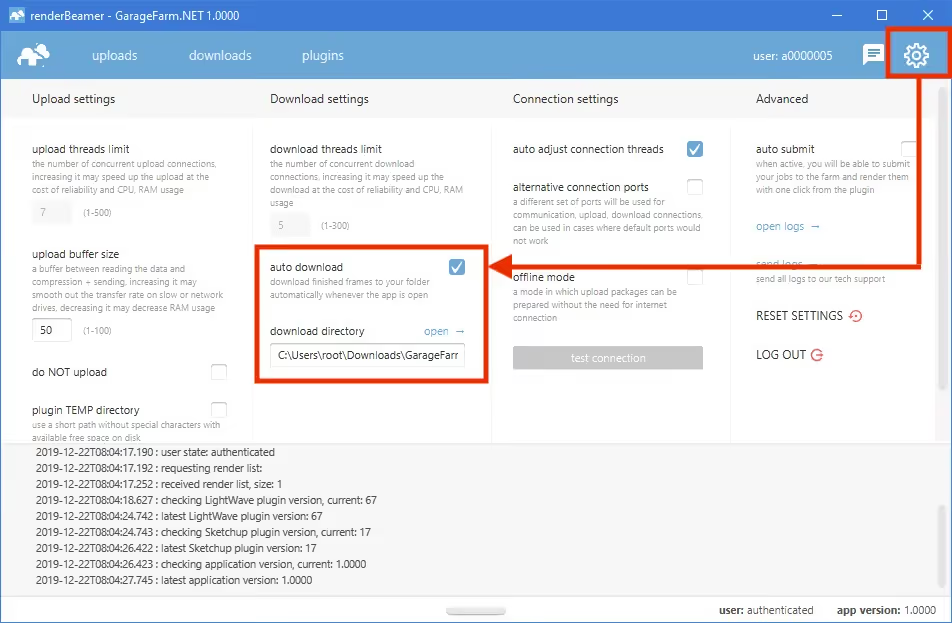
If you prefer more control over what to download and when, you can also download your frames manually. To do that, just turn off auto download switch in renderBeamer settings and go to the “downloads” tab. Next, select the desired render output using a checkbox, and click the download button.

This kind of workflow will download all rendered frames for the selected job or jobs. However, renderBeamer also gives you an option to download individual frames. To do that, you need to use the list files function under RMB.

Once files for the selected job are listed, just roll down the list and select the files you’d like to download using checkboxes. Next, use the same download button.

Once your frames are downloaded, you can use open directory option under RMB to open the folder where frames are saved.
Please make sure you keep renderBeamer running whenever you have jobs rendering to get the frames downloaded right away. It may happen, however, that your frames aren’t downloading in the given moment, and most likely that’s because our application checks for the files on the server in 15 minute cycles and it is currently in between the cycles. You can click refresh list to force the check without waiting for the next cycle.
Purchase credits
When you use up all your trial credits, you’ll need to charge your account to continue using the service. Please note that when your balance goes below $0, you won’t be able to download rendered frames or start new render jobs. You can make payments in the Billing panel in Web Manager. We accept debit cards, credit cards, PayPal and DotPay payments.
If your rendering needs are high or you plan to render regularly, please make sure to check out our volume discounts.
Contact us anytime
You can talk to the GarageFarm.NET’s tech team any time of the day, any day of the week. We’re here to help you get started, answer your questions, and assist you in any way. Don’t hesitate to give us a shout.
You can contact us through our live chat accessible in the web dashboard or our desktop app when you log in to your account or message us here through the guest chat.
We also recommend checking out our FAQ page which answers most of the quest
Register Now and Get $50 FREE Credits!

Frequently asked questions
