
Explore our newest YouTube guide and master the basics with ease
Need Help?
3ds Max Corona
Download and install
Log in to Web Manager (web dashboard) at https://app.garagefarm.net and download our renderBeamer Desktop App for you operating system.
Install the renderBeamer app and start it. Once renderBeamer is done with the installation process, you need to choose the default download directory. This path will be used as the main output place for all your renders. Next, just log in using the account ID you received or your account email. Please keep in mind that the app should always be running in the background whenever uploading a project or downloading rendered frames.

Once renderBeamer is installed, and you’re logged in, you’ll see the Plugins panel. Plugins installation panel should automatically open after the first renderBeamer startup. You can also open it anytime you need to install additional plugins for your 3D apps.
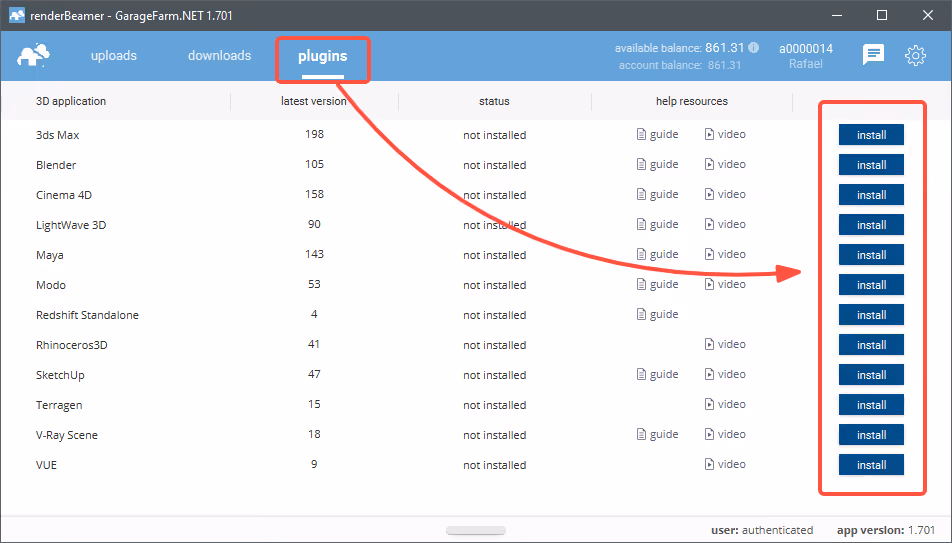
Please keep in mind that each 3D app (DCC) you use needs to have a plugin installed to properly connect to and render on our farm.
Prepare the scene (global setup for all 3ds Max render engines)
Open your scene in 3ds Max and prepare it for rendering on a render farm.
- Set the right resolution, file format with output path and cameras to render.
- Set required render range. You can select between all available options (single, active time segment, range or selected frames). If you are using a multi-camera scene you can set different frame ranges for each camera in our plugin.
- Make sure that your scene does not contain any missing assets and caches.
- Animated textures - animation files (avi/mp4/etc) are not a valid option, also .mov files cannot be used. Please make it a frame sequence (jpg\png or so) and connect as an image sequence. You can use the ".ifl" sequence in 3ds Max.
- External plugins - we support quite a lot of 3ds Max plugins, however, if you are using some atypical add-on, we may need some time to run a test with the plugin & our network rendering system. Also, we check for plugins used in the scene and compare them with our system. In the case when we don't support some plugins, you will be informed about it automatically upon sending the project. You may also contact our support team via chat from your web manager.
- Outputs - they need to be configured the same way as rendering on a local machine. This includes 3ds Max main output, V-Ray frame buffer, V-Ray RAW image, Corona & Mental Ray outputs and any kind of render elements.
- Render region should be off, however, should you require it, you can turn it on and omit our plugin’s warning.
- Multiple cameras in one scene - our plugin supports this setup for stills, camera animation and full animation
- Scene name and output paths should not contain any non-standard system characters like / \ " % # ? or language-specific non-ASCII characters like the Cyrillic or Korean alphabet. If your scene contains such characters, it's always best to change them. If our plugin detects any special characters, it will convert them to "_" including output paths.
Each render engine operates on different render options and features. Therefore, our plugin opens an appropriate GUI for you based on the render engine selected as “Production”.
Use the plugin - setting the mode (Corona)
Once the project is prepared, please locate the renderBeamer menu and hit Beam it up to open the plugin window. In the plugin UI you can prepare your scene for farm rendering.
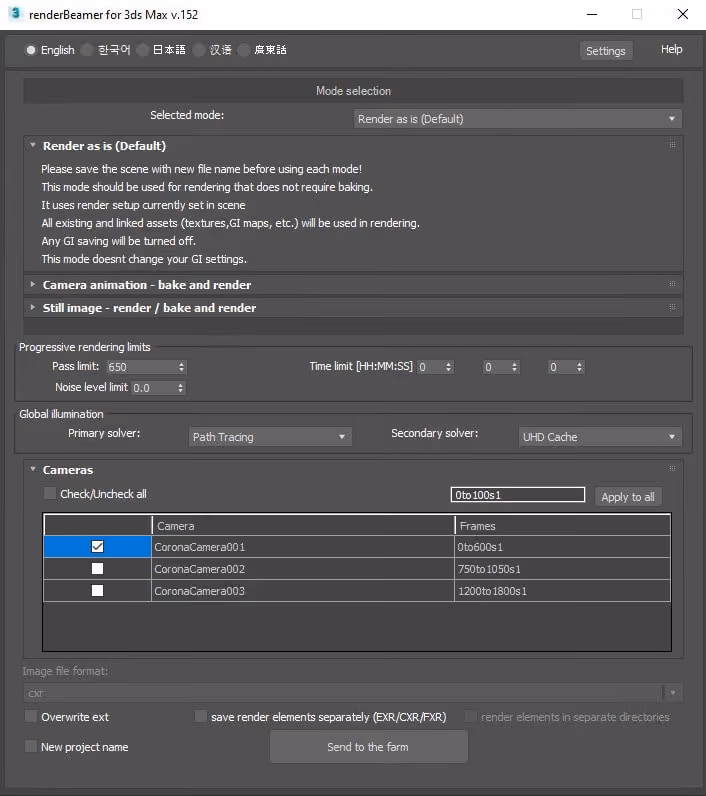
First, you’ll need to start with selecting one of the available render modes: Render as is (Default), Camera animation - bake and render, Still image - render / bake and render. Each render mode is specifically designed for a different kind of scene setup, so please make sure that you select a mode suitable for the type of scene you’re going to render.
Plugin render modes for Corona render engine:
- Render as is (Default) - In this mode your scene renders "as it is". It's useful for scenes with already pre-cached GI or for shots which do not need GI caching. Also, it can be used for scene testing purposes. We do not provide any GI caching options in this mode. Render as is doesn't have any additional settings either.
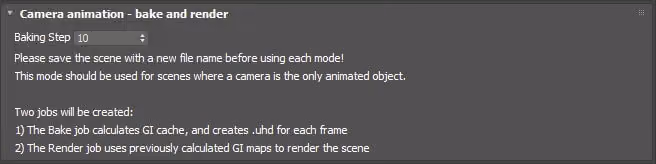
- Camera animation - bake and render - This mode should be used for camera animated scenes. Our plugin creates two jobs in this mode. The first one for the GI caching - called the "bake" scene. The second job is the rendering scene. The rendering scene uses pre-cached GI maps from the first job. With camera animation mode, GI caching is done using the bake step range. The default baking step value is 10, so if your scene is starting at 0 and ending at frame 100, you will receive 11 frames cached (including the first and last frame).
- Still Image - render / bake and render - This is our custom distributed rendering system. It’s designed especially for high-resolution still shots. Depending on which settings you choose, submitting your scene with this mode creates two or three jobs - GI cache, render and merge. If you already have pre-cached GI, you can turn off the “Cache GI on farm” switch, and connect your GI maps via the “from file”. They will be uploaded with your scene and used for rendering. Turning off cache switch will force our plugin to forward 2 jobs to the farm render queue - render and merge. When the cache GI switch is on you will receive 3 jobs - GI cache, render and merge. Still Image mode renders your scene with “strips” (horizontal or vertical render regions). After the strip render job is completed, strips are then stitched to one final resolution frame in a merge job. Please keep in mind that the usage of non-cacheable GI setting sometimes can cause issues with GI rendering. For example, with PathTracking+PathTracking setup you can receive visible seams where the strips connect as each of the render nodes will be calculating GI from scratch when rendering the strip.

We strongly suggest to render high-resolution still shots only in “Still image” mode. Also, it's good to cache GI on the farm side (Cache GI on farm switch). With farm-side GI caching you can be 100% sure that the GI map is correctly cached, saved and used for the final rendering.
Every render region (strip) will be rendered on one render node, so with higher resolutions and better quality, we strongly suggest using 20 or more strips. More strips will render the image faster (not always the case for smaller images). Also, your resolution must be divisible by the number of strips you want to use. Otherwise, the number of strips will be limited.
Use the plugin - render settings (Corona)
Once the mode is correctly selected, you can proceed to the next part - the render settings.
Progressive render limits - You can set the render quality with Pass limit, Time limit or just with Noise level.
Setting Time limit to 1 second will not allow the plugin to send the scene, as 1 second time setup for rendering is reserved to GI caching procedure.
Global Illumination setup - As for progressive rendering limits, GI settings are also read from your scene and mirrored here. If you are using UHD cache or 4k cache and have pre-cached GI maps, please remember to turn off the bake switch in our plugin and connect them to your scene using “from file” mode before sending the project to the farm.
All render settings displayed in the plugin are extracted from your scene, however, if you still want to change something, you can do it here, without going back and using 3ds Max render settings panels.
Use the plugin - camera settings (Corona)
Once you set quality controls & GI setup, you can proceed to Camera and render range settings. Here you can see all your renderable cameras. When you have multi camera scenes, you can set multiple frame ranges for each camera all at once. Each camera in the scene will be rendered as a separate render job - including GI caching. If you want to test your scene, you should put some render step value in the camera frame ranges. For example, if a scene timeline is 1 to 100 frames, you can test it by putting s10 at the end of time value - 0to100s10. Once the test is rendered, you can then resume the job to render full range in the web dashboard without the need to upload the scene again.
Also, please keep in mind that when rendering with still image - bake and render mode, you can only use single frame values.
Our 3ds Max plugin automatically checks your scene’s time setting and will not allow you to put in any frame number other than the scene timeline. For example, if your timeline starts at frame 10, you won't be able to input frame 0 in the plugin.
At the bottom of the plugin you can set additional farm render options.
Overwrite ext switch allows you to switch your already set output format to a new one. By default, your format is read from your scene, however, if you still want to change it, you can do it by ticking Overwrite ext switch and then selecting your desired format from the list.
Turning on Overwrite extension switch will force the output format to save with default settings. So, for example, if you are using some internal settings for output (like TIFF48bit with alpha or similar setups for .exr outputs) we strongly suggest leaving the Overwrite ext switch off.
Next are additional output switches, used for output saving options:
- save render elements separately - which will work only with multi-layer-output files (like EXR/CXR/FXR). This switch will force Corona to save all render elements as separate files instead of one-multi-layer output file. This switch solves 3ds Max & Corona multi-layer saving issues
- render elements in separate directories - will force our render nodes to save each render layer in separate directory
The last option is New project name. This option should be used only when you’re working on a new scene (with new assets) from the same project directory. Otherwise, please leave this switch OFF. With this switch inactive, our plugin will not reupload any previously uploaded assets linked to the project.

Once everything is set just hit the “Send to the farm” button.
Use the plugin - additional settings for 3ds Max plugin
Our plugin has additional settings that allow you to adjust your rendering workflow and experience.
To check and set your preferred settings for our 3ds Max plugin, you need to click the "Settings" button in the top right.

In the settings window, you will find options such as:
- Show confirmation prompt after preparing the scene - by default, this option is always turned on. When our plugin completes the process of preparing a project, it displays a prompt that the renderBeamer application has started uploading the project files.

If you want the scene to reload automatically without being prompted everytime, turn off this option in the settings.
- Upload original Max scene for Vrscene - this option refers to the “send as .vrscene” setting available in the plugin submit window (for projects with the 3ds Max + V-Ray setup). When enabled, our plugin will upload the .max file together with the .vrscene whenever “send as .vrscene” is used. By default, this option is disabled to skip the unnecessary transfer of a .max file.
- Render Stereo V-Ray as a separate job - when you use "V-Ray Stereo Camera" in the scene, by default our plugin splits the main view into two separate jobs - the left view and the right view. This setting allows you to render your project in an optimal way (each view on a separate node). If you need to get one main view from the stereo camera, without splitting it into two separate views, you need to uncheck the box.
- Select .anipack file manually - by default, our plugin will automatically handle Anima assets and export the necessary files to .anipack, but in exceptional cases when such a workflow does not work automatically, it is recommended to enable this option. When enabled, in the process of collecting all the assets and preparing the scene for upload, our plugin will ask you to select the .anipack file which will be used to render the project.
Upload the project
Once our plugin completes the scene export, your project will be redirected to renderBeamer to be uploaded. In a nutshell, renderBeamer is a standalone uploader/downloader application that works in conjunction with our plugins. Simply put, it takes care of the file transfers.
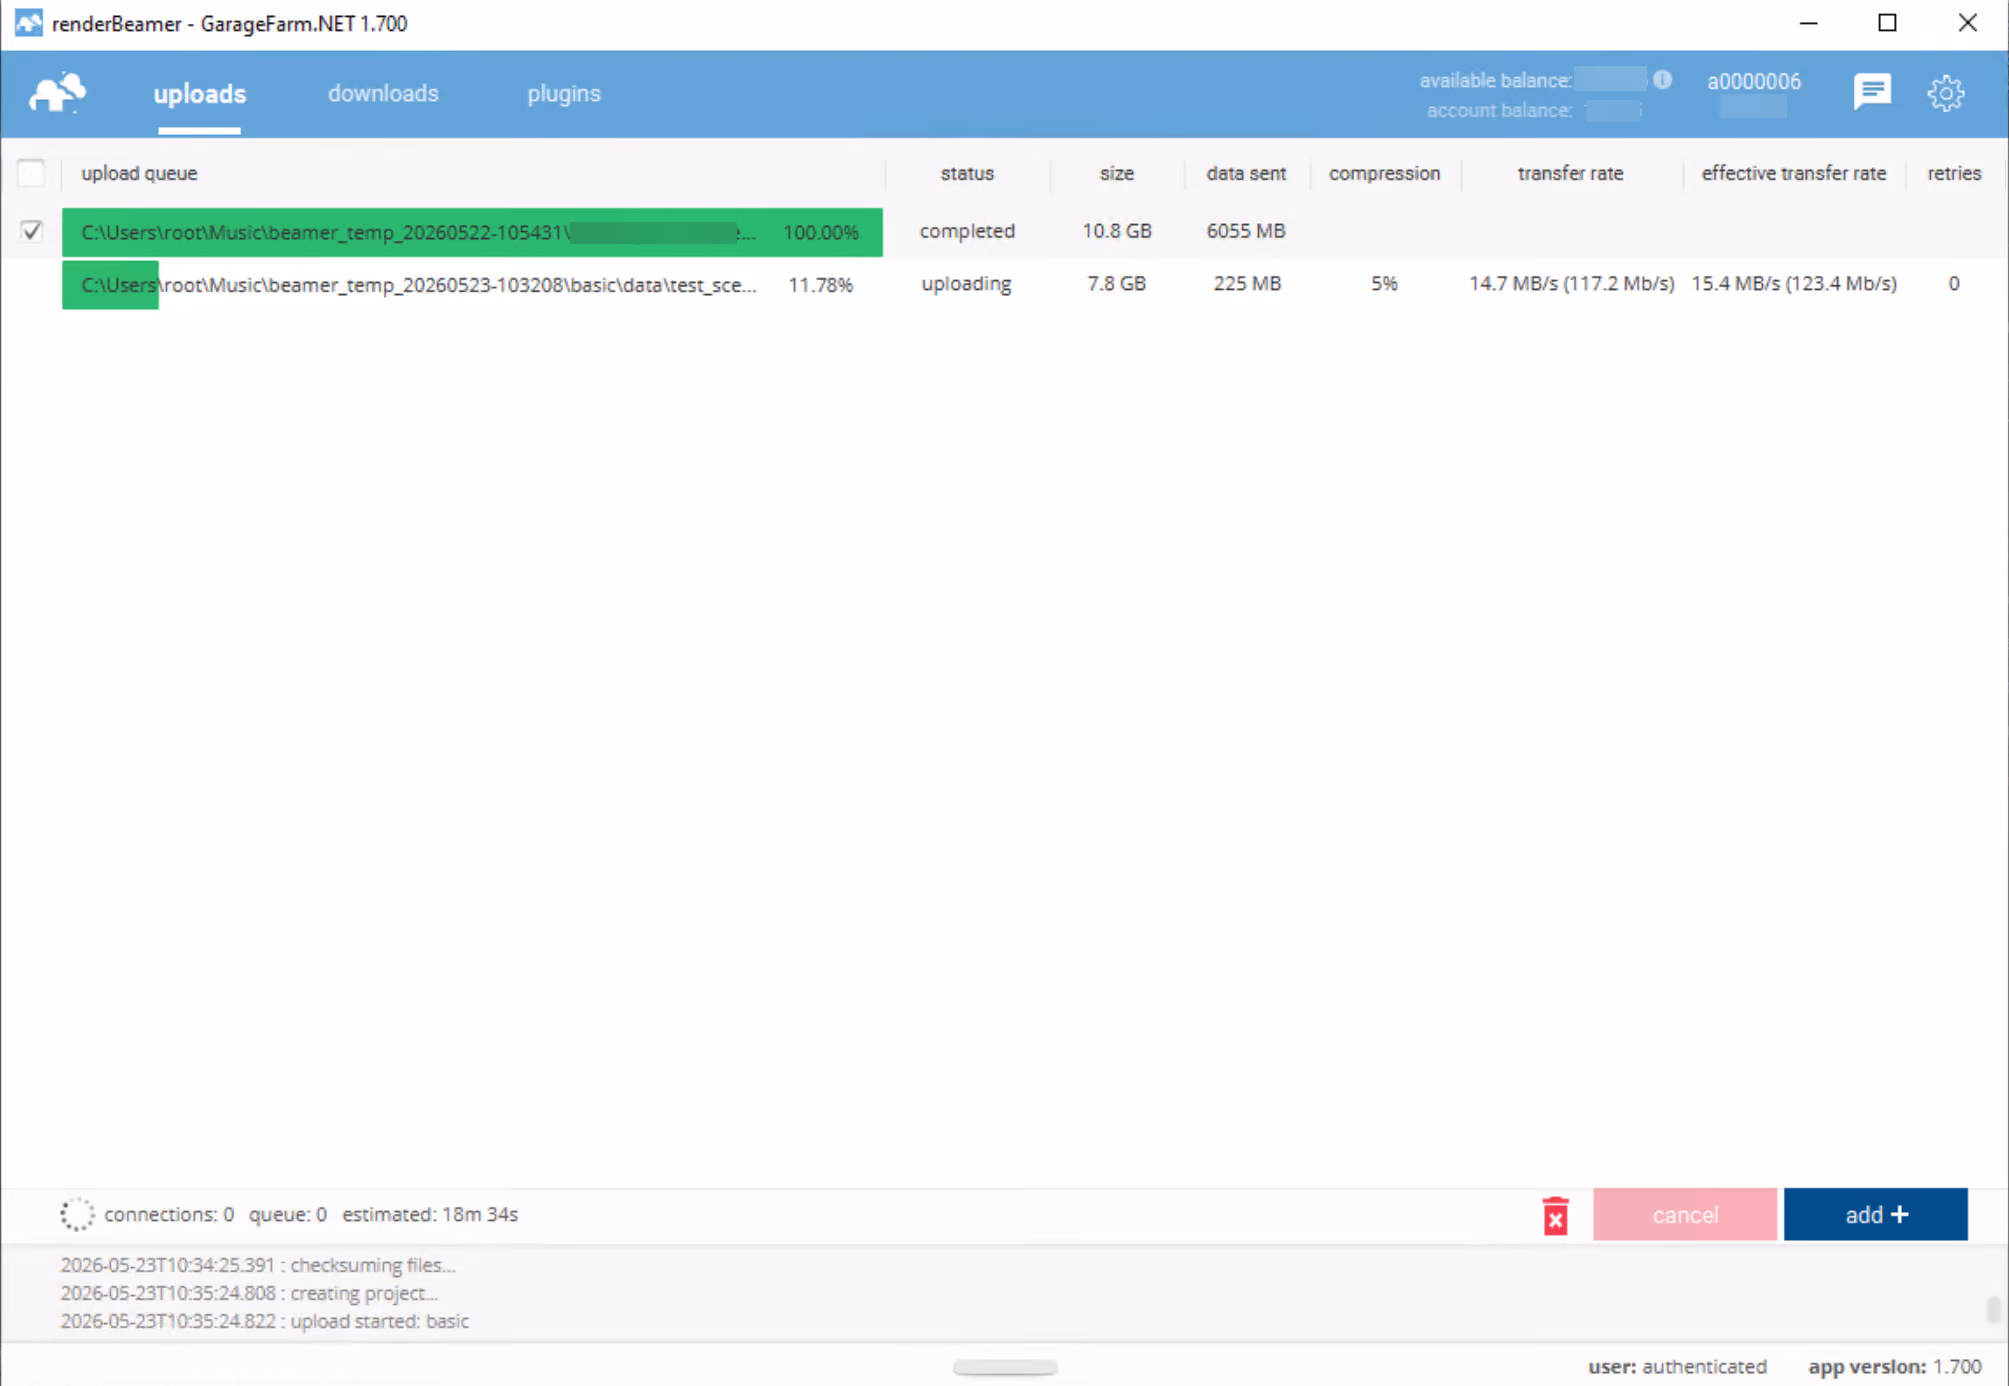
After the scene has been fully uploaded, the app will show you a window with a direct link to your scene on Web Manager (web dashboard). To continue, use the click here to submit job button. If for some reason, you closed the window with the link or it didn’t work, don’t worry, you can locate your project in the web dashboard and submit your scene by clicking on the scene file any time (more on that in the next step). You can also copy the link to the clipboard and manually paste it into your web browser.

Submit the job (add the job to the render queue)
Now that your project is uploaded you will need to follow the final step - creating and submitting a job to render farm. Web Manager is a home to all your projects and render jobs.
If you followed the link generated earlier by renderBeamer, you will now see the job submission window with several fields and settings. If you didn’t follow the link or it didn’t work, you can do it manually by locating your project in the projects panel, finding the scene file within the project folder (in your folder structure look for the folder called “data”, i.e. Project_name/data/SceneName.max), and clicking on it to open the job window.

Most render settings are automatically detected and pre-filled based on your scene. Before submitting the job to the render queue, review the options below and make any adjustments required for your specific project.

Advanced mode - located in the top-right corner of the submission window. By default, this mode is disabled to keep the interface simple and focused on the most commonly used settings. Enabling it reveals additional optional settings, including Output Path, Output File Name, Advanced Settings, Retries, and Job Node Limit, providing greater control over job submission for advanced workflows.

Job name - displays the name that will be assigned to the submitted job. By default, it is generated automatically based on the project structure and scene file name. This farm-side path helps organize and identify jobs submitted to the render farm. The generated name will be visible in the Web Dashboard and can help you easily identify and manage your render jobs.

Output path - here you can find the default save path for rendered frames in the given job. The default output path is generated based on the name of your project and scene. You can customize this path if needed, for example when rendering multiple versions of the same project or when your workflow requires a specific output structure. This option is available in "Advanced mode".
Output file name (without extension) - by default, the output file name is generated based on the name of your scene. If you need a custom naming convention or want to create a unique output name that better fits your pipeline, you can specify your own file name. This option is available in "Advanced mode".
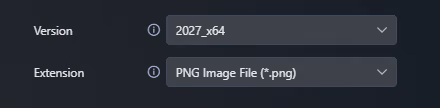
Version - by default, the version of 3ds Max is set to the same version you have uploaded the project with. However, if you need to use a different version of 3ds Max than the one detected, you can choose a specific version available on the list.
Extension - a format for the output file is the same as in your scene settings. However, if you want to change the extension to a different one, you can choose from the available options, i.e: BMP, CIN, EPS, PS, EXR, FXR, HDR, PIC, JPG, JPE, JPEG, PNG, RGB, RGBA, SGI, INT, INTA, BW, RLA, RPF, RGA, TGA, VDA, ICB, VST, TIF, VRIMG, DDS, CXR.

test/full job - by default, this switch is enabled (set to the "test job" option) for animation ranges containing more than 5 frames in total. This means that our system automatically sets up your scene's range to render every n-th frame. We always recommend performing a test render before proceeding with the final render. This allows you to identify potential errors and estimate costs. If you want to define the test range manually or want to render the full range without prior testing, simply toggle the switch to the "full Job" option.
For more details on the benefits and usage examples of this option, please refer to a separate article.

Frame range - use this field to specify the frame range you want to render. Frame range example for animations: 1to780s1 - this is a sequence of 780 frames in total, and all frames from 1 to 780 will be rendered. The parameter s1 means that every subsequent frame in the given range will be rendered. If you want to perform a test render first, set a higher step value, for example s20. This will render every twentieth frame in the animation range. For example, if you set the range to 1to780s20, the frames 1, 21, 41, 61, 81, 101, ..., 741, 761 will be rendered.
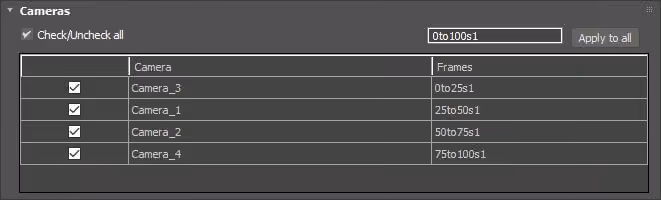
If the field displays "Using frame range from list below", the selected items are currently using their own frame ranges defined in the list below. You can edit each frame range individually for every camera, scene state, state sets, or other item.
To apply the same frame range to all selected items, enable the override checkbox next to the Frame range field. This will activate the main Frame range input and use its value for all selected items. The individual frame ranges in the list will be overridden accordingly.
If you only want to render a single frame (still image), enter a single frame number into the field. For example, 1 will render frame number 1.
If you are going to render an animation or a still image, we always recommend that you perform a test before the final rendering:
- For animations, the best way to get a cost estimate is to run a test of the scene on the farm with around 20 frames spread evenly across the range. For example, a frame range 1to200s20 will render every 20th frame as a test and based on that our system will produce a cost estimate for the full render.
- For stills, please render the image in 1/5 resolution or any other smaller resolution. In the case of 1/5 resolution test, the cost of full resolution render will be 25 times bigger than the cost of a test. For example, if you want to render an image in resolution 5000x6000, run a test in 1000x1200 res first. If your test costs $1, then the estimated cost for the full res image should be around $25 (5 x 5 = 25). For a 1/4 test it would be $16 (4 x 4 = 16) and so on.
There's more information about running tests and estimating the cost in our documentation.
Resolution - here you can set the output resolution in pixels.
If you are going to render a still image in high resolution and your scene does not contain any post-production effects, then it’s recommended to use "Strips" to speed up rendering by using multiple nodes simultaneously (see more info below).

Frames per execution - this option is only available for animations. By default, the value for FPE is set to 1 for projects rendered on CPU. This means that each frame will be rendered as a new execution (a separate task), in other words, the scene will be loaded on each node every time a new frame starts. In the case of projects rendered on GPU, the value for FPE is set to 5 by default. So it means that 5 frames will be rendered in a row on one node.
The FPE (Frames Per Execution) option allows you to render several frames (the value you put in) in a row without the need to reload the scene on a render node, and potentially may improve rendering efficiency. If your scene has a long loading time but a short rendering time, you can set FPE to a higher value (for example 4). If the loading time is not long but the rendering time is long, leave the default value or set it to 1.
Detailed information on the use and examples of the FPE option in practice can be found in our dedicated guide: https://garagefarm.net/documentation/how-to-use-and-optimize-frame-per-execution-fpe

Strips - is our custom distributed rendering system designed primarily for high-resolution still images. It is compatible with all supported render engines and both CPU and GPU rendering.
When a scene is submitted using Strips mode in the plugin, an additional Strips option becomes available in the Web Dashboard. The number of available strips depends on the scene resolution. By default, the value selected during submission is used.
The Web Dashboard also displays a recommended strips value, calculated automatically by our system to provide the best balance between rendering speed and cost.
You can choose any available strips count based on your priorities. Higher strip counts generally improve rendering speed but may increase the cost. Lower strip counts can be more cost-effective, especially for scenes with long loading times or significant initialization overhead.
If you are rendering a still shot/one frame in high resolution, we recommend using the "Strips" option - this is our custom distributed rendering system that allows you to render one frame on several nodes at the same time and speed up rendering!
Please note that Strips is available only for single-frame renders. If your job contains an animation frame range, the option will be disabled, as distributed rendering can only be used for still images.
Mode - If your scene contains only cameras, the Cameras mode is available and set as the default. However, if our system detects additional configurations such as Scene states, State sets, Batch render, or Render Stacks, no mode is preselected (the dropdown menu will show "Select mode"). In this case, you need to choose the appropriate mode for rendering.
Below are descriptions of the available modes, depending on your scene setup.

Cameras - in this part of the submit window (cameras list) you can select all the cameras that you want to render, and you can also set an individual frame range for each camera. Each selected camera will be added to the queue and rendered as a separate job.
In case you do not select any of the cameras from the list, then the camera selected in the scene will be used as the default camera for rendering.

Batch render - this mode allows to queue multiple render sets, each with its own camera, scene state, and frame range, following the Batch Render workflow from 3ds Max.
These render sets also include resolution, width, height, and preset from 3ds Max, which are displayed along with other settings. You can adjust parameters such as frame range and camera selection directly in Web Manager. Selected sets will be processed separately and added to the render queue.
With "Batch Render" mode enabled, you can manage render configurations in Web Manager. If needed, you can switch back to "Cameras", "Scene States" or “State Sets" modes.

Scene states - If your scene contains scene states, our plugin automatically detects them and forwards all states settings along with the job upload. You can render scene states by switching the mode to “Scene states” (instead of cameras).
For each state, you can set an individual camera and range of frames. Each selected state will be added to the queue and rendered as a separate job.
Mode switched to “Scene states”. You can still edit cameras and render range - directly on Web Manager, without the need to reupload the scene. Also, if you still want to render just a camera - you can switch the mode back to “Cameras”.

State sets - this mode gives a flexible way to manage and render multiple scene configurations in a single project. Each set can have its own camera and frame range, making it easy to organize different setups without manually changing scene settings every time.
State Sets are useful when working with multiple lighting conditions, material overrides, or object visibility changes, providing a structured approach to handling variations within a scene. Our plugin detects and uses settings directly from the native State Sets tool in 3ds Max, ensuring seamless integration with your existing workflow.
Once selected, each set is added to the queue as a separate job. You can tweak frame ranges and camera assignments directly in Web Manager before rendering, ensuring full control over each setup.
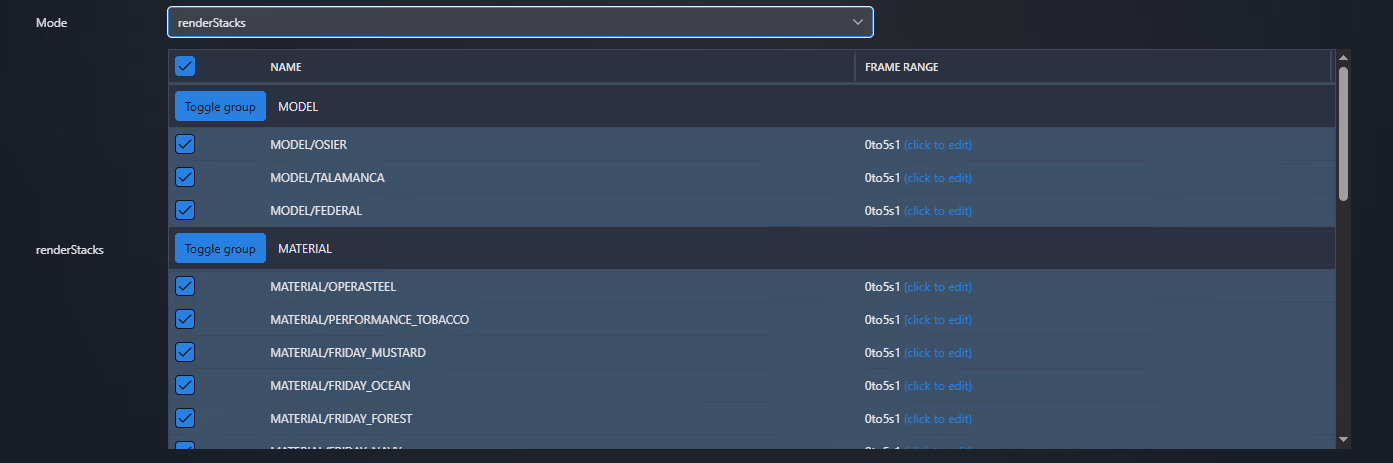
renderStacks - (based on the renderStacks plugin) - managing multiple scene variations becomes seamless with this mode, allowing for structured batch rendering of different models, materials, lighting setups, or other scene parameters. It is based on the renderStacks plugin for 3ds Max, which automates the process and keeps render configurations organized.
Each entry/pass in the “renderStacks” mode includes a defined frame range and is processed as a separate job in the queue. It’s a practical solution for rendering multiple design iterations or testing different scene setups without manual adjustments.
Once uploaded, you can manage and modify frame ranges in Web Manager before rendering, ensuring full control over each variation.
The “renderStacks” mode and list of passes will appear in Web Manager only if the renderStacks plugin was active during scene submission via our 3ds Max plugin. If the scene was prepared using renderStacks plugin but no “RenderStacks” mode or passes are visible, contact our support team for assistance.
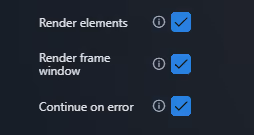
Render elements - Our system automatically detects whether additional outputs (render elements) are set in your scene, and then it enables this option. In case you do not want to render additional render elements (despite the settings in the scene), you can disable this switch, then none of the additional outputs will be rendered or saved.
Render frame window - This option is equivalent to "frame buffer preview" in 3ds Max. When this option is enabled, you will be able to check the progress of rendering from 3ds Max's frame buffer window during rendering. By default, the "Render frame window" option is enabled for jobs with 3ds Max + V-Ray.
Continue on error - By default this switch is turned ON. This means that any error messages related to missing textures and other assets will be skipped. The calculations will continue and rendering will not be aborted. If you disable this option and, let’s say, your scene contains missing asset, rendering will not be possible and the process will fail.
Pixel aspect - These settings are read from your settings in 3ds Max. You can adjust them here to fit the requirements of your output device, without the need to re-upload the scene.

When you add a scene to the queue, these values for Pass limit and Noise limit are read from the render settings in your scene. You can modify them if you want to get a higher quality output. Also, alternatively, you can perform a test with a lower quality to see if given objects are rendered correctly. Both values have a switch that when disabled allows you to always use the scene settings without overwriting the values (set in the web dashboard). This switch is useful when you want to clone a job but are not sure what the original settings were when you uploaded the scene.
Pass limit - if you need to increase or decrease the number of samples taken for each pixel, you can do it by changing the value in this field.
Noise limit - The value of sampling a pixel is set to the same you have in your render settings. You can adjust the value to a lower or higher one. According to Corona documentation, the typical values should be in the range from 0.001 to 100. Our
Gamma correction - our plugin reads your settings for gamma correction and automatically turns it ON when it detects it in your scene, while keeping the values for gamma in/out. In case you want to adjust these settings, you can do so by putting values into the fields, then the modified values will be used during rendering. Also, you can disable the gamma correction option altogether by unchecking the checkbox.

Advanced settings - available after enabling "Advanced mode". This section contains advanced configuration options intended for special workflows and support-assisted setups. In most cases, these settings should be left unchanged unless instructed otherwise by our support team.
- Job dependencies - if you want this job to start rendering only after another job in the queue has finished, you can select that job here. The current job will remain on hold until the selected dependency job is completed.
- Custom script - if your job requires a modified render environment or a custom script prepared by our support team (for example, a custom plugin installation), select the appropriate script from the list.
- Custom node version - if you need a different software setup (e.g. custom software version), put here the value you received from our support. Note that inputting a wrong number may cause errors during rendering.
The options above are intended for advanced use cases and are empty by default. Do not modify them unless instructed to do so by our support team.

Priority - before adding a job to the render queue, you can decide how you want to prioritize it. Depending on the queue and farm traffic, a higher priority may allow your job to quickly acquire nodes to render your project faster. Each priority has a different rate and gives you a different number of nodes - a detailed list can be found here: https://garagefarm.net/pricing

Node groups (preferred hardware) - by default, the system sets the preferred hardware to nodes with 62GB RAM. As we render Corona projects on a CPU device, you can switch the node group button to a custom setup and select the particular group of nodes either based on CPU cores or RAM:

The full technical specification of nodes can be found here: https://garagefarm.net/pricing#specs
If you know that your scene requires more than 62GB RAM, then when adding a job to the queue select the group with 121 GB RAM or more to render more optimally only on nodes that have more RAM.
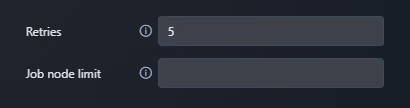
Retries - the value for this option is set to 5 by default. This means that if a rendering process fails or the software crashes, our system will perform two additional rendering attempts. We recommend leaving this option set to default (value 25) as this is the optimal setting to retry rendering in the case of some random 3rd party software errors.
Job node limit - by default, the value for this option is empty and so the nodes are assigned automatically depending on the job priority and nodes availability on the farm. Nevertheless, if you want to limit the number of nodes for the given job, please put here the value of the maximum number of nodes you want to be used during rendering.
Add job as paused - if you tick this option and then submit your job, it will be added with the status “paused”. This means that it will not start rendering automatically. It is useful to use this option if you intend to add the job to the queue, but you do not intend to render it at the moment. After adding a "paused" job, you can resume it at any time by selecting the "resume job" option (right-click on the job).
Create video sequence from output frames - You can create animated video outputs right after rendering frames. Select “Create video sequence from output frames” switch and set all desired video output settings. With the switch ON, the farm will run an additional job to render the frames sequence to a single video output.

More info about the settings available in the "video sequence job" you can find in our dedicated article.

Back - if you do not want to add the current job to the render queue or you want to reset your settings and add the scene again, you can use this option. The submission window with the settings for the given job will be closed and all changes will be cancelled.
Submit - when you press this button, the system will immediately add the job to the render queue. Please remember to check all settings before submitting a job!
Monitor render progress
After giving your render settings a final check and choosing your preferred priority, hit Submit to add your job to the render queue. If you’re a first-time user, you will have received $25 worth of credit to test out our service. The credits should be enough to run a few test jobs and familiarize you with the service.
You can right-click on the job to get additional options: change priority, pause job, kill job, and archive job.
The estimate is based on the currently finished frames and is approximated at that point. Rendering a test as prompted in the plugin (using a step i.e. 1to100s10) is highly recommended for more accurate estimates and detecting potential errors.

Once the job starts rendering, you can track its overall progress directly from the project list. Each job entry shows the frame range being rendered, the number of completed frames, and the current completion percentage.
For more detailed information, expand the job row and open the Active Frames section to monitor the progress of individual frames in real time.
Job details are available directly within the project list. By default, all jobs are collapsed. To view additional information, select a job and expand its row. Each job can be expanded independently to display detailed information and rendering progress.
ACTIVE FRAMES - displays frames that are currently being rendered. Completed frames are automatically moved to the DONE FRAMES section.
DONE FRAMES - contains all completed frames. Here, you can review basic information about each rendered frame, such as render time and cost. Each frame row can also be expanded to access additional details, including information about the render node used, associated subjobs, and execution logs.

Right-click any frame in the ACTIVE FRAMES section (after selecting a job and expanding its row) to access the real-time render log from the node currently rendering that frame.
Please note that after a job completes, the ACTIVE FRAMES section will no longer contain any entries. All rendered frames are automatically moved to the DONE FRAMES section.

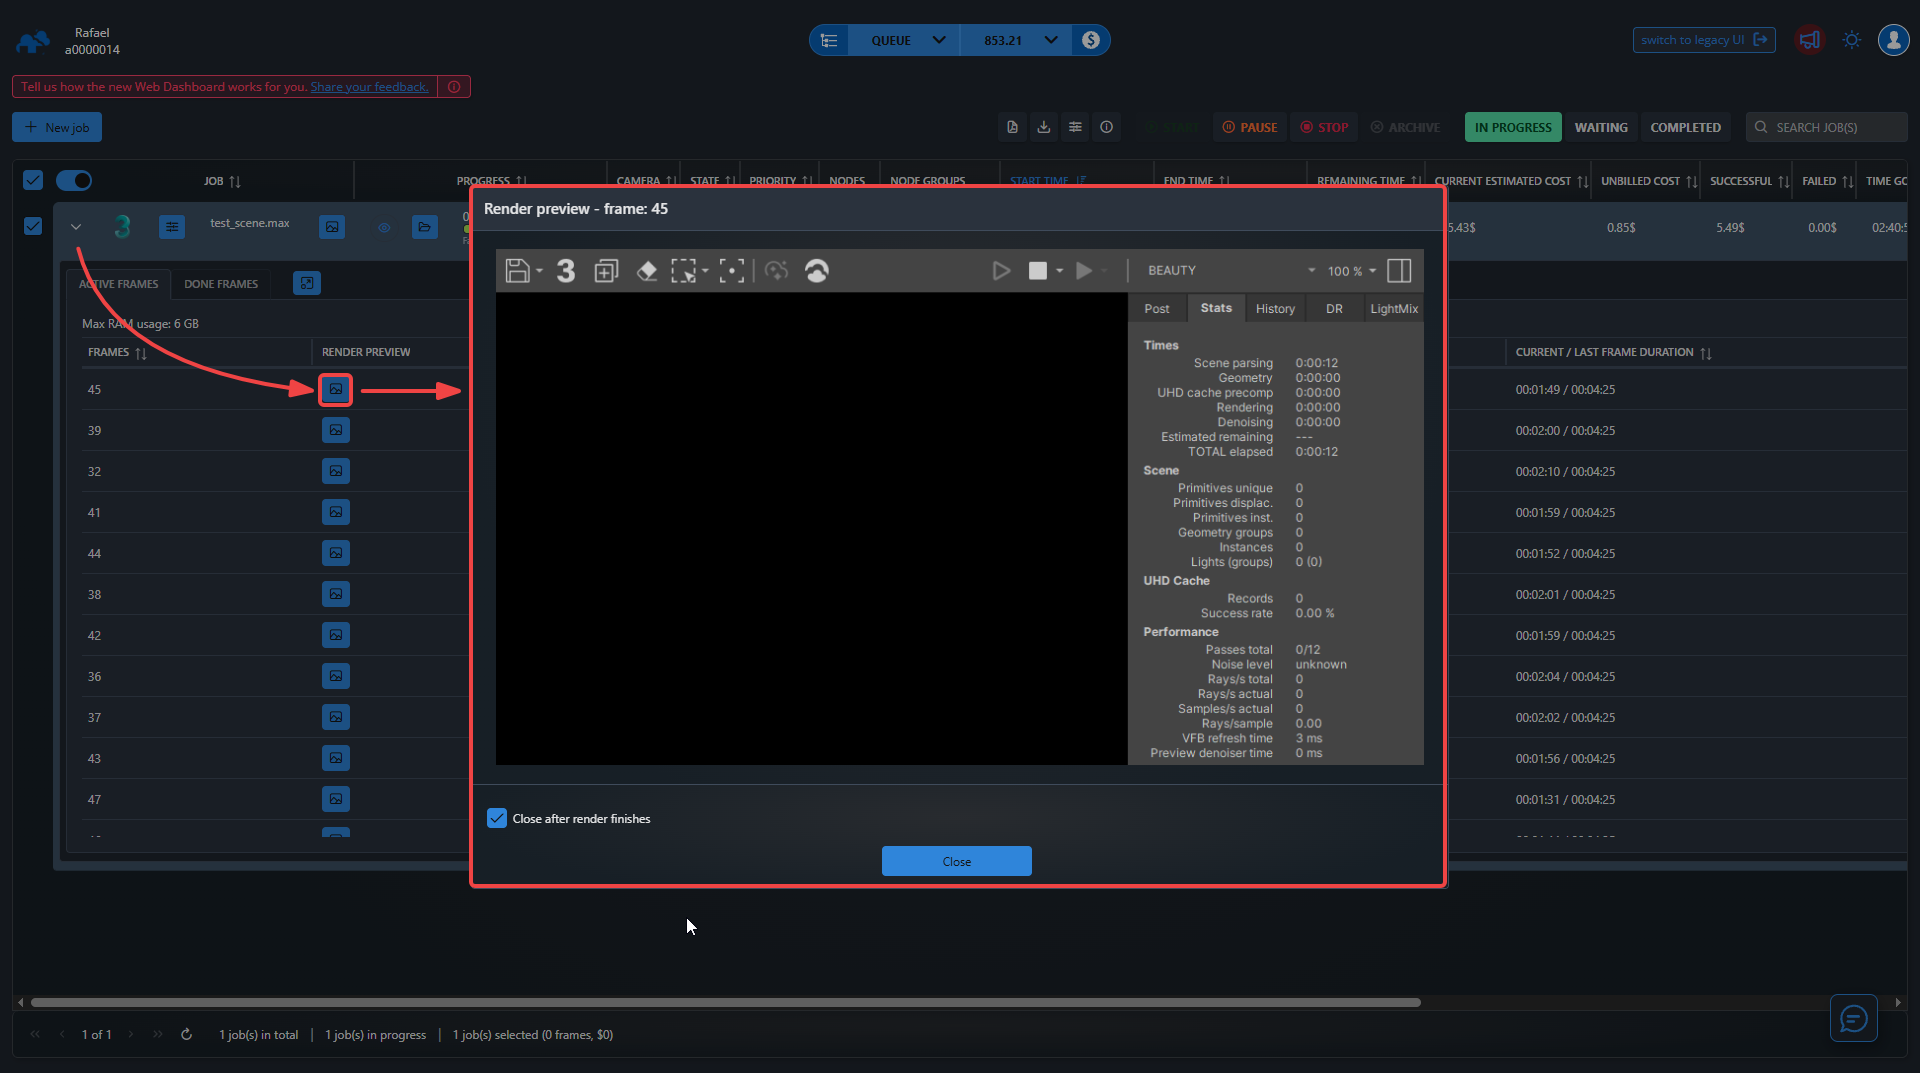
To view the preview of an individual frame, expand the job row and open the ACTIVE FRAMES section. Then click the "Render Preview icon" next to the desired frame (in the RENDER PREVIEW column).
Download and review frames
Each frame completed rendering is downloaded automatically to your local drive to a directory you selected in the renderBeamer application. If you’re unsure where your download folder is located, you can double-check it or change it in renderBeamer’s settings (click on the cogwheel). Also, ensure you have auto download turned on to get the frames downloaded as soon as they are available. If this box is unchecked, you will have to click on each job in Beamer's "downloads" tab, and manually download the frames.
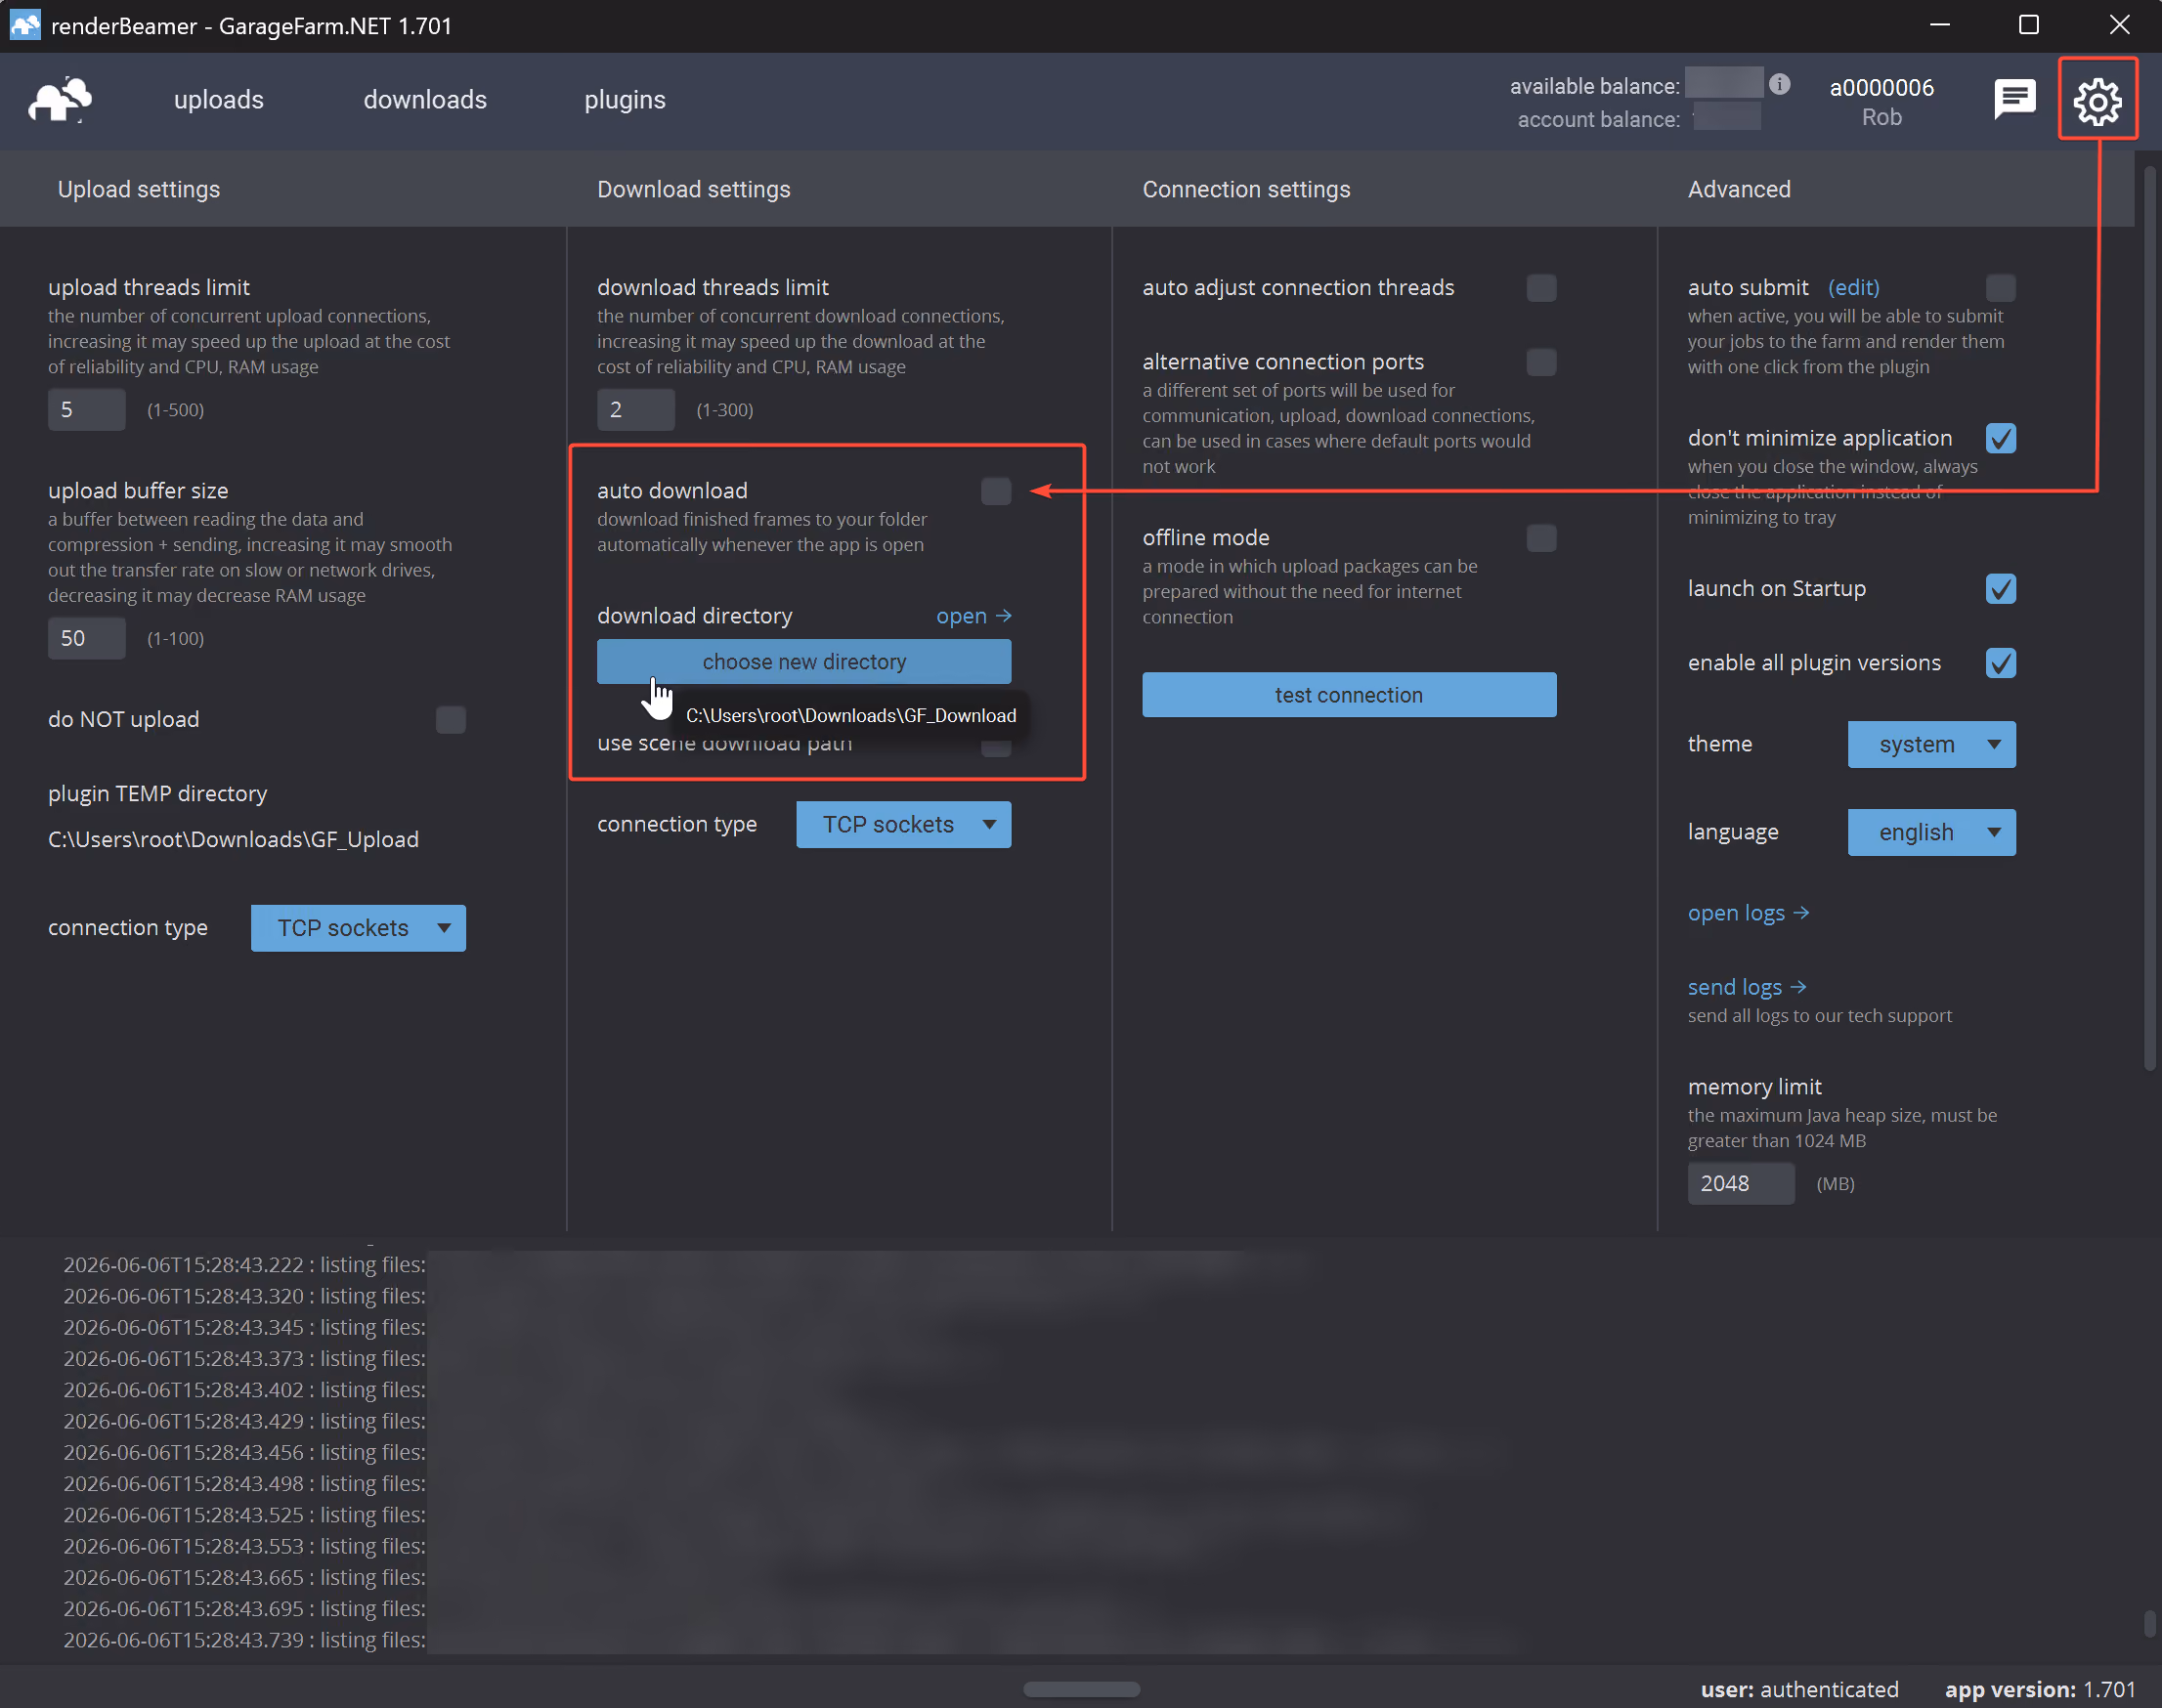
If you prefer more control over what to download and when you can also download your frames manually. To do that, just turn off the auto download switch in renderBeamer settings and go to the “downloads” tab. Next, select the desired render output using a checkbox, and click the download button.
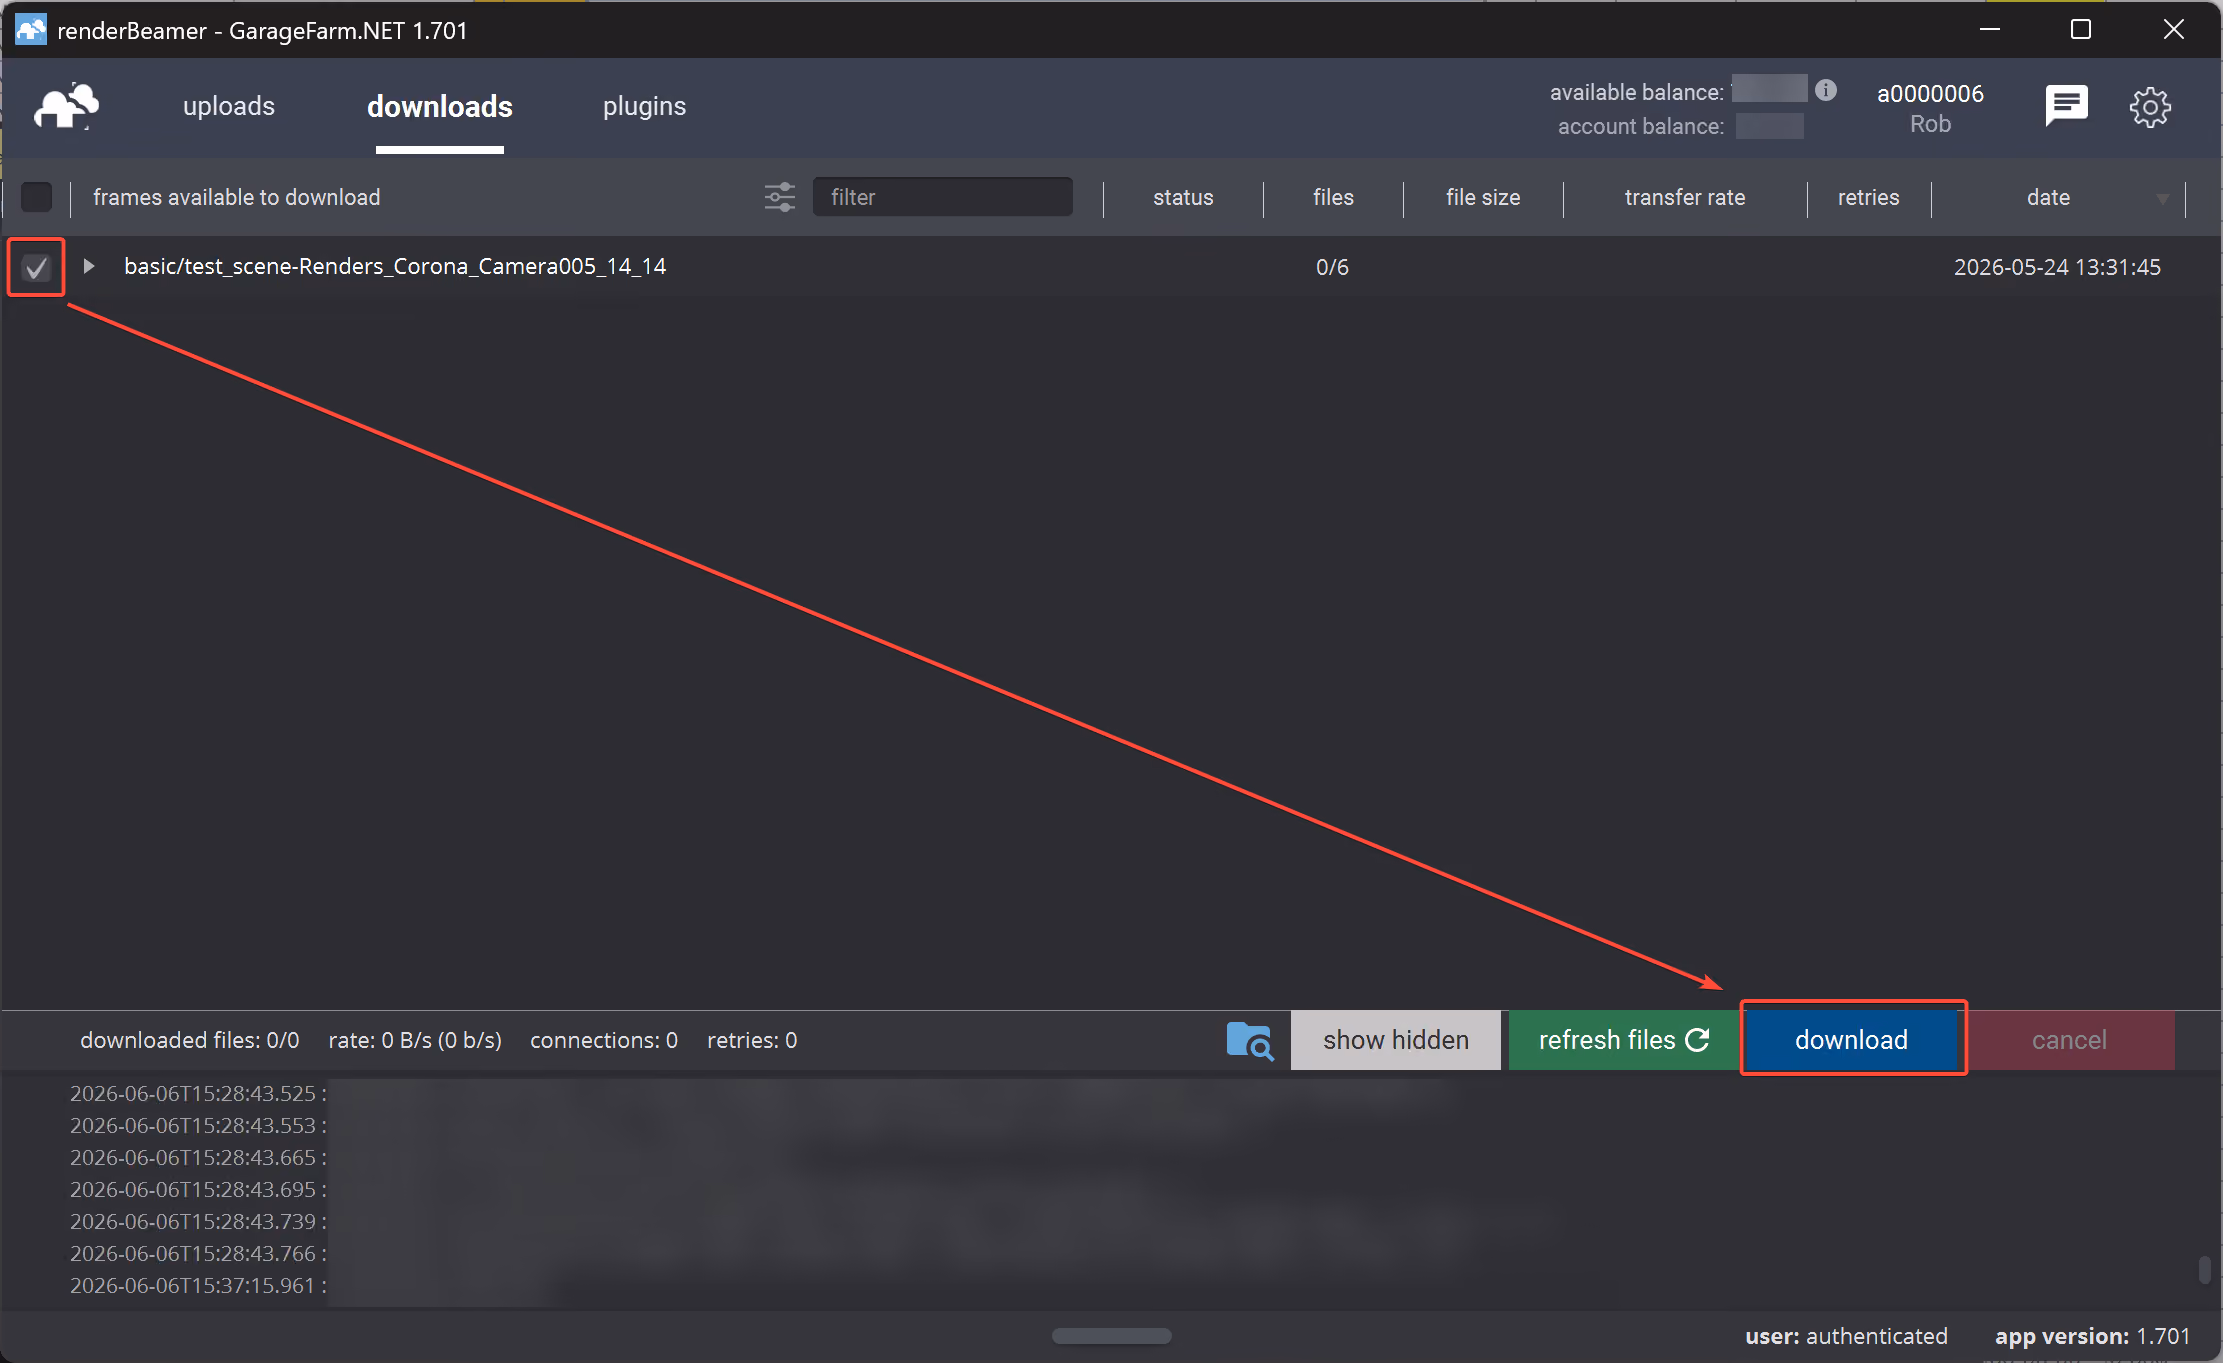
This workflow will download all rendered frames for the selected job or jobs. However, renderBeamer also gives you an option to download individual frames. You need to use the list files function under RMB to do that.

Once files for the selected job are listed, just roll down the list and select the files you’d like to download using checkboxes. Next, use the same download button.

Once your frames are downloaded, you can use the “open directory” option under RMB to open the folder where frames are saved.
Please ensure you keep renderBeamer running whenever you have jobs rendering to get the frames downloaded immediately. It may happen, however, that your frames aren’t downloading at the given moment. It’s likely because our application syncs the files in 15-minute cycles, and it is currently in between the cycles. You can click refresh to force the application to sync.
Purchase credits
You’ll need to charge your account to continue using the service once all trial credits are used up. Please note that when your balance goes below $0, you won’t be able to download rendered frames or start new render jobs.
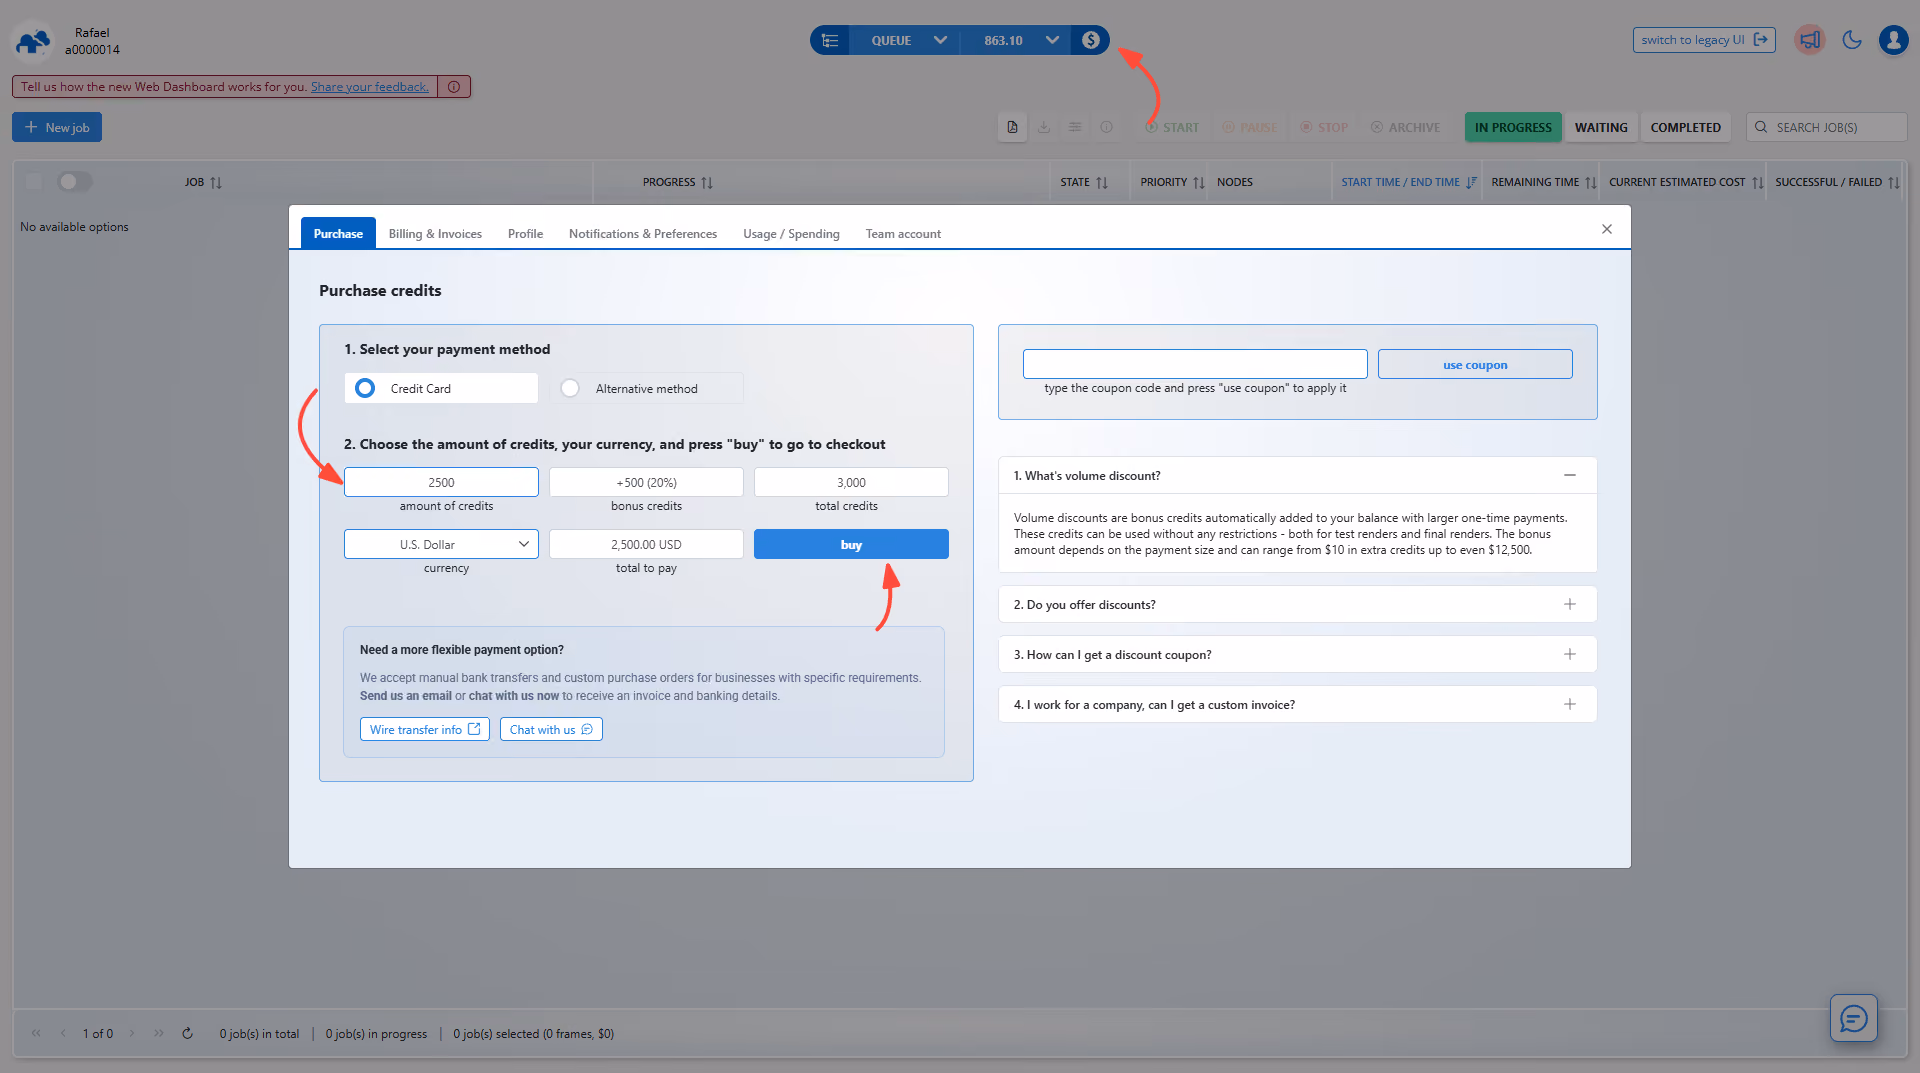
Credits can be purchased in the Purchase panel available in the Web Dashboard. The default payment method is credit card payment, but you can also use alternative payment methods supporting debit/credit cards, Revolut Pay, and Google Pay. If you prefer paying via bank transfer, detailed wire transfer instructions are also available in the Purchase panel.
You can access the Purchase panel by clicking the $ icon in the main navigation bar next to your account balance, or by selecting “Top up balance” from the Account menu in the top-right corner of the dashboard.
If your rendering needs are high or you plan to render regularly, please make sure to check out our volume discounts.
In case your account balance goes below 0, any current jobs will be paused - all frames/strips that were in the middle of rendering will be completed but any subsequent frames/strips will not start rendering. To download rendered frames, your account balance must be positive or equal to $0.
Contact us anytime
You can talk to GarageFarm.NET’s tech team any time of the day, any day of the week. We’re here to help you get started, answer your questions, and assist you in any way. Don’t hesitate to give us a shout.
You can contact us through our live chat accessible in the web dashboard or our desktop app when you log in to your account or message us here through the guest chat.
Register Now and Get $50 FREE Credits!

Frequently asked questions