Log in to Web Manager (web dashboard) at https://app.garagefarm.net and download our renderBeamer app for your operating system.
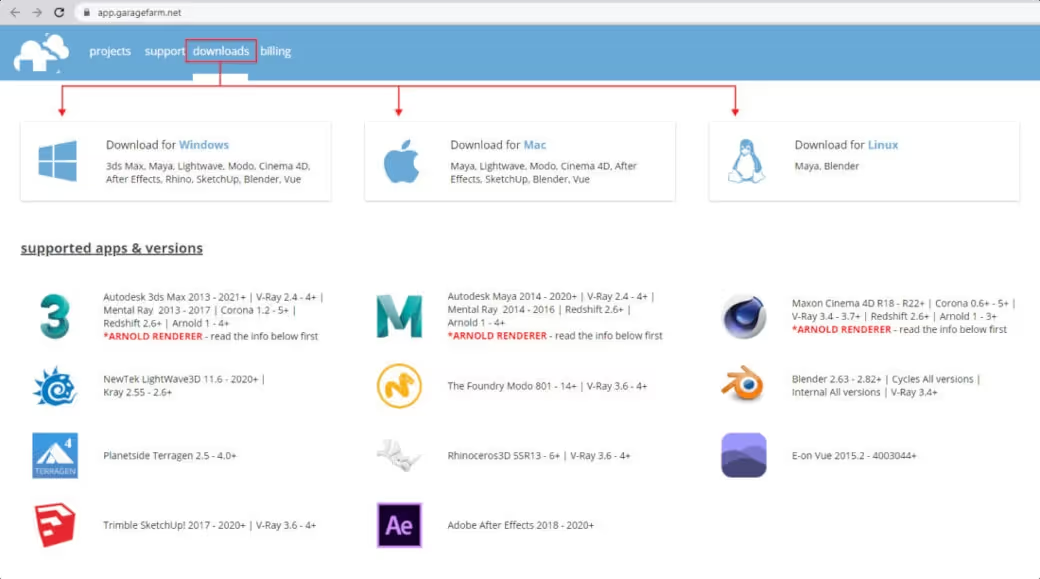
Install the renderBeamer app and start it. Once renderBeamer is done with the installation process, you need to choose the default download directory. This path will be the main output place for all your renders. Next, just log in using the account ID you received or your account email. Please remember that the app should always be running in the background when uploading a project or downloading rendered frames.

Once renderBeamer is installed, and you’re logged in, you’ll see the Plugins panel. Plugins installation panel should automatically open after the first renderBeamer startup. You can also open it anytime you need to install additional plugins for your 3D apps.
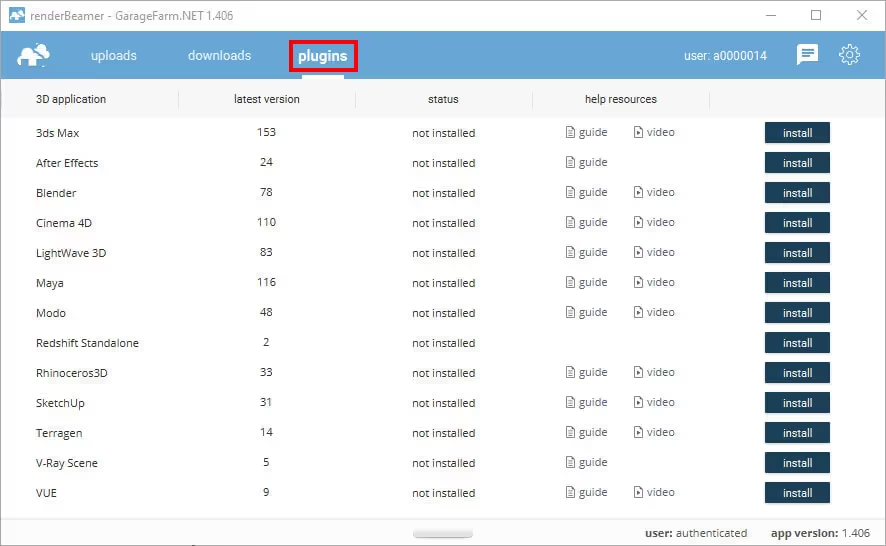
Open your scene in Maya and prepare it for rendering on a render farm.
After installing our plugin, it should be visible in the Maya GUI. To send your project to the farm, please locate the renderBeamer icon which can be found in the shelf tabs and click the icon to open the plugin window. Please remember to make sure you have the correct version of the scene to render opened before starting the plugin.

Launching our plugin redirects you to the setup tab in the renderBeamer application where your scene settings are automatically detected and displayed for checking and modification before scene submission in a specific mode.


IMPORTANT: According to Chaos Group documentation, the Irradiance Map method has been deprecated for V-Ray 5.xx.xx. Therefore, for the latest V-Ray versions (5.00.00 and newer) for Maya, our plugin does not support any modes other than "Render As Is" for animation rendering.
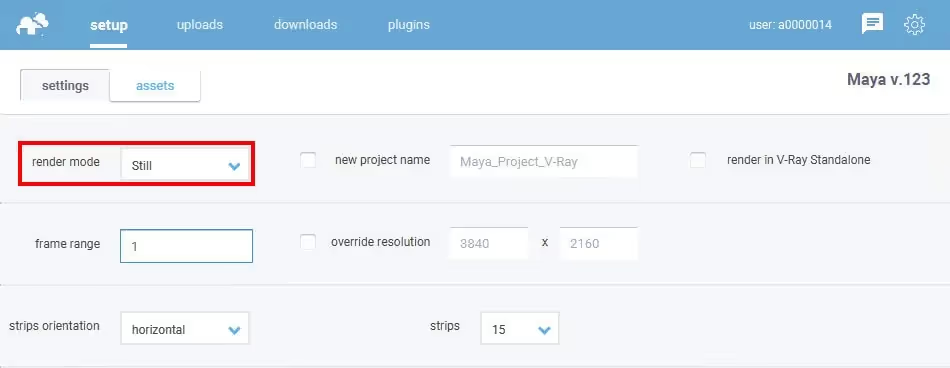
Below all the render mode options you can find the checkbox render in V-Ray Standalone instead of Maya. By default, this option is disabled and it is used for rendering Maya scenes as .vrscenes. You can do that by turning on the send as .vrscene switch. This option forces V-Ray to export the scene to V-Ray standalone. This can be used in various situations. For instance, when the scene is really big, or when most of the scene is built of V-Ray objects, or V-Ray proxies and similar solutions. More importantly, in most cases rendering a .vrscene (V-Ray standalone scene) is significantly faster than rendering a .ma or .mb file. Also, this option is not available when the scene uses more than one render layer.
You can read more about the importance of testing and ways to estimate the render cost and time in our FAQ.
Once you selected the plugin mode, you can now continue the workflow in the setup window and go to the range and resolution setup.
Settings tab
Our plugin automatically detects your settings that have been set in Maya render setup, but regardless of the render mode you choose, you can always make changes here in the plugin before sending the scene.
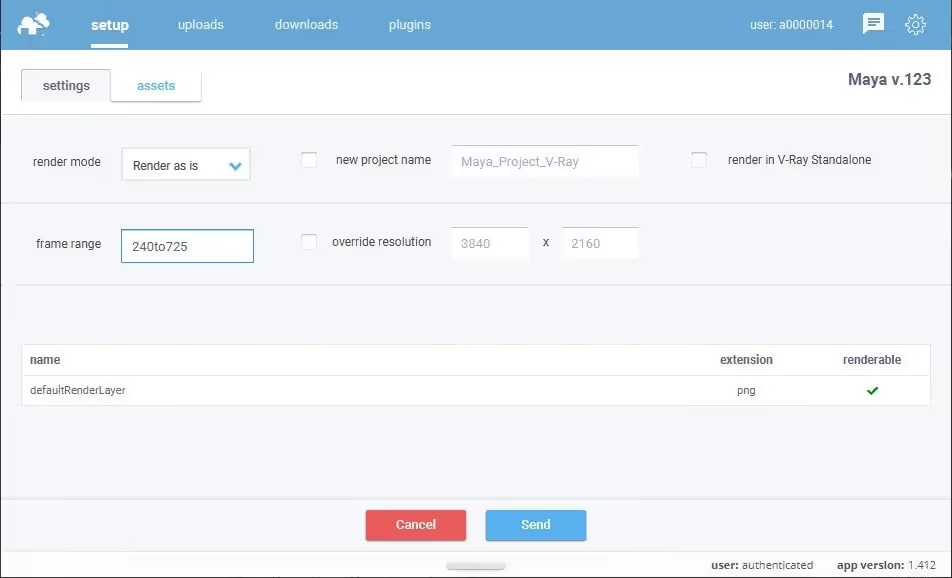
frame range - is the field that allows you to set the start and end frames for the rendering process. It is important to input the correct range to ensure that the desired frames are rendered.
override resolution - after enabling this option, you can edit the settings for the resolution of your scene.
new project name – If you have already uploaded a project and are going to submit the same scene (from the same project) but using modified assets (named the same as previously), we recommend using this option. In this case, all assets will be uploaded again and you will be sure that you are using (new) modified assets. Otherwise, our plugin may not detect the new assets and thus won't upload them. If you decide to activate this option, please make sure to set a different project name (other than the default one).
render layers - In this window, you will find information about the current settings for render layers created in a given scene.
You can check two settings for each layer you created:
Assets tab
Here, you can check all the assets detected by our plugin - you can replace a given asset with a different one if you need or remove it.
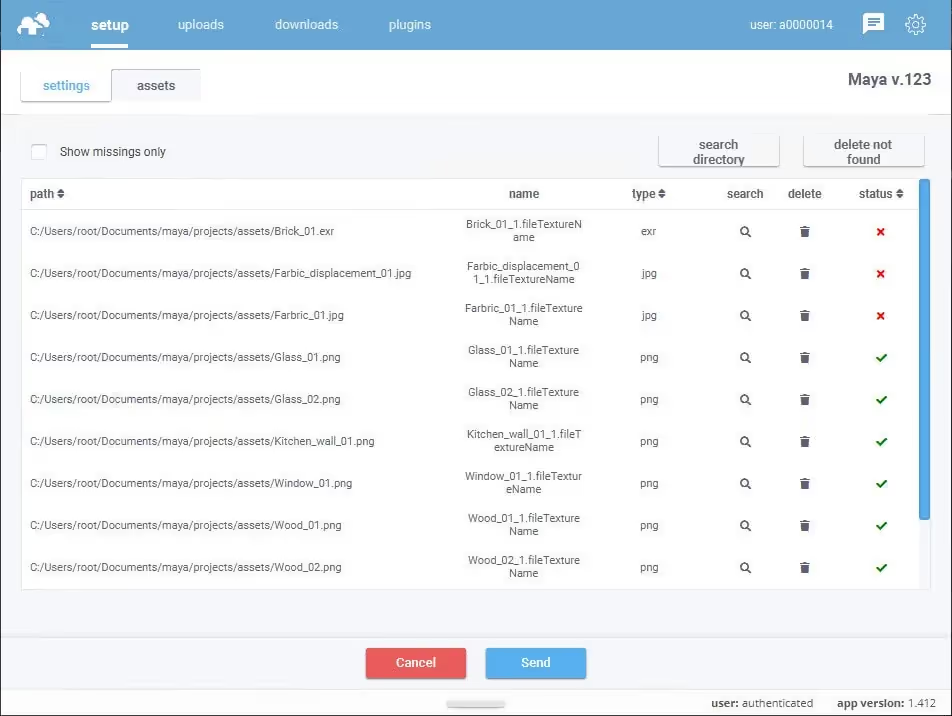
show missing only - after ticking this option, only the missing assets will be shown in the window
show directory - by choosing this option, you can select a global path location for all assets
delete all not found - by choosing this option, you can remove all missing assets from the scene (please remember to proceed with that if you are sure that these assets are unnecessary for the correct render of the scene)
search - by choosing this option, you can select a specific location for this file only
delete - as an alternative to the "search" option, you can remove the asset if it is not used in the scene
status - displays the status (found or missing) for each detected asset.
Once our plugin completes the scene export, your project will be redirected to renderBeamer to be uploaded. In a nutshell, renderBeamer is a standalone uploader/downloader application that works in conjunction with our plugins. Simply put, it takes care of the file transfers.
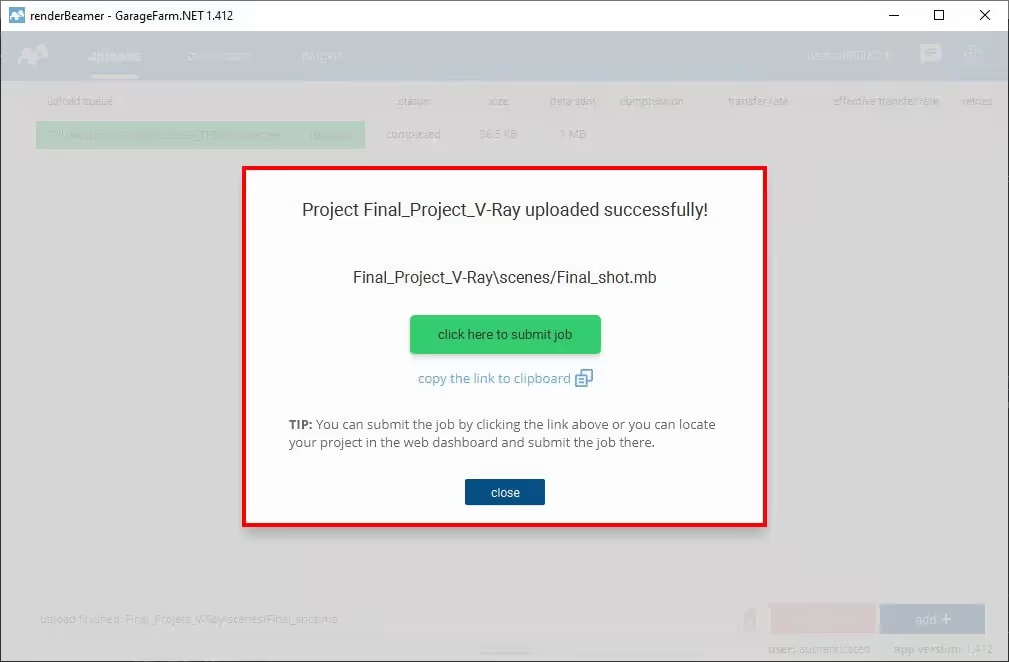
After the scene has been fully uploaded, the app will show you a window with a direct link to your scene on Web Manager (web dashboard). To continue, use the click here to submit job button. If for some reason, you closed the window with the link or it didn’t work, don’t worry, you can locate your project in the web dashboard and submit your scene by clicking on the scene file any time (more on that in the next step). You can also copy the link to the clipboard and manually paste it into your web browser.
Now that your project is uploaded, you will need to follow the final step - creating and submitting a job to render farm. Web Manager is the place where all your projects and render jobs reside.
If you followed the link generated earlier by renderBeamer, you would now see the job submission window with several fields and settings. If you didn’t follow the link or it didn’t work, you can do it manually by locating your project in the Projects panel, finding the scene file within the project folder (in your folder structure look for the folder called “data”, i.e. Project_name/data/SceneName.mb), and clicking on it to open the job window.
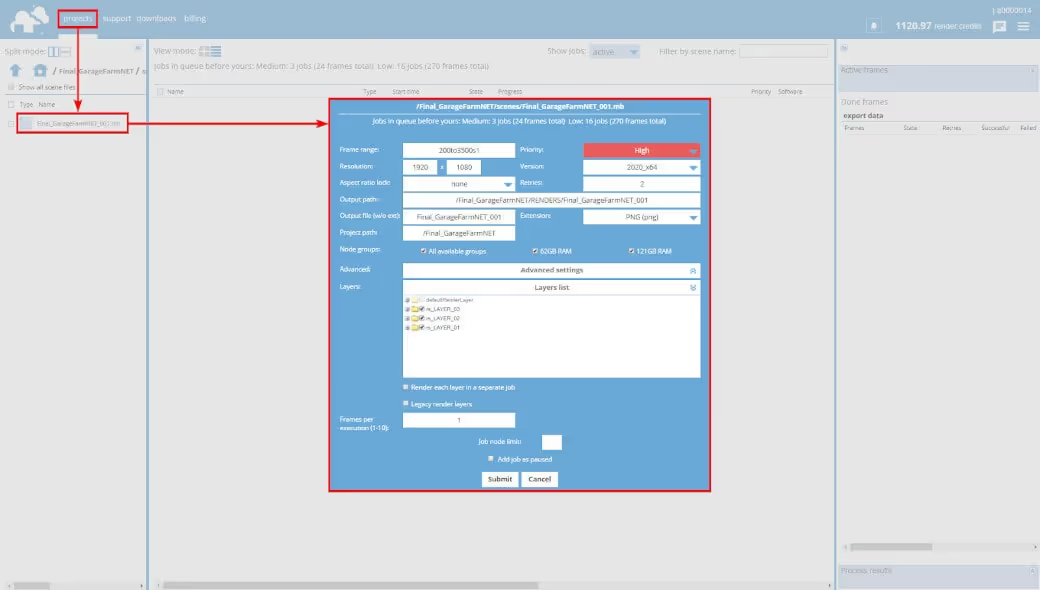
Our system automatically detects your settings in the scene and uses them to render the job. Before submitting the job to the render queue, please ensure everything is correct and make adjustments if necessary.

Frame range - use this field to put in the frame range you want to render. Frame range example for animations: 1to780s1 - this is a sequence of 780 frames in total, and all the frames 1 to 780 will be rendered. The parameter "s1" means that every subsequent frame in the given range will be rendered. If you want to do a test first, set a higher s value, e.g. "s20", which will result in every twentieth frame in the animation range to be rendered. So if you set the range to 1to780s20, then the frames 1,21,41,61,81,101,...,741,761 will be rendered.
If you have multiple layers and/or cameras in your scene and want to modify the frame range for all of them separately. You need to enable the option: “Render each layer/camera in a separate job” (more information with examples below).
If you only want to render a single frame (still image), you should input a single frame number into the field. For example, 1 will render frame number 1.
Resolution - here, you can set the output resolution in pixels.
Aspect ratio lock - if you need to change the resolution and want to keep a certain aspect ratio, you can use one of the available presets: 4:3; 16:9; 16:10; 21 9; 1:1. Leaving the option as "none" means that you are free to modify the values for the "Resolution" ignoring the aspect ratio.

Output path - here, you can find the default save path for rendered frames in the given job. The default output path is based on the name of your project and scene. You can edit this path if you clone your job and need to render a different range in that project.
Output file (w/o ext) - by default, the frames file name is set based on the name of your scene. If you want to create a unique name and/or you need to customize naming for the output according to your pipeline, you can set your own name for the output file.
Extension - a format for the output file is the same as in your scene settings. However, if you want to change the extension to a different one, you can choose from the available options, i.e: BMP, IRIS, PNG, JPEG, TGA, RAW TGA, CINEON, DPX, MULTILAYER, EXR, HDR, TIFF.
Project path - by default here, you can find the project's location, where all the files associated with a scene are collected.

Priority - before adding a job to the render queue, you can decide how you want to prioritize it. Depending on the queue and farm traffic, a higher priority may allow your job to acquire nodes sooner to render your project faster. Each priority has a different rate and gives you a different number of nodes - a detailed list can be found here: https://garagefarm.net/pricing
Version - by default, the version of Maya is set to the same version you have uploaded the project with. However, if you need to use a different version than the one detected, you can choose a specific version available on the list.
Retries - the value for this option is set to 2 by default. This means that if a rendering process fails or the software crashes, our system will perform two additional rendering attempts. We recommend leaving this option set to default (value 2) as this is the optimal setting to retry rendering in the case of some random 3rd party software errors.

Preferred hardware (node groups) - depending on whether you are rendering your project using V-Ray on CPU or GPU, our system will show you possible node configurations based on these settings. For CPU, in most cases, the default group is selected by default, but you can switch the node group button to a custom setup and select the particular group of nodes either based on CPU cores or RAM.


The full technical specification of nodes can be found here: https://garagefarm.net/pricing#specs

Advanced settings

Layers list - in this window, you will find the settings of your render layers created in the scene. By default, the settings are the same as in the scene. Layers that are renderable are ticked, and those that are non-renderable are unticked. You can check these settings and switch OFF the layers you don't want to render.

Render each layer/camera in a separate job - If you need to render each of your renderable layers and/or camera(s) as a separate job, then you need to select this option. If you do, each layer will be added to the queue as a separate job and rendered independently of other jobs. By default, this option is disabled.
Enabling this option allows to set an individual frame range for a given render layer(s) and/or for a given camera(s). It can also be useful when wanting to split a single long rendering job with multiple layers/cameras into multiple shorter jobs.
Each selected item will be added to the queue as a separate job with an individual frame range.
Below you can find some examples of how this option can be used in practice:

Option: "Render each layer/camera in a separate job" is ON
Each layer has a separate individual frame range. This means that three jobs will be added to the queue. Each job will be a separate layer with all its cameras.

Option: "Render each layer/camera in a separate job" is ON
In this case, instead of rendering all layers with included cameras, all cameras are selected, and thus each camera will be added to the queue as a separate job. So there will be a total of 7 cameras and each with a separate range.
To enable cameras, first, deselect the checkbox of a given layer, expand the list for a given layer, and select which cameras should be rendered as a separate job. You can set a separate range for each camera.

Option: "Render each layer/camera in a separate job" is ON
This case uses a mix of settings for the multi camera/layers feature.
With these settings, two separate jobs will be added to the queue. The first job is a view from the cam named "camera03" for Layer: "defaultRenderLayer". This camera will be rendered with a frame range: 150to250.
The second job is the layer "rs_renderSerupLayer2" which includes two cameras and both of them will be rendered in a single job with a frame range set for the layer, i.e. 420to580.
You can also see that "rs_randerSetupLayer1" with all cameras has been deselected (no item is selected) so it will not be rendered
Legacy render layers - this option is automatically set either as enabled or disabled. It depends on your Rendering Preferences settings in Maya. If you use "Render Setup" as the default mode for the Preferred Render Setup System, this option will be unticked in Web Manager. However, if you use "Legacy Render Layer" then this option will be ticked in Web Manager.

Frames per execution - this option is only available for animations. By default, the value for FPE is set to 1 for projects rendered on CPU. This means that each frame will be rendered as a new execution (a separate task), in other words, the scene will be loaded on each node every time a new frame starts. In the case of projects rendered on GPU, the value for FPE is set to 5 by default. So it means that 5 frames will be rendered in a row on one node.
The FPE (Frames Per Execution) option allows you to render several frames (the value you put in) in a row without reloading the scene on a render node and potentially may improve rendering efficiency. If your scene has a long loading time, but a short rendering time, you can set FPE to a higher value (for example 4). If the loading time is not long but the rendering time is long, leave the default value or set it to 1.
Detailed information on the use and examples of the FPE option in practice can be found in our dedicated guide: https://garagefarm.net/documentation/how-to-use-and-optimize-frame-per-execution-fpe
Job node limit - by default, the value for this option is empty, so the nodes are assigned automatically depending on the job priority and nodes availability on the farm. Nevertheless, if you want to limit the number of nodes for the given job, please put here the value of the maximum number of nodes you want to be used during rendering.

Add job as paused - if you tick this option and then submit your job, it will be added with the status “paused”. This means that it will not start rendering automatically. It is useful to use this option if you intend to add the job to the queue, but you do not intend to render it at the moment. After adding a "paused" job, you can resume it at any time by selecting the "resume job" option (right-click on the job).
Submit - when you press this button, the system will immediately add the job to the render queue. Please remember to check all settings before submitting a job!
Cancel - if you do not want to add the current job to the render queue or want to reset your settings and add the scene again, you can use this option. The submission window with the settings for the given job will be closed, and all changes will be canceled.
After giving your render settings a final check and choosing your preferred priority, hit Submit to add your job to the render queue. If you’re a first-time user, you will have received $25 worth of credit to test out our service. The credits should be enough to run a few test jobs and familiarize you with the service.

When the job has started rendering, you can check the real-time progress of currently processed frames. To do that, just select the render job from the main project list and click the arrow on the top right side to open the progress panel.
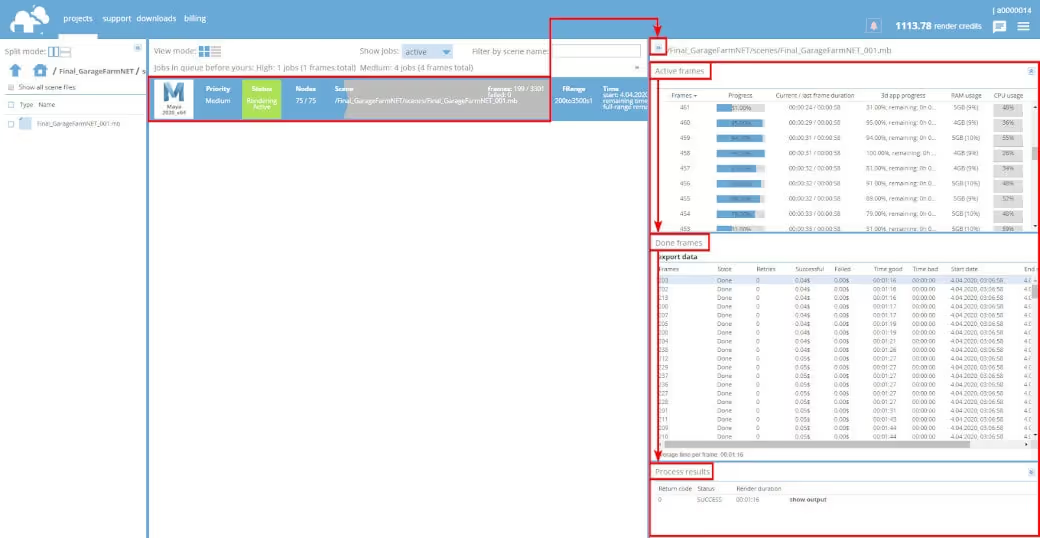
The Progress Panel (the panel on the right side of the screen) will show its content only when any of the jobs is selected. The panel is divided into 3 sections.
Active frames - it shows currently rendering frames. When a frame finishes, it is moved to the second section, Done frames. If you select any frame in the Done frames list, you can then access the render output process log in the bottom section called Process results.

Each frame completed rendering is downloaded automatically to your local drive to a directory you selected in the renderBeamer application. If you’re unsure where your download folder is located, you can double-check it or change it in renderBeamer’s settings (click on the cogwheel). Also, ensure you have auto download turned on to get the frames downloaded as soon as they are available. If this box is unchecked, you will have to click on each job in Beamer's "downloads" tab, and manually download the frames.
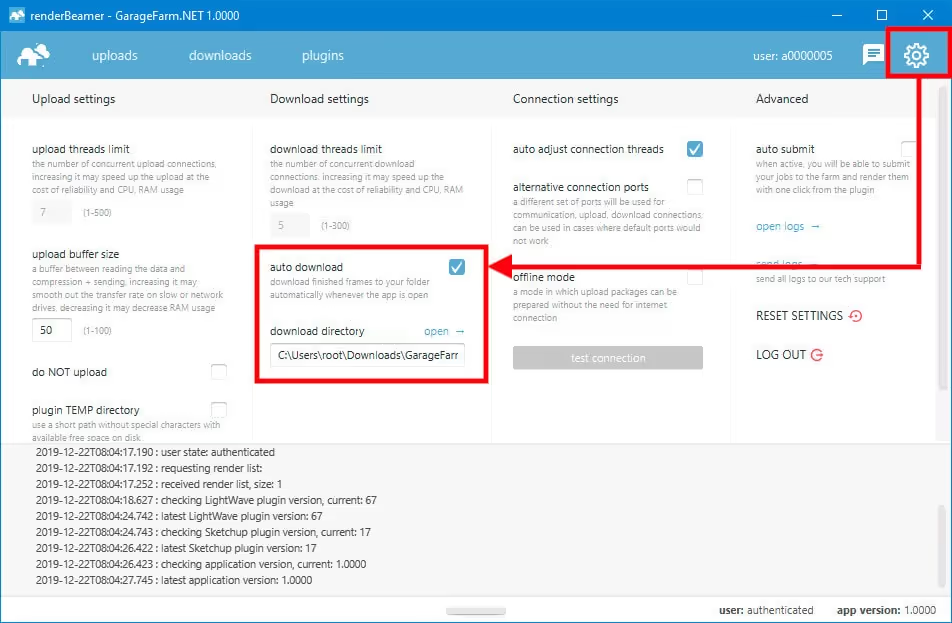
If you prefer more control over what to download and when you can also download your frames manually. To do that, just turn off the auto download switch in renderBeamer settings and go to the “downloads” tab. Next, select the desired render output using a checkbox, and click the download button.
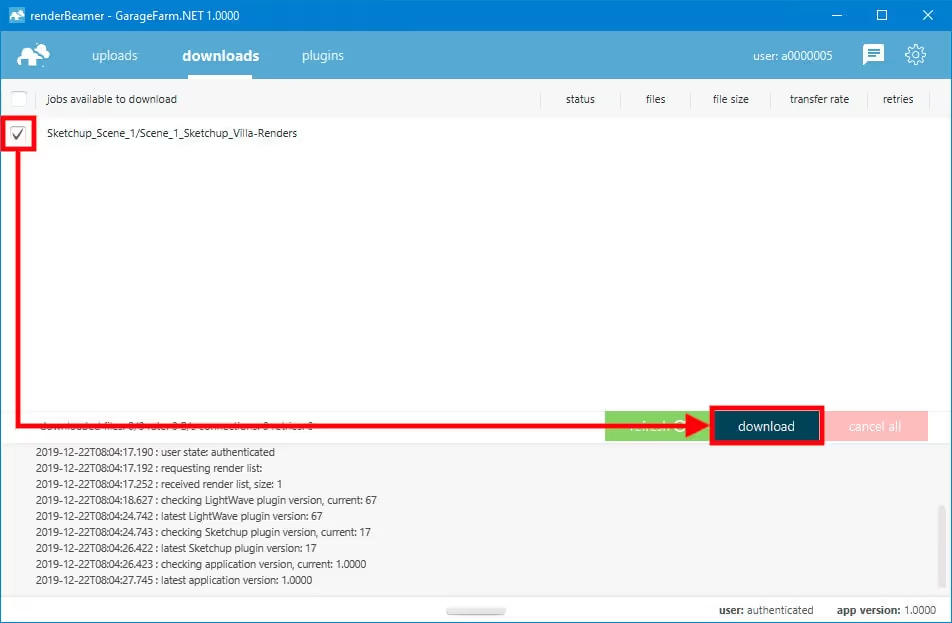
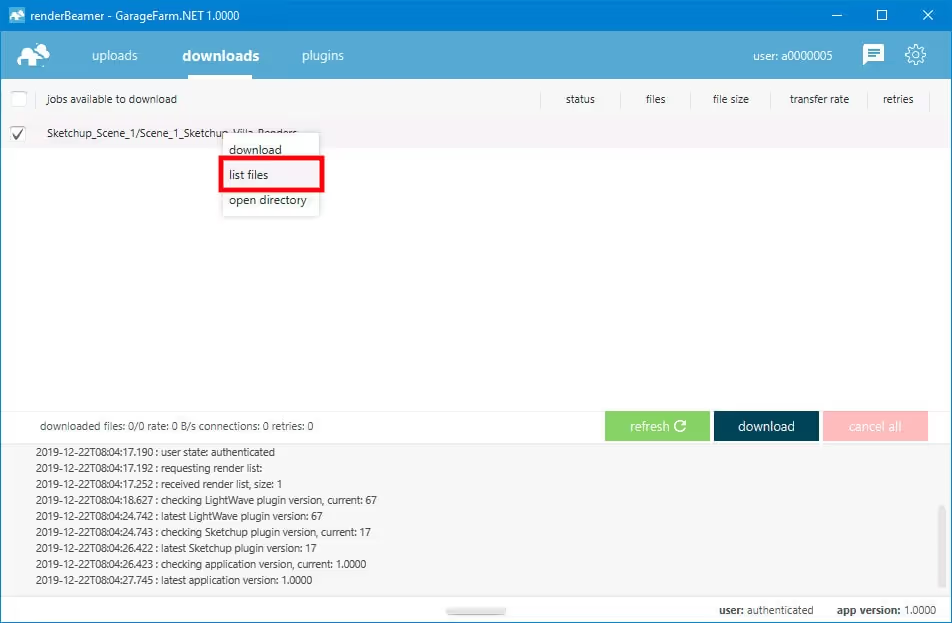
This workflow will download all rendered frames for the selected job or jobs. However, renderBeamer also gives you an option to download individual frames. You need to use the list files function under RMB to do that.
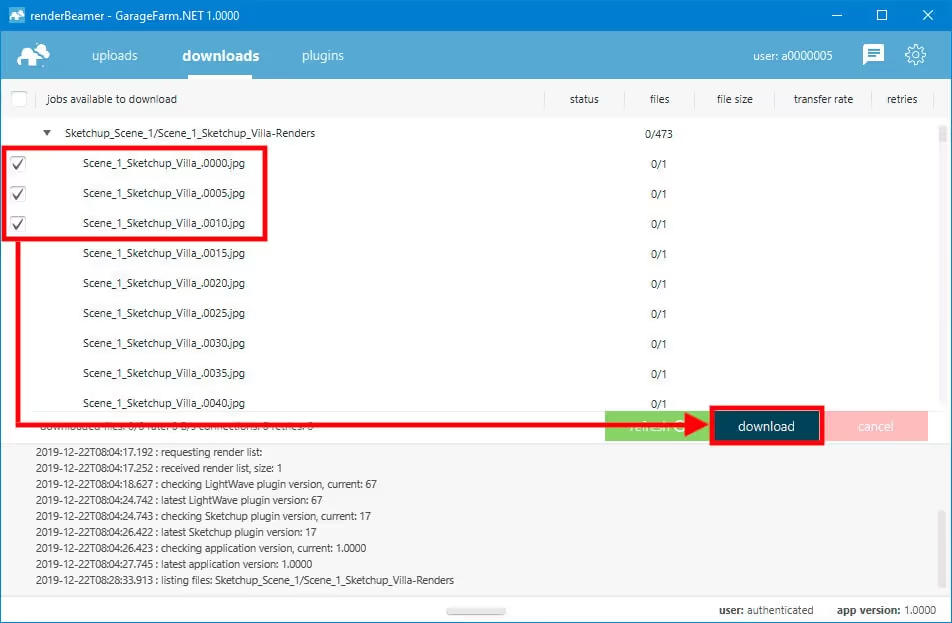
Once files for the selected job are listed, just roll down the list and select the files you’d like to download using checkboxes. Next, use the same download button.
Once your frames are downloaded, you can use the open directory option under RMB to open the folder where frames are saved.
You’ll need to charge your account to continue using the service when you use up all your trial credits. Please note that when your balance goes below $0, you won’t be able to download rendered frames or start new render jobs. You can make payments in the Billing panel in Web Manager. We accept debit cards, credit cards, and wire transfer payments. Also, you can purchase credits via Revolut, Zen, P24.
If your rendering needs are high or you plan to render regularly, please make sure to check out our volume discounts.

You can talk to GarageFarm.NET’s tech team any time of the day, any day of the week. We’re here to help you get started, answer your questions, and assist you in any way. Don’t hesitate to give us a shout.
You can contact us through our live chat accessible in the web dashboard or our desktop app when you log in to your account or message us here through the guest chat.
We also recommend checking out our FAQ page, which answers most of the new users' questions.