documentation

How to convert a sequence of images into a video on GarageFarm?

Can I get a video out of my rendered frames?

We all know that it is not recommended to render directly to a video format because of potential issues that may occur during rendering which might make the video file unusable.  

GarageFarm gives you an ability to create a video based on a rendered sequence of frames. In other words, you can convert the previously rendered frames of PNGs or JPEGs to a video format such as MP4. 

To convert a sequence of images to a video we use the FFmpeg tool. It allows us to render videos using our cloud technology quickly and without the need of having any additional video editing programs. 

How to create a video from a sequence of images?

You can create video output from a rendered sequence of images in two ways - manual and automatic.

1st method - the manual way:

Any time you have finished rendering a job in an image format i.e. PNGs or JPEGs, you can then manually select those files or a finished job and convert them to a video using a so-called “video job”.

To manually add a job that converts sequence of images to video output, follow any of the three options:

  • (1) go to the file browser section in the web dashboard, then locate the sequence output folder or a file inside of it, and click RMB (right mouse button) and choose “Create video sequence”:
  • (2) go to the render jobs section in the web dashboard, then select a job that is done, and click RMB (right mouse button) and choose “Create video sequence”:
  • (3) go to the render jobs section in the web dashboard, then select a job that is done, and click on the icon at the top of the panel:
  • After executing the "Create video sequence" option, a job submission window will appear where you can see and configure all video encoding related settings (more on that in point 3 of this guide).

    2nd method - the automatic way:  

    You can create video output automatically every time you add a render job to the queue. 

    In the standard render job submission window for Blender, 3ds Max, and After Effects, you’ll find a checkbox “create video sequence from output frames” which enables additional settings for rendering videos.

    additional settings for the “create video sequence from output frames” option ON

    Basically, this option works just like executing the "create video sequence" option we covered earlier (the manual way). The difference is that this video job is added automatically as a separate job along with the scene you are about to render so in effect you will have 2 jobs. As soon as the render job is finished and all the frames are rendered, the conversion will be performed on the sequence from the given job.

    To use this feature, all you have to do is check the “create video sequence from output frames” box in the job settings window and choose your preferred video output settings.

    What settings should I set to get video output?

    In this section, we’ll cover all the video related settings that are available in the video job.

    video job settings

    Overview of the settings available in the video job:

    Frame range -  the range is set automatically based on the detected image sequence you want to convert to video output. If you tick on the “create video sequence from output frames” option when adding a job to the queue, this range will be the same as the range for the rendering job. Then, after completing the rendering of all the frames from that sequence, the job that converts frames to video will start.

    Priority - before adding a job to the render queue, you can decide how you want to prioritize it. Depending on the queue and farm traffic, a higher priority may allow your job to quickly acquire nodes to convert your sequence of images faster. Each priority has a different rate - a detailed list can be found here: https://garagefarm.net/pricing 

    Output path - here you can find the default save path for converted video in the given job. The default output path is based on the name of your project and scene/sequence images. You can edit this path if you clone your job and need to render a different extension in that project.

    Output file (w/o ext) - by default, the frames file name is set based on the name of your sequence images. If you want to create a unique name and/or you need to customize naming for the output according to your pipeline, you can set your own name for the output video file.

    Extension - by default, the video output extension is set to a common setup, which is .mp4 (MP4 MPEG-4 Part 14). However, if you want to change the extension to a different one, you can choose from the available options, i.e: .mkv, mov, .webm, mxf 

    video job settings: advances settings

    Advanced settings

    • Job dependencies - if you want this job to start rendering after finishing another job that is in the queue, you can select it here. As a result, the current job will not start until the selected dependency job has finished.
    • Custom node version - if you need a different software setup (e.g. custom software version), put here the value you received from our support. Note that inputting a wrong number may cause errors during rendering.
    • Custom script - if your job requires a modified environment or adding a custom script (prepared by our support team), e.g. custom plugin installation, select the available script from the list.
    The advanced settings above are empty by default, please do not modify them without consulting support first.

    Audio path - here you can add a path for your audio that you want to be included for video output. If you uploaded (in advance) your .mp3; .wav or .ogg audio file, put the path to it, e.g.: /_add_GF/final_audio.mp3

    example path of an audio file

    Encoder - depending on the video output extension you choose, you can select one of the specific codecs:

    list of available video codecs based on the video output extension (containers)

    Framerate - that means frames per second, also known as FPS option. It is the frequency (rate) at which consecutive images (frames) are displayed in one second of video. By default it is set to 25, but you can also set any other value for FPS, eg: 24, 30, etc.

    Bitrate - by default, the value of this parameter is set to 5000. This is a well known standard and gives good quality video output. Nevertheless, if you prefer to set a higher value, feel free to change it.

    Pixel format - by default, it is set to "yov420p" depending on your preferences, you can choose one of the available Pixel formats:

    list of available pixel formats based on encoder (video codec)

    Profiles - By default it is set to "main profile". Depending on which encoder for video output you choose, there you can select one of the specific profiles:

    list of available profiles based on encoder (video codec)

    Encode all outputs - this option is useful when you have render elements in your scene and you would like to convert each of them to a separate video file. By default this option is disabled, so only the main render output frames (or a selected sequence) will be used to create a video by default. If enabled, all rendered layers will be used to convert them to video output.

    Add job as paused - if you tick this option and then submit your job, it will be added with the status “paused”. This means that it will not start rendering automatically. It is useful to use this option if you intend to add the job to the queue, but you do not intend to render it at the moment. After adding a "paused" job, you can resume it at any time by selecting the "resume job" option (right-click on the job).

    Submit - when you press this button, the system will immediately add the job to the render queue. Please remember to check all settings before submitting a job!

    Cancel - if you do not want to add the current job to the render queue or you want to reset your settings and add the scene again, you can use this option. The submission window with the settings for the given job will be closed and all changes will be cancelled.

    How can I download my video output?

    Both the rendered frames and the video output can be downloaded in a standard and automatic way via the renderBeamer app

    Each rendered and completed output is downloaded automatically to your local drive to a directory you selected in the renderBeamer application. If you’re unsure where your download folder is located, you can double-check it or change it in renderBeamer’s settings (click on the cogwheel). Also, ensure you have auto download turned on to get the frames downloaded as soon as they are available. If this box is unchecked, you will have to click on each job in Beamer's "downloads'' tab, and manually download the output(s). 

    renderBeamer default settings with auto download ON

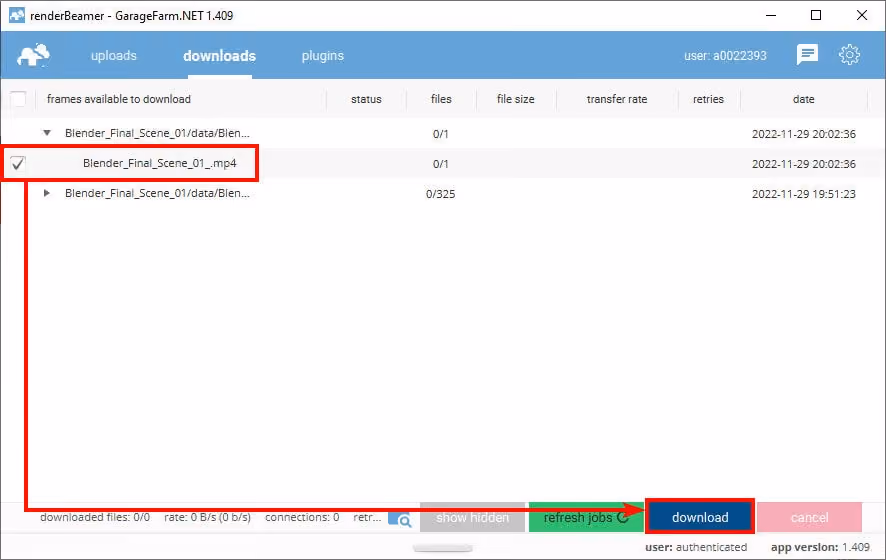
    If you prefer more control over what to download and when, you can also download your output(s) manually. To do that, just turn off the auto download switch in renderBeamer settings and go to the “downloads” tab. Next, select the desired render output using a checkbox, and click the download button. 

    renderBeamer downloading frames for a selected video job

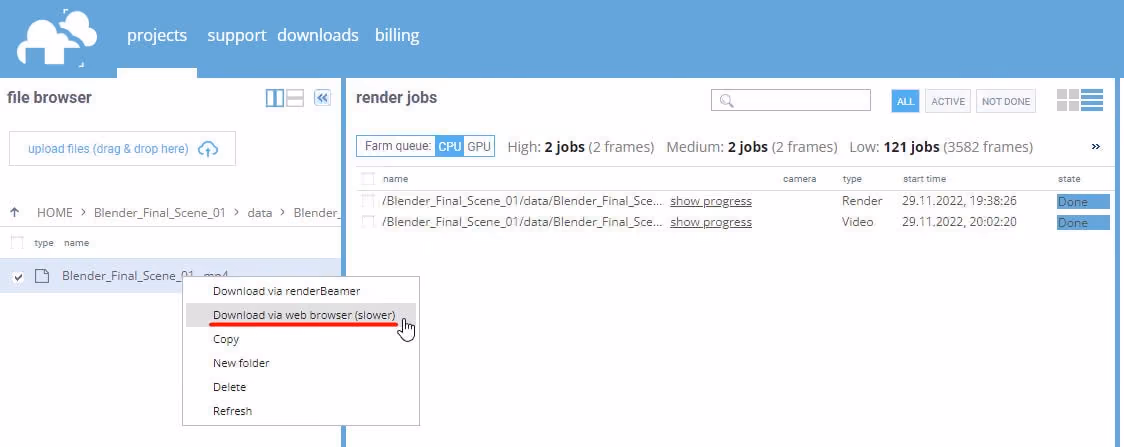
    The other option is to download directly from the web dashboard. To download an output, click RMB on a video file you’d like to download and select the option: “Download via web browser”. This way you do not need to open our application to download a file because it will be downloaded using the browser.

    direct downloading from web dashboard (via web browser)
    No credit card required

    Register Now and Get $50 FREE Credits!

    Blue gradient background with abstract digital patterns on the left side.
    Table of Contents
    FAQ

    Frequently asked questions

    Everything you need to know before starting your first render.
    General
    Uploading & Downloading
    Question text goes here

    Lorem ipsum dolor sit amet, consectetur adipiscing elit, sed do eiusmod tempor incididunt ut labore et dolore magna aliqua. Ut enim ad minim veniam, quis nostrud exercitation ullamco laboris nisi ut aliquip ex ea commodo consequat. Duis aute irure dolor in reprehenderit in voluptate velit esse cillum dolore eu fugiat nulla pariatur.

    Do I need to get a subscription?

    On GarageFarm, you pay as you go. Pay only for the time you are rendering. It’s up to you how much you spend. It can be anything between $10 and $10,000 or much more. You’re not required to purchase a subscription and you won’t incur monthly charges for using the service.

    Pricing & billing
    Do I need to register an account?

    To use GarageFarm cloud render farm you need to register an account and then activate it. Registration is straightforward and requires you to provide your name, email, and country. You will get a verification link in the email. When you open the link, your account will get activated and will be ready to use. 

    We don’t require a credit card to start using the service. As soon as you register and activate an account, you can use a trial that comes with starter credits.

    Getting started
    Do I need to upload my project again after rendering a test job?

    You can submit a job that has been previously tested by right-clicking on it in the web dashboard and selecting ‘Render full range’ without uploading the project again. Please note that the “Render full range” is available for jobs that have been previously rendered with a step (i.e. 1to400s20). Certain renderers and GI modes won’t allow using this feature and you will need to upload the scene again to render the full range.

    Uploading & downloading
    Do you accept American Express card payments?

    Yes, we accept American Express card payments. AmEx card payments are possible when you process a transaction through PayPal or Revolut.

    Pricing & billing
    Do you have ISO certification? Is GarageFarm ISO certified?

    We understand that your projects are valuable and confidential, and we take security very seriously.

    GarageFarm's sister company, and our infastructure provider, Copernicus Computing is certified as ISO 27001 compliant which means that the organization has been audited by an accredited certification body and have demonstrated that it has implemented an information security management system that meets the international quality standards.

    This certification ensures GarageFarm customers that the rendering services comply with strict security and privacy standards, providing an additional level of trust in how their data and projects are managed on the GarageFarm platform.

    To learn more about the ISO certification and its implementation process by our sister company, you can read this blog article. You can also view the ISO 27001 certificate here.

    General
    Do you offer discounts for students?

    Sorry but we don’t. You should try our Low priority, though. It’s great for students and artists who are just starting out. In addition, each account comes with $25 trial credits. You can obtain additional credits through coupons giveaways. Make sure to follow us on Twitter or sign up for our newsletter to stay in the loop.

    Pricing & billing
    Do you offer to sign an NDA?

    We can either offer to sign our NDA or sign the NDA provided by you after our legal department reviews the document and approves it.

    General
    Do you support 3rd party plugins? What if I use a plugin that you don’t have on your farm?

    We have a broad range of supported plugins that we constantly maintain and update. If you happen to use a plugin that we don’t have or have a different version currently installed, it‘s not a problem. Talk to us via live chat and tell us the app/plugin you’re using. We’ll explore purchase options. If the software is free, we’ll try to get it installed on the farm within a few hours.

    Please note that the custom plugin installations apply only to users rendering on Medium and High priorities. Take a look at the list of apps and plugins supported on GarageFarm https://garagefarm.net/supported-apps.

    General
    Do you support CPU and GPU rendering? What software can render on CPU and what on GPU?

    On GarageFarm, you can render on nodes that either use CPU or GPU. The computing device you choose to render on largely depends on your 3D software, the technology it supports, and compatibility with our hardware. 

    For example, if you're using Redshift, you can mainly render on GPU because that's how Redshift is built (with an exception of newer Redshift that has a CPU rendering capability). If you're using Cycles in Blender, you can choose either CPU or GPU because Cycles supports both technologies and both modes are supported on GarageFarm. V-Ray also supports both CPU and GPU, and both modes are supported on GarageFarm.

    Rendering modes supported on GarageFarm:

    V-Ray - CPU and GPU

    Corona - CPU

    Redshift - GPU

    FStorm - GPU

    ProRender - GPU

    Cycles - CPU and GPU

    Cycles 4D - CPU and GPU

    Arnold - CPU

    Cinema 4D native engine - CPU

    Modo native engine - CPU

    General
    Does your price include tax/VAT?

    Our prices do not include the tax/VAT.

    We are a United Kingdom-based company, which means that for everyone from the UK we need to add 20% of the VAT to the payment. Generally, HRMC will refund the VAT amount to British companies after filing the VAT Return form.

    If you are from a country within the European Union, and you have a valid VAT number, the tax/VAT won’t be added to the payment.

    If you are from a country within the European Union, but you don’t have the VAT number, we will add the standard VAT rate for your country to your payments.

    If you are from a country outside of the European Union, you don’t need to pay the tax/VAT.

    Pricing & billing
    How can I check rendered frames?

    Each completed frame is downloaded automatically to your local drive to a directory you selected in the renderBeamer application. Please make sure you keep renderBeamer running and the auto-download on whenever you have jobs rendering to get the frames downloaded right away. 

    As an alternative, when you’re logged in to your account on the website https://app.garagefarm.net/, you can preview all rendered frames in the web dashboard. In the file browser on the left, you can see all your project files. Navigate to the folder inside your project with Renders in the name at the end. You can double click on the frame to preview it online.

    Uploading & downloading
    How can I download frames?

    To download frames you will need to open renderBeamer - our desktop client app. If you have auto-download turned on in preferences, the frames will automatically download to your local drive as soon as they finish rendering. If the auto-download is turned off, you can download the frames manually by going to the downloads tab, selecting the job from the list, and right-clicking or hitting the download button. Each frame will download to a directory you selected in your renderBeamer preferences. If you’re not seeing the job or some frames are missing, try the refresh button - it will sync the app with the cloud. Check out our video tutorial showing how to download frames https://youtu.be/z0F0p5TSHRw?t=304.

    Uploading & downloading
    How can I get a render time and cost estimate?

    You can get a quick estimate using our cost calculator. Remember, it’s only an approximation and only works for animations.

    To get a more accurate estimate for animations, we recommend testing a few frames on the farm using a step. For example, if you have 400 frames in your sequence and set the frame range to 1to400s20, you will get 20 frames rendered in total. Our system will then calculate the cost estimate for the full range based on those frames rendered. An important thing to note is that test rendering using a step allows you to test the frames across the entire animation. This results in a more accurate estimation than rendering, for example, 5 successive frames from one part of the animation, i.e. 1to5.

    Remember that the more frames you render in a test job, the more accurate the estimation is. Also, you won't need to render those frames again when you choose to render a full range after testing a job with a step. 

    The calculator works with animations only. To get an estimate for a still, render the image on the farm in a lower resolution. 

    Please render the image in 1/5 resolution or any other smaller resolution. In the case of a 1/5 resolution test, the cost of a full-resolution render will be 25 times higher than the cost of a test. For example, if you want to render an image in resolution 5000x6000, run a test in 1000x1200 res first, which is 1/5 of the full resolution. If your test costs $1, the estimated cost for the full-res image should be around $25 (5 x 5 = 25). For a 1/4 test, it would be $16 (4 x 4 = 16). You can apply the same logic to any other resolution. 

    Dive deeper into the why and how of running tests on a render farm https://garagefarm.net/blog/how-to-use-online-render-farms-part-2.

    Testing & estimating
    How can I know what the current farm load is?

    Upon submitting a job on the web dashboard, you’ll be able to see the number of jobs that are currently rendering and waiting in the queue. You can use this info to decide which priority you need to use given the farm load.

    General
    How can I pay for the service?

    We offer a variety of payment options that include debit/credit card, wire transfers, PayPal and some other e-wallets. We encourage you to check out this document detailing how to buy credits on GarageFarm https://app.garagefarm.net/payments.pdf.

    Pricing & billing
    How can I test the service?

    Every new user gets trial credits when registering an account on GarageFarm. You can use the trial to test the service without making a commitment. The trial is sufficient to get familiar with the workflow and to test all features thoroughly. 

    You won’t be required to use a credit card or to pay when using a trial account on GarageFarm.

    Testing & estimating
    How can I upload my project to the farm?

    Once you have an account on GarageFarm, you’ll need to download and install our software that includes a desktop client app and a plugin for the DCC(3D app) of your choice. After installing the software and a quick setup, you will be able to upload your project to our farm right from your DCC’s interface.

    Uploading & downloading
    How to get started?

    Once you have an account on GarageFarm, you will need to download the desktop client app called rendreBeamer. It bridges your computer with the cloud. In renderBeamer, you can select a DCC (3D app) you want to integrate with. The integration is quick and simple and requires installing a plugin for your DCC. 

    The next step is to send a project to the farm from the interface of your DCC using the renderBeamer plugin. The full workflow is described step by step in our starter guide https://garagefarm.net/software-guides/general-guide.

    Getting started
    I got charged for frames that were broken or rendered too long. Can I get a refund?

    Don’t worry. Please contact us and we will investigate the issue and will help you find the cause.

    If the cause of the incorrect frames was our system failure, we will offer you a refund or some other form of compensation.

    Please note that we can’t guarantee a full refund in cases where no tests were performed or the instructions provided in the system or documentation weren’t followed or were neglected. You can read about the Return Policy in our Terms of Service.

    Pricing & billing
    I have a new scene that uses assets from the same project already uploaded to the farm. Will I have to upload the entire project with all the assets again?

    No! Our software will checksum the files that are already present on your GarageFarm account and upload only the new scene, new assets, or the assets that have been modified.

    Uploading & downloading
    If the calculator says my project would take 10h to render, is it the actual render time?

    The calculator shows the farm render time in a best-case scenario where your job gets a maximum number of available nodes, however, in practice that number may vary. In addition, the calculator only shows the time of the nodes when they are rendering. It doesn't include the waiting time in the queue or the time a scene would need to open/load on the render node.

    Testing & estimating
    Is the farm secure? Can I render a confidential project on GarageFarm?

    When uploading scenes to GarageFarm, all transfers are encrypted. Projects stored on GarageFarm are secured on internal servers safe from any external access. We will always ask for your permission in case we want to use your project files to provide better customer support and a better user experience. We will never share your files with anyone outside of GarageFarm without your written consent.

    Following controls are in place to prevent unauthorized physical access, damage and/or interference to the data center building and office: Security guards, secure gate and doors to the servers area and server room. Secure gates and doors, barbed wire fence, security officers, security agency monitoring, security cameras, individually issued security cards for accessing separate areas of the building. To ensure physical security and restrict access and protect equipment we have security guards, access cards, reception, ID cards.

    By system design, GarageFarm users are not allowed to access any other data than their own. No client is allowed to access data directly. Each client is allowed to access only his data. Data access is highly secured against unauthorized access.

    Our data centre operator provides secure internet connectivity. They do not have access to our local network and data contained there and the data transfer is securely encrypted.

    We conduct penetration testing and vulnerability scanning at least once a year. We outsource the testing to our data centre operator's IT department. We evaluate our network and infrastructure security by routine checks. We also perform critical vulnerability software security updates - infrastructure systems and networking gear. 

    We perform regular sandbox tests of our own and acquired software against a set of rules. Additionally, we perform antivirus and malware checks. Security on developers' workstations is monitored with special care. We continuously and actively monitor network, firewall, and system device logs and employ all the newest security patches and updates company-wide. Our development team is regularly trained in the scope of software cybersecurity.

    General
    Is there a trial available?

    Every account comes with $25 trial credits to allow you to test the service without commitment. You can use all the farm features just like on a full account with two limitations - 10 render nodes (machines) and 30 jobs. It means that you can render a project that costs no more than the amount of the trial credits and the number of jobs doesn’t exceed 30. While on trial you won’t be able to utilize the full rendering speed. However, as soon as you make your first credit purchase the node and job limitation will be lifted.

    Getting started
    What does GarageFarm do?

    GarageFarm has been helping 3D artists meet deadlines and scale their businesses since 2010. It seamlessly connects with your 3D software and fully automates the process of rendering. You can send your scene right from the interface of your application without any complex and time-consuming setups. GarageFarm combines the best of both worlds - advanced technology and the human factor. When rendering with us you're never in the dark, left with no help and a looming deadline. 

    Don't take our word for it. See how our customers use GarageFarm and what they say about us https://garagefarm.net/case-studies.

    General
    What files should I upload?

    To ensure correct results we’ll need all the files used in the scene: textures, proxies, xrefs, lights, cache etc. However, you don’t need to worry about it because our plugin will analyze the project and will collect all the files connected with the scene and upload them to the farm automatically.

    Uploading & downloading
    What should I do when a scene fails to render?

    We have a team of experts that are online and at your disposal at any time of the day 7 days a week. All you need to do is reach out through our live chat and ask about the job that failed. We will troubleshoot it for you and assist you through the process.

    General
    What will happen when my render job is more expensive than the credits available in my account?

    As soon as your account goes below 0, the render job will get paused (not killed!) and the currently rendering frame(s) will continue rendering until finished. This means your account will go to a negative balance. To prevent this from happening it is crucial to run test jobs before deciding to render full range or full-resolution renders in order to estimate job cost and plan accordingly.

    The negative balance in the account is the responsibility of the user and must be paid to enable back full system functionality.

    Additionally, if you are a new user and haven't made any payment yet, when your balance reaches -$50, the ongoing jobs will be killed to avoid accruing further costs.

    Pricing & billing
    What’s included in the rendering time and in the price? How am I charged? How is my render job billed?

    We only charge for rendering time, in other words, the time nodes (farm computers) are working and actively processing a job. To break it down further, rendering time includes scene/asset loading, pre-processing, rendering, and output saving. All these processes influence the total time it takes to render a project and effectively that’s what is included in the final cost.

    We don’t charge for jobs while they’re waiting in the queue, when they’re acquiring nodes, or when software is being installed on the node prior to starting a 3D app. The billing starts as soon as a job is assigned a node and the node starts rendering. We charge by the second and the pricing is all-inclusive - it encompasses electricity cost, license cost, and service cost. 

    See our Pricing page to learn more.

    Pricing & billing
    What’s your storage policy? How long will you keep my files?

    We allow our users to store project data (project files and any files saved in an account) on our servers for a total of 28 days after a completed render job or project. We guarantee to safely store project data as they are within the initial 7 days. After that, we will relocate the data to archive storage for the remaining period. The archive storage isn’t guaranteed against data loss. We will completely and securely delete the project files stored in your account 28 days after the last completed render job in the given project.

    General
    When should I pay?

    Initially, you receive $25 credits that you can use to run some test jobs and get familiar with our service. Once you use them up, you’ll need to buy credits to continue rendering. You should give our discounts offer a closer look.

    Pricing & billing
    Where are you based?

    We are a UK based business, our data centre is in Poland, and the employees are working remotely from various locations in Europe, Asia, and Australia.

    General
    Why is running test jobs important?

    Network rendering across multiple machines is very different from rendering locally on a single machine, especially when system environments aren’t the same as is often the case with cloud rendering. Tests help you determine whether your scene renders fine and produces the same results as on your local machine. On top of that, you avoid the situation where you pay for results that aren’t what you had in mind.

    We always urge users to run tests first no matter how optimized a scene might be or how confident you are that the scene will render without any issues. Better be safe than sorry. In addition, tests cost very little and if the results are correct, the frames rendered in a test won’t be re-rendered and you won’t be charged for them when rendering full range.

    Testing & estimating
    Thank you! Your submission has been received!
    Oops! Something went wrong while submitting the form.
    Blue grid lines forming a partial semicircle pattern on a transparent background.Blue circle with a white question mark in the center, symbolizing FAQs.