
Explore our newest YouTube guide and master the basics with ease
Need Help?
How to use and optimize Frame Per Execution (FPE)
Definition of FPE
FPE or Frames Per Execution is a setting that is available when rendering animations. By default, the value for FPE is set to 1 for projects rendered on CPU. This means that each frame will be rendered as a new execution (a separate task), in other words, the scene will be loaded on each node every time a new frame starts. In the case of projects rendered on GPU, the value for FPE is set to 5 by default. So it means that 5 frames will be rendered in a row on one node.
The FPE (Frames Per Execution) setting allows you to render several frames (the value you put in) in a row without the need to reload the scene on a render node, and potentially may improve rendering performance/efficiency. If your scene has a long loading time but a short rendering time, you can set FPE to a higher value (for example 4). If the loading time is short but the rendering time is long, leave the value as default or set it to 1.
Where you can set FPE (on GarageFarm)
There are two places where you can set the value for Frame Per Execution.
The first place you can find it is the web dashboard (Web Manager). You’ll see it in the submit window that appears in the last step of adding a scene to the farm queue. In this window, you will find a number of settings - some may differ depending on the 3D app used but others are common including the Frame Per Execution.
More information about submitting a job and all the relevant settings can be found in our step by step guides here: https://garagefarm.net/software-guides.

The second place where you can adjust Frame Per Execution is the renderBeamer app.
First, you’ll need to activate the auto submit option in renderBeamer’s settings (cogwheel icon). Then, by selecting edit, you’ll be able to access auto submit advanced settings.
This is a panel where you can create and manage auto submit templates for any supported 3D application. Among several settings available you can find a field called FPE - here you can set a custom Frame Per Execution value. Please remember that this value will be applied to all the scenes you submit when the auto submit option is enabled.
Note that auto submit is an advanced setting that allows you to simplify and speed up the workflow by reducing the number of steps you need to take to submit a job to rendering. Therefore, we recommend using auto submit only after you have familiarized yourself with the standard workflow. Check out this video to learn how it works: Auto submit render jobs to a cloud render farm.

A detailed explanation and the mechanism of all the settings in the renderBeamer app can be found here: (guide will be available soon).
When to use FPE
Below you can find some examples of the various uses of the Frame Per Executions setting. Each of the examples provided contains a different scenario that has been described in detail along with the calculation of the total render time, individual render times, and a comparison table with cost and time estimates.
Example #1 - 100 frame Animation
Project’s details:
- average scene loading/processing time: 5 minutes
- average rendering time of one frame: 2 minutes
- number of frames to render in total: 100 frames

Total render time of 1 frame on 1 node: 7 minutes (5m - loading time, 2m - rendering time).
Total render time of 100 frames: 700 minutes (7m x 100 frames).
The first scenario in this example is where FPE is set to 1. In this case, to render one frame, a node will ALWAYS need to load a scene before starting the rendering process. This means that if the preprocessing/loading time is 5 minutes and the actual rendering time is 2 minutes, then the whole process takes 7 minutes. The same applies to all the frames from the given animation - each frame will be rendered separately on a separate node.
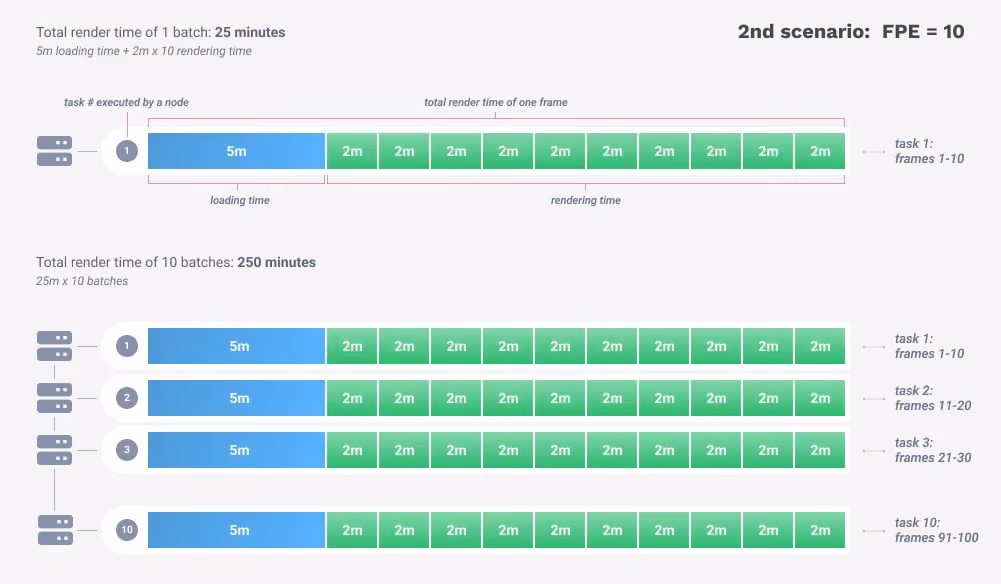
Total render time of 1 batch on 1 node: 25 minutes (5m - loading/preprocessing time, 10 x 2m = 20m - rendering time).
Total render time of 10 batches on 10 nodes: 250 minutes (25m x 10 batches)
If the FPE is set to 10, it means that 10 frames will be rendered in a row in a single execution on each node. So, in this example, you can see that the scene will load on a node only once (5 minutes) and 10 frames will be rendered on a single load (each frame will render 2 minutes, so it will take 20 minutes for 10 frames). The total time to render one batch of 10 frames will take 25 minutes on one node.
The image above shows how the frames will be split into batches and rendered on each node as individual tasks. Because this is an animation of 100 frames and FPE is set to 10, a project with a frame range of 1-100 will be rendered in 10 separate batches (each batch contains 10 frames).
Costs and render time comparison for FPE = 1 & FPE = 10
In the table, you will find detailed calculations based on the assumptions we made about the project (preprocessing/loading time + rendering time) and using both the default and custom FPE setting.
The first assumption shows the cost and the render times with FPE = 1. The total render time for 100 frames, in this case, will be 700 minutes, because each frame will be rendered as a separate task on a separate node. Setting the FPE = 10 allowed us to optimize the total render time of the scene down to 250 minutes because each batch of 10 frames loaded the scene only once on a given node.
As the cost is calculated on the basis of the priority used and the whole rendering process (preprocessing/loading time + rendering time), in this case, when the loading time is much longer than the rendering time, the difference in the final cost is significant.
Example #2 - 250 frames Animation
Project’s details:
- average scene loading/processing time: 10 minutes
- average rendering time of one frame: 40 minutes
- number of frames to render in total: 250 frames
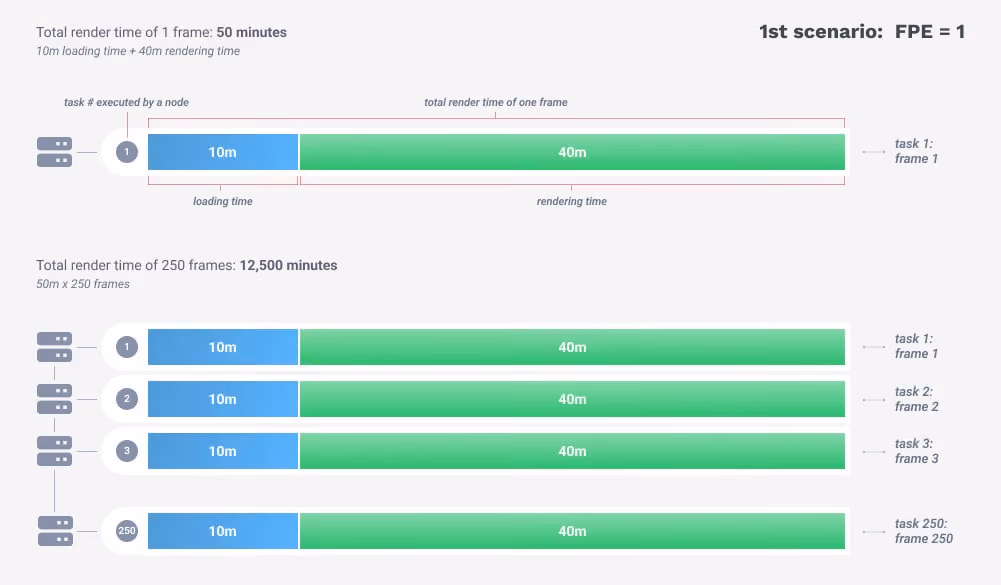
Total render time of 1 frame on 1 node: 50 minutes (10m - loading time, 40m - rendering time).
Total render time of 250 frames: 12,500 minutes (50m x 2500 frames).

Total render time of 1 batch on 1 node: 210 minutes (10m - loading/preprocessing time, 5 x 40m = 200m - rendering time).
Total render time of 50 batches on 50 nodes: 10,500 minutes (210m x 50 batches)
Cost and render times comparison for FPE = 1 & FPE = 5
In the table, you will find detailed calculations based on the assumptions we made about the project (preprocessing/loading time + rendering time) and using both the default and custom FPE setting.
The first assumption shows the cost and the render times with FPE = 1. The total render time for 250 frames, in this case, will be 12,500 minutes, because each frame will be rendered as a separate task on a separate node. Setting the FPE = 5 allowed us to optimize the total render time of the scene down to 10,500 minutes because each batch of 5 frames loaded the scene only once on a given node.
As the cost is calculated on the basis of the priority used and the whole rendering process (preprocessing/loading time + rendering time), in this case, when the loading time is much longer than the rendering time, the difference in the final cost is significant.
Please note that the examples provided have been prepared to explain the mechanics of the FPE feature. Those values aren’t constant and may vary from project to project. Each scene has its own properties and settings that affect the processing and loading time, and for that matter, the estimates should be calculated for each case individually.
Advantages and disadvantages of using FPE
Calculate and estimate cost by using FPE
We have designed our cost calculator so that you can simulate various scenarios of rendering a scene with different FPE and loading time settings.
Below you will find information on where you can locate these options in our calculator.

Link to our calculator: https://garagefarm.net/cost-calculator
The calculator compares the data about your computer to the nodes on GarageFarm. Based on the results, it calculates the time a project would take to render and how much it would cost.</p><p>Please note that these calculations are just based on the data you provided so the results are only estimates. For more precise calculations, we encourage you to perform the test directly on our farm.
Register Now and Get $50 FREE Credits!

Frequently asked questions