Log in to Web Manager (web dashboard) at https://app.garagefarm.net and download our renderBeamer app for you operating system.

Install the renderBeamer app and start it. Once renderBeamer is done with the installation process, you need to choose the default download directory. This path will be used as the main output place for all your renders. Next, just log in using the account ID you received or your account email. Please keep in mind that the app should always be running in the background whenever uploading a project or downloading rendered frames.

Once renderBeamer is installed and you’re logged in, you’ll see the Plugins panel. Plugins installation panel should automatically open after the first renderBeamer startup. You can also open it anytime you need to install additional plugins for your 3D apps.
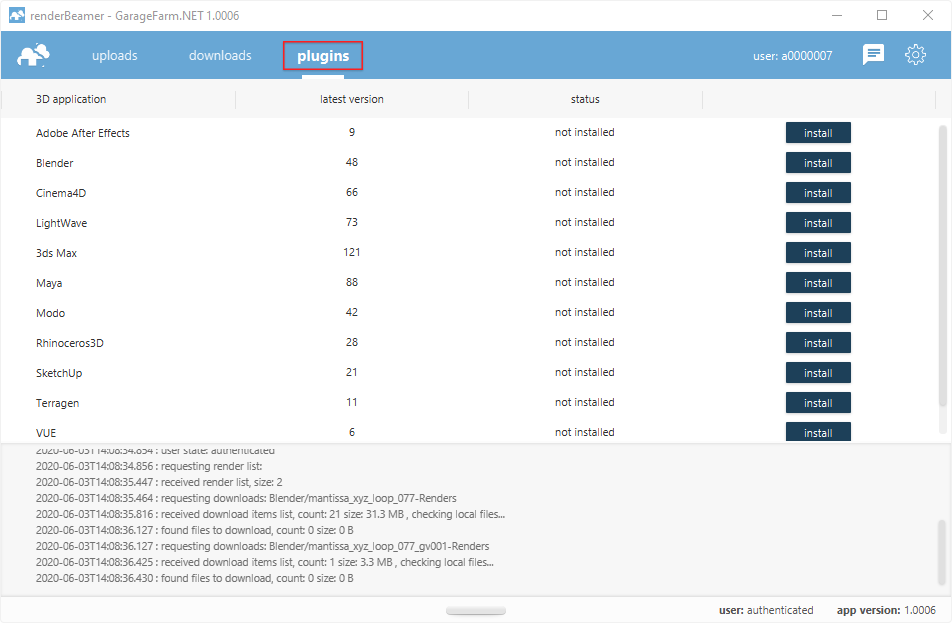
Here in the plugins panel, you can install plugins that allow you to work with our farm. Once you installed the plugin for your 3D app, you can proceed to the next step.
At first, you’ll need to prepare your SketchUp project for .vrscene export. Our SketchUp plugin works as an automated .vrscene exporter, so we require everything to have been prepared before using it. Preparation should be done in accordance with the intended renderer mode. Preparation process should be done directly in SketchUp settings, and V-Ray render options. This step is crucial because of the .vrscene export procedure.
You can use our plugin with 3 modes - page render (with multi page option), page animation , and frames render.

This mode is designed to render single or multiple SketchUp pages as still shots. With page render you can choose to render still shots from your current project pages. Below you can find directions on how to prepare your scene for the .vrscene export procedure used by our plugin.
Head to V-Ray settings and make sure you do the following:
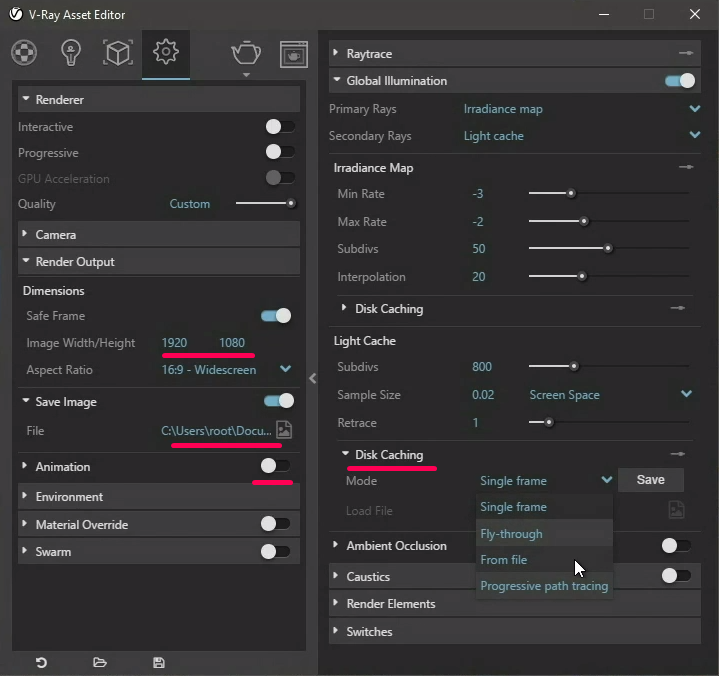
Now your scene should be correctly set up and ready to go. Please make sure you save your scene before going to the next step. Next, just run renderBeamer from the extensions menu.
Page render mode should be used only to render Sketchup pages as still shots.
We will divide your still image into several parts called strips and will distribute them across multiple nodes. You can select the number of strips you want to render with (1 strip = 1 node, usually the higher number means the image will complete sooner, with some exceptions). An important thing to note is that the image resolution height must be divisible by the number of strips you choose. For example, 1920x1080 can be divided by 10 and thus the image will be split into 10 strips.
Our plugin reads your GI settings and just forwards them to the UI. We strongly suggest to always leave the “bake” switch (next to GI engines) on. Otherwise, you can expect visible connection lines between rendered strips, as every render node will calculate its “own” GI files. Using the bake switch with the “off” setting is only recommended when rendering scenes with setups like BR, BR+BR or with pre-cached GI maps.
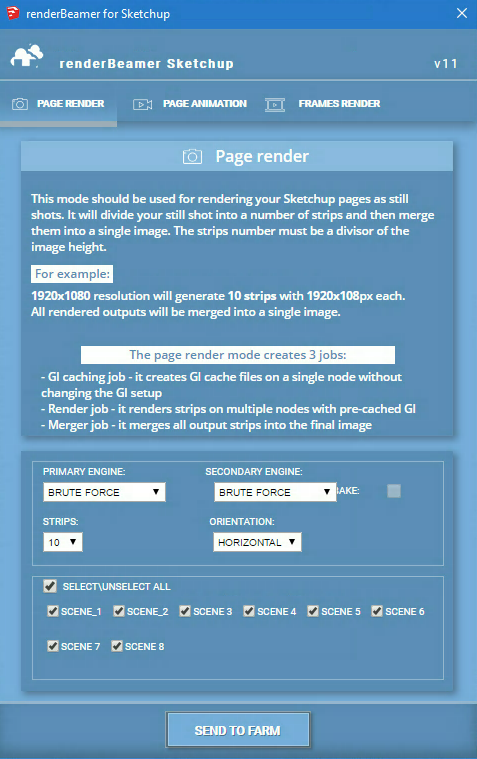
To continue, just select the number of strips, choose the strips orientation (horizontal or vertical), double check the bake switch box (this means we will cache the GI), and select the pages you want to render. Now, your project is fully set up and ready to be sent to the farm.
If you have multiple pages, and want to render them as still images, first, you need to make sure you have your SketchUp Animation settings properly configured. Go to View > Animation > Settings and enable Scene Transitions and input 1 second in the time field just like in the image below.
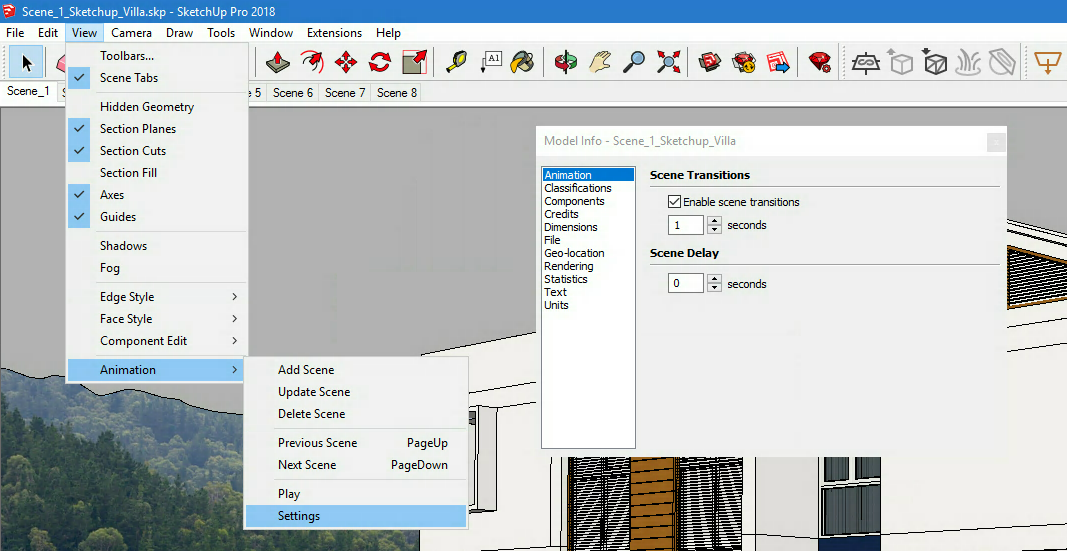
Now head to V-Ray settings and make sure you do the following:
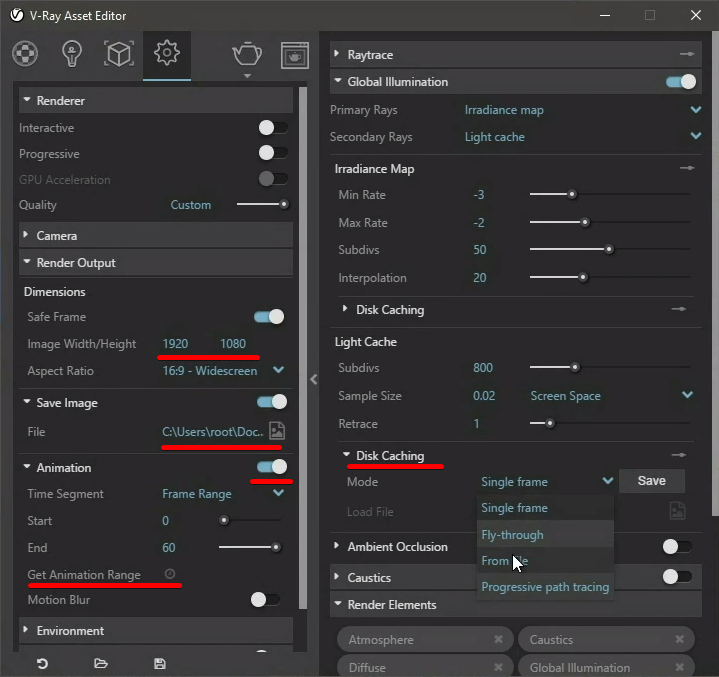
Now your scene should be correctly set up and ready to go. Next, just run renderBeamer from the extensions menu. Plugin usage is exactly the same as for single page rendering.
This mode should be used for fully animated camera shots. First, you need to make sure you have your SketchUp Animation settings properly configured. Go to View > Animation > Settings, enable Scene Transitions and input 1 second in the time field. Sketchup operates in seconds, not frames. By default, V-Ray 3.x sets 30 frames per second. That means if you set the Scene Transition time to 1 second - you will receive 30 frames rendered between Page 1 -> Page 2. If you set 2 seconds for scene transition, you will get 60 frames rendered between your SketchUp pages.
Now head to V-Ray settings and make sure you do the following:
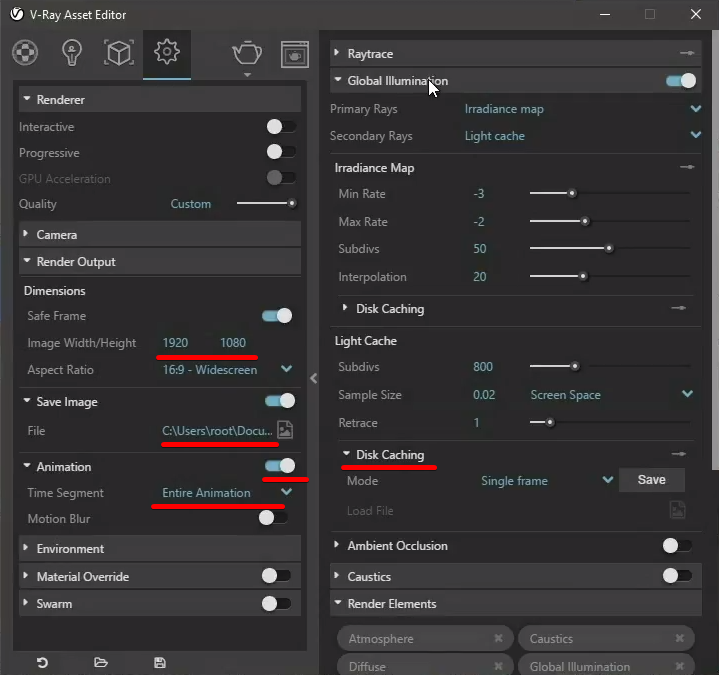
Now your scene should be prepared correctly and ready to go. Please make sure you save your scene before going to the next step. Next, just run renderBeamer from the extensions menu.
Another Important thing to note is that by default SketchUp renders 30 frames per page. You can adjust this value in SketchUp’s settings View > Animation > Settings using the time field. Next, you need to select your page range (the starting Page and the ending Page), set baking step (which defines the step for caching GI, i.e. 10 = every 10th frame), and check the store direct light checkbox. Now, your project is fully set up and ready to send to the farm.
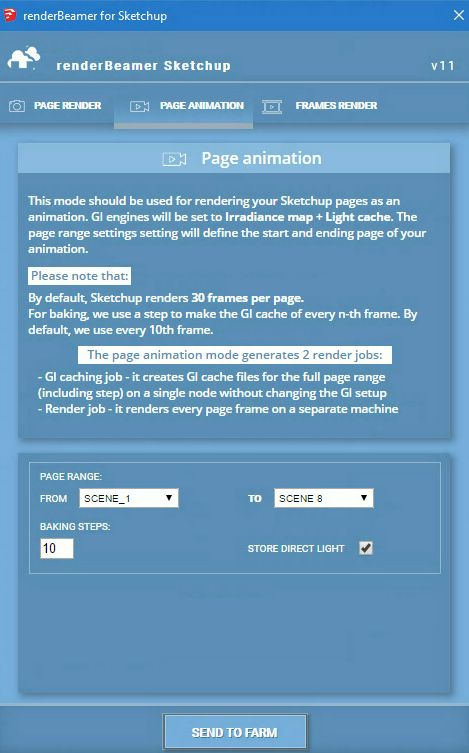
Irradiance Map (with incremental add to current map option for GI caching, and from file for rendering) + Light Cache (in flythrough mode for GI caching). If you are using any other GI setup, please use Frames render mode instead.
Frames animation mode is designed for more advanced users who are familiar with operating on frames - not SketchUp pages. If you're not sure about the workflow with frames & SketchUp please use Page render or Page animation modes instead.
With frames animation you can choose which exact frames you want to render, or which frame needs to be rendered as still shots. By default, SketchUp renders scenes with 30 frames per second (FPS). That means if your project starts from page 1 and ends on page 8 - you will have 210 frames to render (starting from frame 0). Frames mode allows you to operate in two combined modes - range rendering and still image rendering.
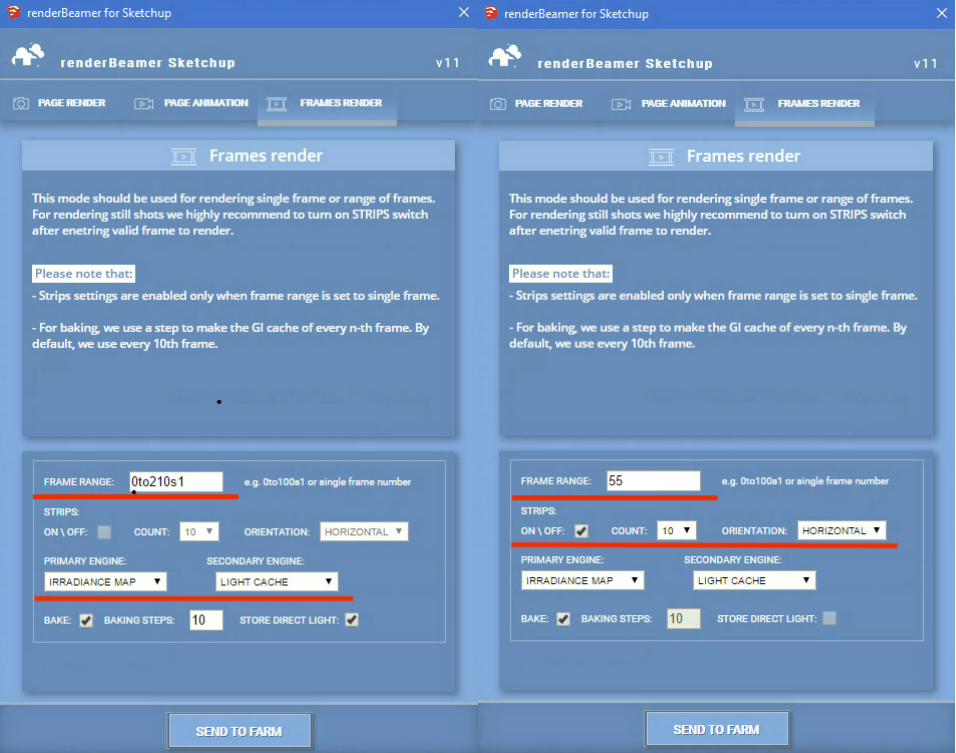
To use Frames render with range rendering just put desired render range in “Frame range” field. You can also set a render step (for testing purposes) by changing the “s” value at the end of frame range. For example, setting render range to 0to210s10 will render every 10th frame. Please keep in mind that our plugin will not allow you to render a range greater than what is set in the project. As for GI settings, they are forwarded from your V-Ray render setup and reflected on the plugin UI. By default, the bake switch is on so that your scene can be GI cached before rendering.
To use Frames render mode with distributed still shot rendering you need to put a single frame value in “Frame range” field. Still shot mode (similar to “Page render”) works only with single frames rendering. That means you can select frames in your project render range and just forward it to the farm as one still shot. By default, the strips on/off switch will be always ON when using single frame render range. Next, you can select how many strips you want to use. More strips usually means faster rendering.
Please keep in mind that your resolution needs to be divisible by an even number!
Good example - 3840x2160 - you can easily use 10, 20, or 30 strips with this resolution
Bad example - 3843x2169 - it’s much harder to divide this resolution and so only a few strips will be available
After you click SEND TO FARM please don’t perform any operations in SketchUp while the plugin is exporting the scene. It may seem like the program is hanging but, in fact, the V-Ray exporter is working in the background. It may take a minute or longer depending on the size and complexity of your scene. With bigger projects (like 500MB+ and lots of geometry, additional assets and so on) .vrscene export can take even 10 minutes or longer. After that, you can continue using SketchUp for your work or close it since we won’t be needing it anymore.
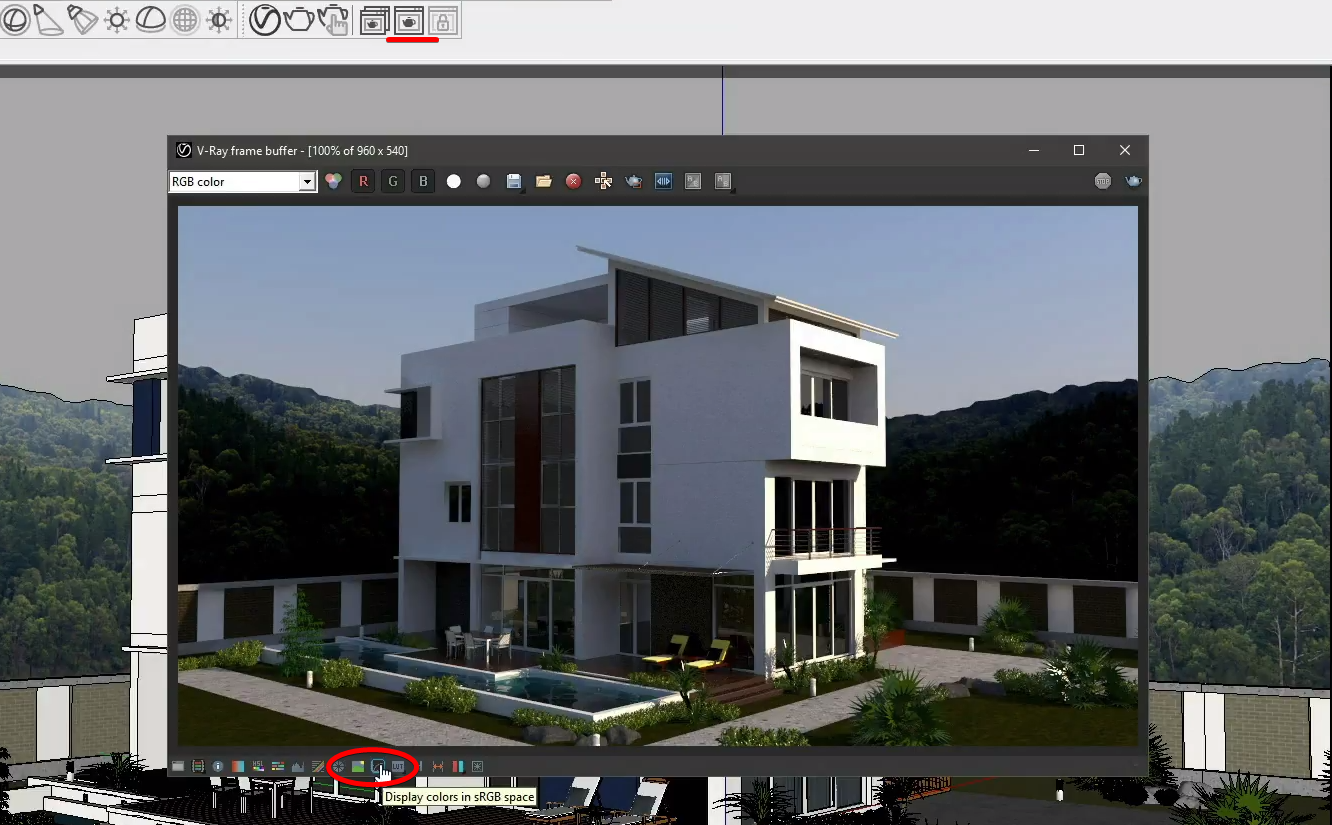
Our plugin will remind you about checking the sRGB output settings you have used in your scene. It’s crucial to render the scene with the same setup as on your local machine. Open the V-Ray frame buffer and check your color space settings at the bottom of the window. By default, the sRGB switch is always on. You will also be able to set sRGB ON or OFF later, after uploading the scene
You can read more about the importance of testing and ways to estimate the render cost and time in our FAQ.
Once our plugin completes the scene export, your project will be redirected to renderBeamer to be uploaded. renderBeamer is a standalone uploader/downloader application that works in conjunction with our plugins. Simply put, it takes care of the file transfers.
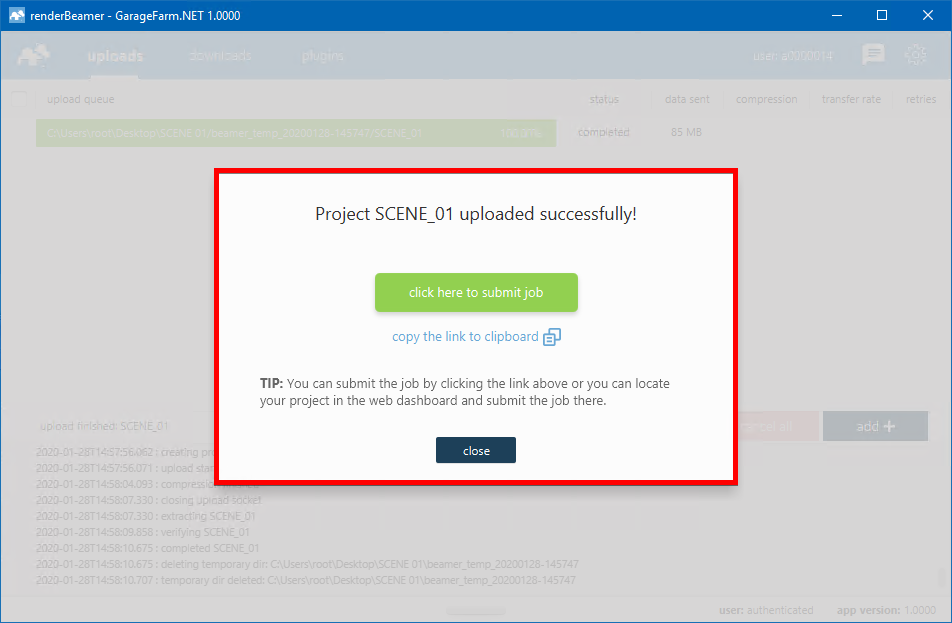
After the scene has been fully uploaded, the app will show you a window with a direct link to your scene on Web Manager (web dashboard). To continue just use click here to submit job button. If for some reason you closed the window with the link or it didn’t work, don’t worry, you can locate your project in the web dashboard and submit your scene by clicking on the scene file later (more on that in the next step). You can also copy link to clipboard and manually paste it into your web browser.
Now that your project is uploaded you will need to follow the final step - creating and submitting a job to render farm. Web Manager is where all your projects and render jobs reside.
If you followed the link generated earlier by renderBeamer, you will now see the job submission window with several fields and settings. If you didn’t follow the link or it didn’t work, you can do it manually by locating your project in the Projects panel, finding the scene file within the project folder (in your folder structure look for the folder called “data”, i.e. Project_name/data/SceneName.max), and clicking on it to open the job window.
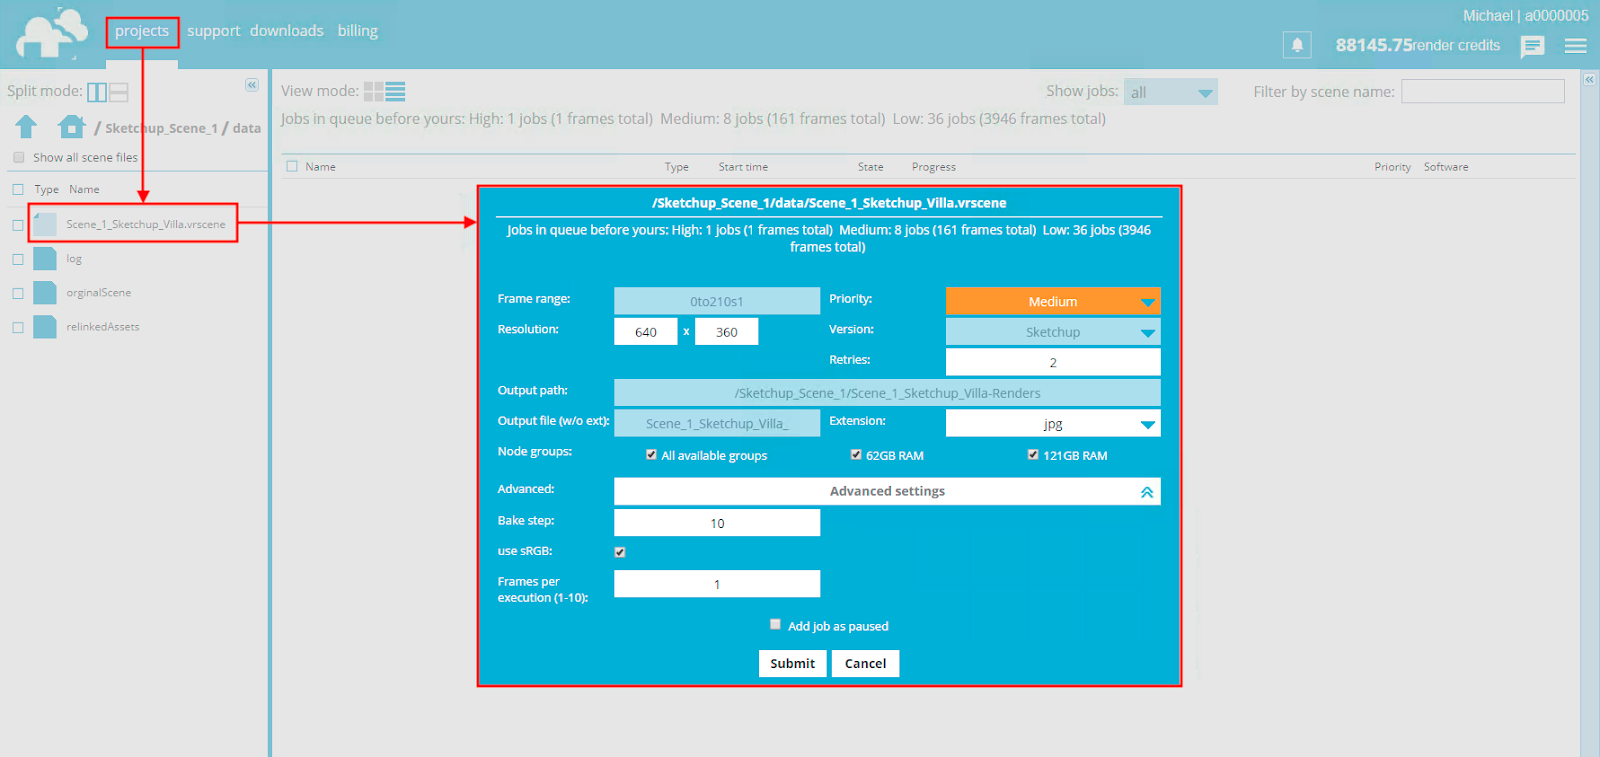
You can choose between three priorities when submitting a job: High, Medium, and Low (more info on Pricing page and FAQ page). You can also view the current queue on the farm, which should help you inform your decision about selecting the priority.
After giving your render settings a final check and choosing your preferred priority hit Submit to add your job to the render queue. If you’re a first time user, you will have received $25 worth of credit to test out our service. The credits should be enough to run a few test jobs and get you familiar with the service.

When the job has started rendering, you can check the real-time progress of currently processed frames. To do that, just select the render job from the main project list and then click the arrow on the top right side to open the progress panel.
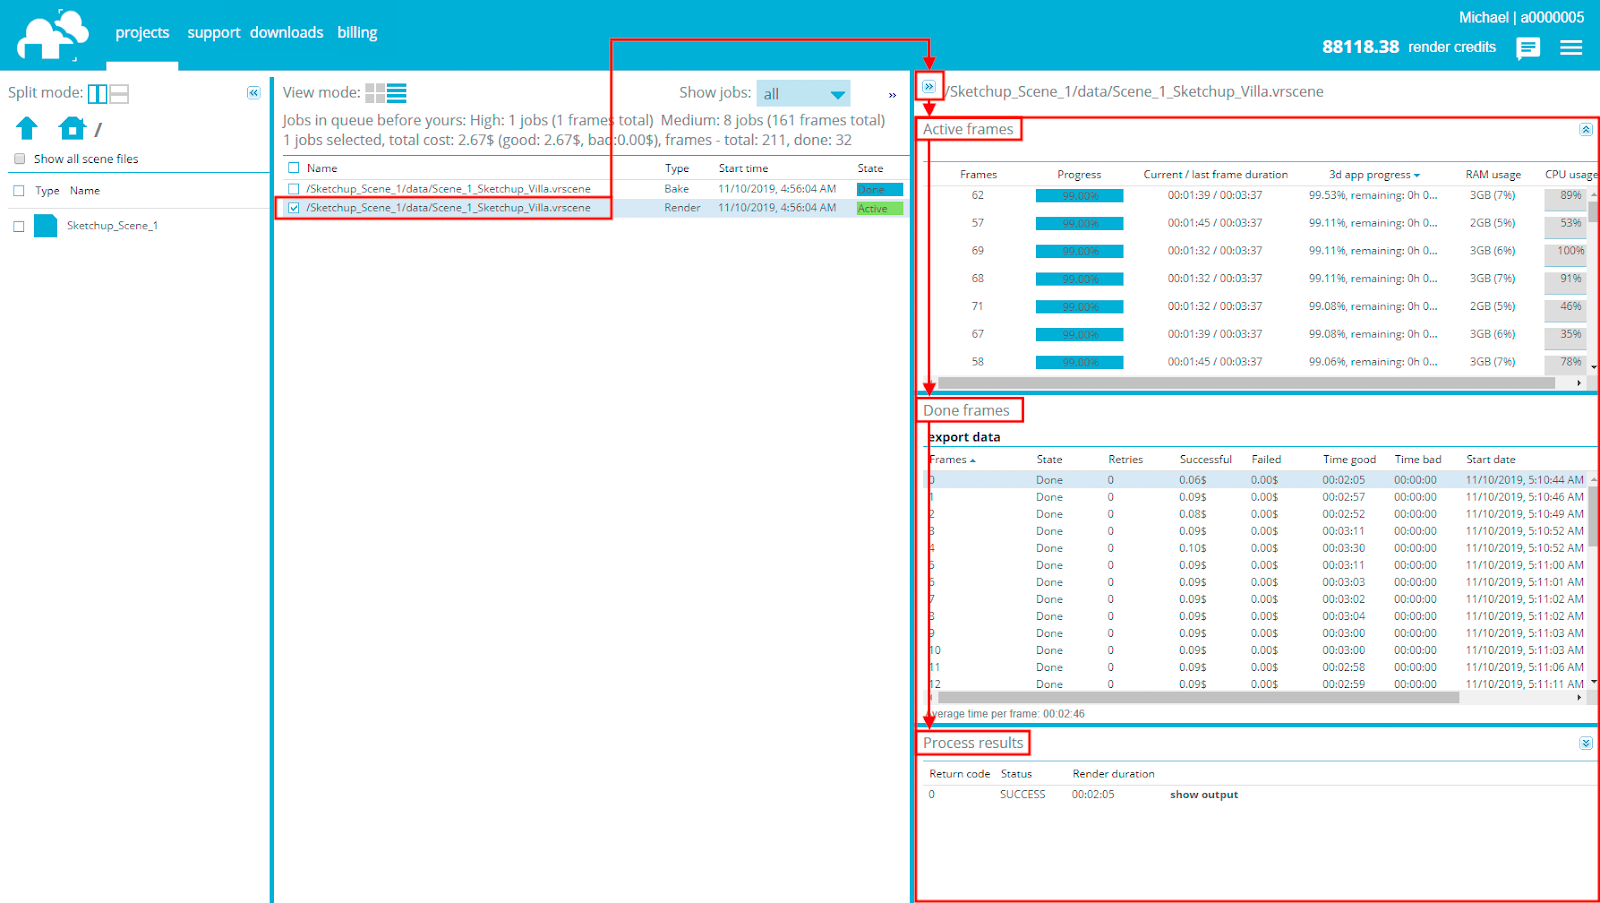
The progress panel will show its content only when any of the jobs is selected. The panel is divided into 3 sections.
Active frames - it shows currently rendering frames. When a frame finishes, it is moved to the second section Done frames. If you select any frame in the Done frames list, you can then access the render output process log in the bottom section called Process results.

Each frame that has completed rendering is downloaded automatically to your local drive to a directory you selected in the renderBeamer application. If you’re not sure where your download folder is located, you can double check it or change it in renderBeamer’s settings (click on the cogwheel). Also, make sure you have auto download turned on to get the frames downloaded as soon as they are available. If this box is unchecked, you will have to click on each job in Beamer's "downloads" tab, and manually download the frames.
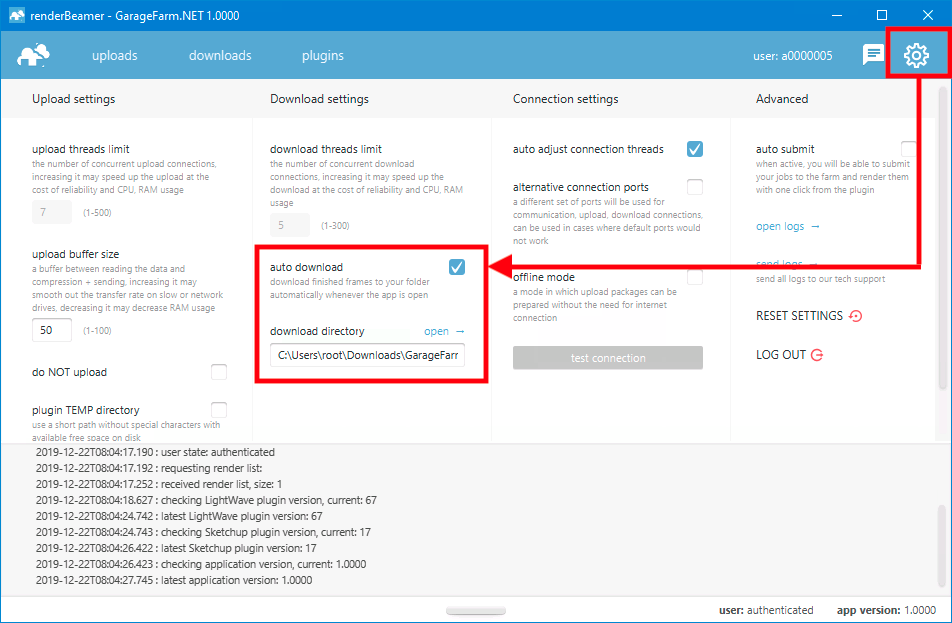
If you prefer more control over what to download and when, you can also download your frames manually. To do that, just turn off auto download switch in renderBeamer settings and go to the “downloads” tab. Next, select the desired render output using a checkbox, and click the download button.
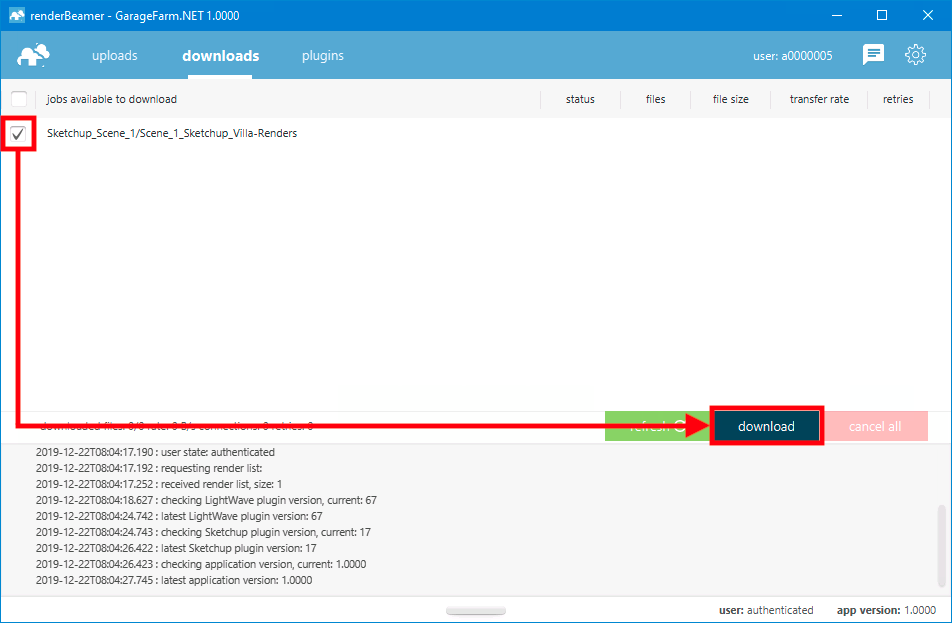
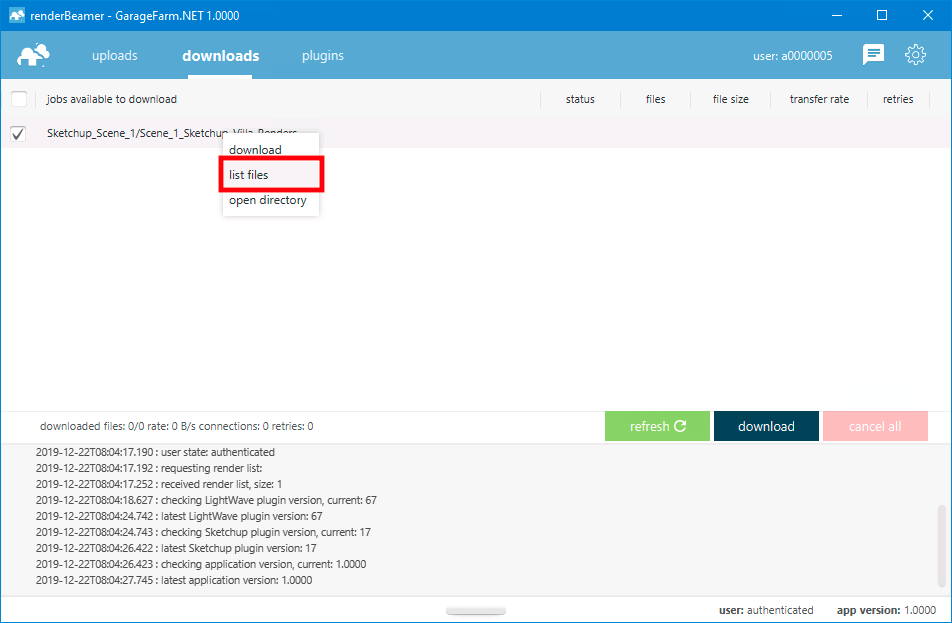
This kind of workflow will download all rendered frames for the selected job or jobs. However, renderBeamer also gives you an option to download individual frames. To do that, you need to use the list files function under RMB.
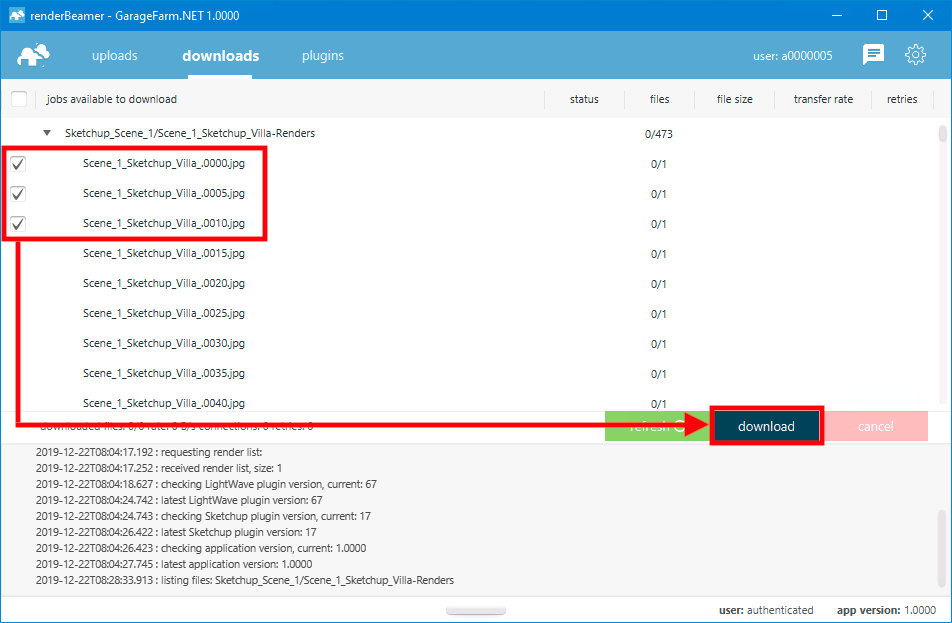
Once files for the selected job are listed, just roll down the list and select the files you’d like to download using checkboxes. Next, use the same download button.
Once your frames are downloaded, you can use open directory option under RMB to open the folder where frames are saved.
You’ll need to charge your account to continue using the service when you use up all your trial credits. Please note that when your balance goes below $0, you won’t be able to download rendered frames or start new render jobs. You can make payments in the Billing panel in Web Manager. We accept debit cards, credit cards, and wire transfer payments. Also, you can purchase credits via Revolut, Zen, P24.
If your rendering needs are high or you plan to render regularly, please make sure to check out our volume discounts.

You can talk to the GarageFarm.NET’s tech team any time of the day, any day of the week. We’re here to help you get started, answer your questions, and assist you in any way. Don’t hesitate to give us a shout.
You can contact us through our live chat accessible in the web dashboard or our desktop app when you log in to your account or message us here through the guest chat.
We also recommend checking out our FAQ page which answers most of the questions new users have.