Log in to Web Manager (web dashboard) at https://app.garagefarm.net and download our renderBeamer app for your operating system.
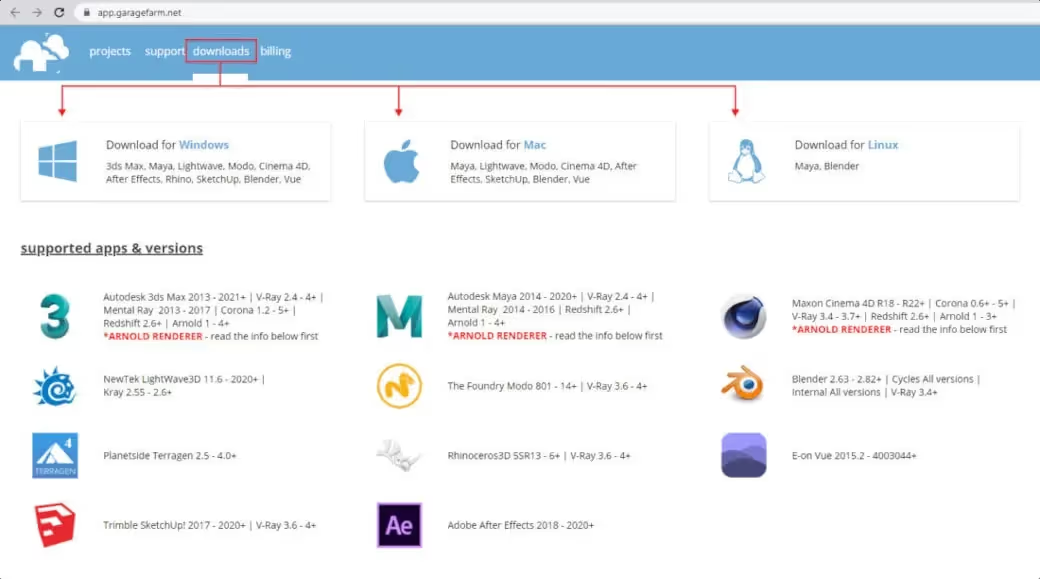
Install the renderBeamer app and start it. Once renderBeamer is done with the installation process, you need to choose the default download directory. This path will be used as the main output place for all your renders. Next, just log in using the account ID you received or your account email. Please keep in mind that the app should always be running in the background whenever uploading a project or downloading rendered frames.

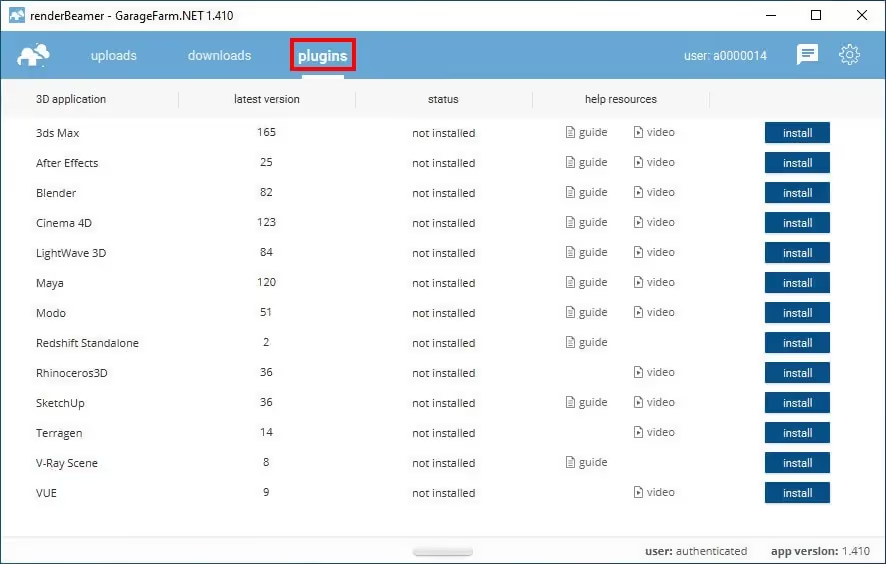
Once renderBeamer is installed and you’re logged in, you’ll see the Plugins panel. Plugins installation panel should automatically open after the first renderBeamer startup. You can also open it anytime you need to install additional plugins for your 3D apps.
Open your scene in 3ds Max and prepare it for rendering on a render farm.
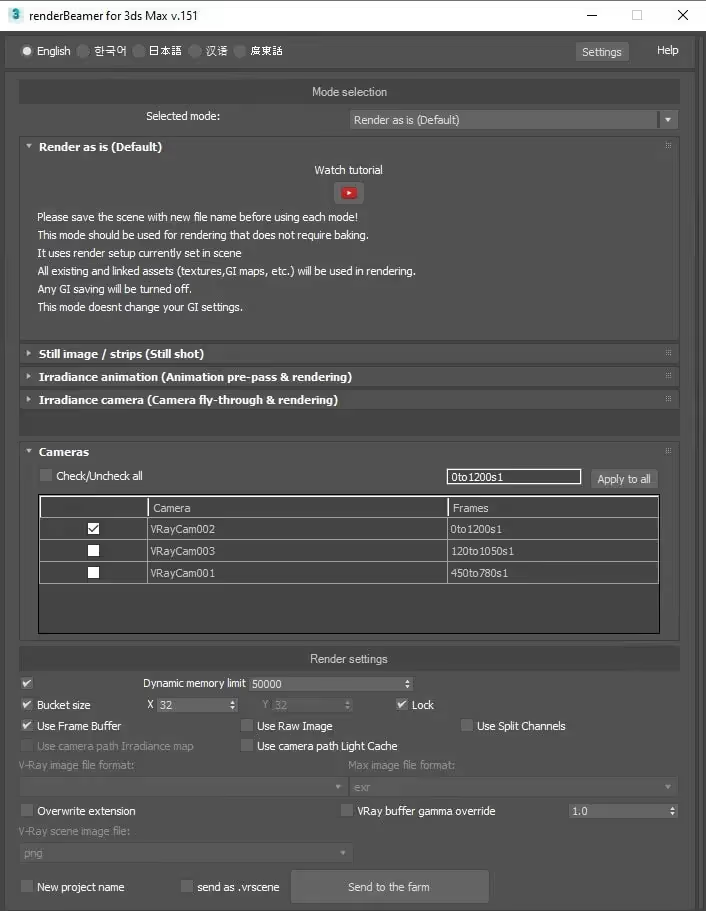
Once your project is prepared, please locate the renderBeamer menu and hit Beam it up to open the plugin window. In the plugin GUI you’ll need to finalize the scene setup using one of the available render modes: Render as is (Default); Still image /strips (Still shot); Irradiance animation (Animation pre-pass & rendering); Irradiance camera (Camera fly-through & rendering). Each render mode is specifically designed for a different kind of scene setup, so please make sure that you select a mode suitable for the type of scene you’re going to render. This is crucial because each mode uses different GI and render settings and so selecting an inadequate mode will result in incorrect rendering.


You can read more about the importance of testing and ways to estimate the render cost and time in our FAQ.
Once you selected the plugin mode, you can now continue the workflow to the second part of the setup window – the camera and frame range setup. When you have multi-camera scenes, you can set multiple frame ranges for each camera all at once. The same kind of workflow goes for Still Image mode. Each camera in the scene will be rendered as a separate render job including a GI caching procedure, scene rendering and merging job (applies to strip mode). If you want to test your scene, just put some render step value in the camera frame ranges. For example, if a scene timeline is 0 to 100 frames, you can test it by putting s10 at the end of time value – 0to100s10, thereby making the job render every 10th frame.Once the test is rendered, you can then resume the job to render full range in your web dashboard without the need to upload the scene again.

Once you set all your cameras and frame ranges, you can proceed to the last part of the plugin settings. This settings group is mostly a reflection of what you see in V-Ray settings plus output formats from the 3ds Max render setup.
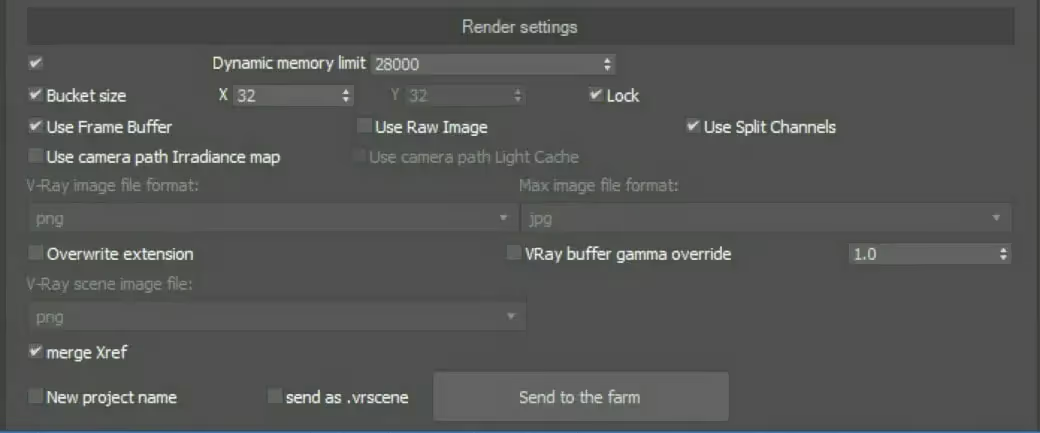
Dynamic memory limit – This option allows you to set RAM utilization border for V-Ray geometry and pre-processing. By default, it’s set to 28GB (28000). We strongly suggest leaving this setting at a default value unless your scene is really big with tons of additional xrefs or V-Ray proxies.
Bucket size –It’s set to 32×32 by default. If you are using 4k+ resolution, you can increase the size of render buckets (to something like 64×64), but please keep in mind that if a scene contains a lot of reflection or refraction materials, and the bucket size is too big, some buckets may “hang” on calculating the most reflective (or transparent) objects. That’s why we strongly suggest leaving the 32×32 setting as buckets, with 32×32 size are the most common for 1080p and similar resolutions.
Use Frame Buffer / Use Raw Image / Use Split Channels – these 3 switches are just on/off settings for 3ds Max + V-Ray outputs. By default, Use Frame Buffer should always be turned on. That’s because when using V-Ray the main output,the image and format are saved from the V-Ray frame buffer and not the 3ds Max main output. You can use Use Raw Image to turn on the multi-layer exr (or .vrimg) saving option.The Use split channels switch works in conjunction with Use frame buffer. It forces V-Ray to save main outputs with its default setting – separated from the main RGB channel and Alpha.
Use camera path Irradiance map/Light Cache – This switch is just a reflection of the GI settings. Our plugin reads those switches from your current render setup, so if you don’t want to change them, just leave this setting as it is.
Below that you can select output formats for the V-Ray output and 3ds Max main output. By default, selection lists are off. That’s because plugin reads those settings and just forwards them with the scene. If you want to change your V-Ray or 3ds Max output format, you need to turn on Overwrite extension switch.
V-Ray buffer gamma override – It’s off by default. This switch should be used ONLY if you need different gamma for V-Ray frame buffer and V-Ray RAW image outputs.
Below all the main output formats configurations you can find the V-Ray scene image file output. This selection list works along with the send .vrscene switch. You won’t be able to select output format from this list until send as .vrscene is on. This selection list is for rendering 3ds Max scenes as .vrscenes. You can do that by turning on the send as .vrscene switch. This option forces V-Ray to export the scene to V-Ray standalone. This can be used in various situations. For instance, when a 3ds Max scene is really big, or when most of the scene is compromised of V-Ray objects, or V-Ray proxies and similar solutions.More importantly, in most cases rendering a .vrscene (V-Ray standalone scene) is significantly faster than rendering a .max file.
merge XRef – This switch works similarly to the 3ds Max “merge object” function. Once it’s on, it will force 3ds Max to merge all external objects into one scene. This switch can be used when your scene contains many external x-refs scenes in different directories and network paths. Also, using .max scenes with merged x-refs makes the rendering on the farm faster and more stable because there’s no need for loading & reloading those assets.
New project name – This option should be used only when you’re working on a new scene (with new assets) from the same project directory. Otherwise, please leave this switch OFF. With this switch inactive, our plugin will not reupload any previously uploaded assets linked to the project.
Once you’re done with the mode selection, camera range settings and render setup, just click the Send to farm button. Our plugin will create a temporary directory next to your .max file and will start preparing your project.It will then copy all connected assets and relink them.
Due to some network drive limitations of Windows and copy/move/rename operations on them, we advise against using network drives. Next, our 3ds Max plugin will check the farm .dll list with what you have locally. If there are any incompatible .dlls (3ds Max plugins) you will see a prompt with Continue and Cancel options. If those missing plugins (.dlls) can be skipped, just continue with the process. If those missing plugins are crucial in your project (and are not installed on the farm), please contact us.
After the complete project preparation process (depending on scene and assets size it can take several minutes) our 3ds Max plugin will redirect all data to the renderBeamer application which will take care of the file compression and upload processes.
There’s one rule you should remember – all outputs, settings, and file formats from 3ds Max Common tab, V-Ray Frame Buffer, and Render Elements settings are inherited by our plugin settings as well as the scene which is uploaded to the farm.
If you want to render the scene the same way as it is set up to render on your computer, just skip the ‘Render settings’ part of the plugin setup, select the render mode, frame range and cameras setup and click the Send to Farm button.
However, if you only want to change the output settings for the purpose of rendering on the farm, you don’t have to modify your scene’s settings every time. You can use our plugin output settings which will overwrite the settings of the scene you are uploading.
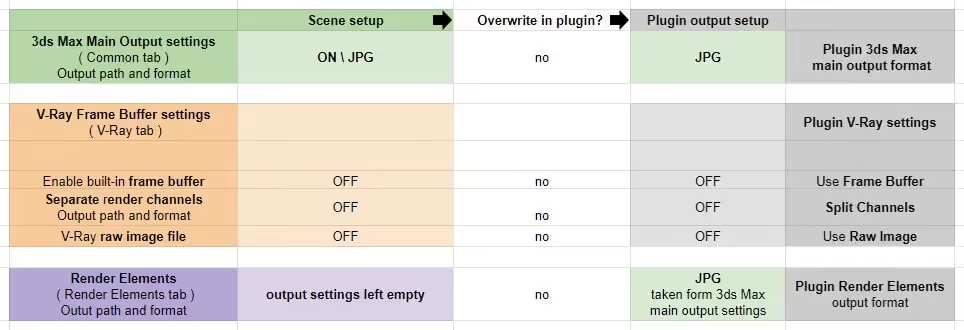
In the diagram below you can see how the scene’s output settings are inherited by our plugin.
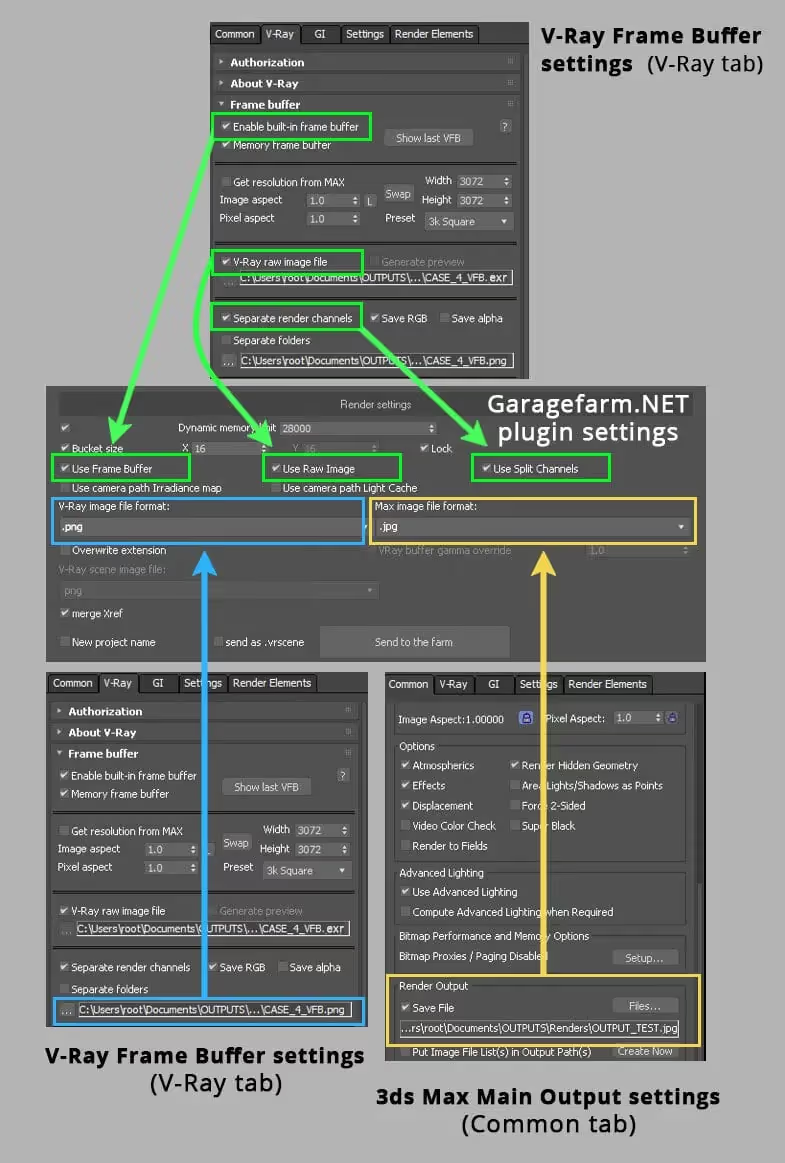
As you can see all output formats and V-Ray frame buffer options are inherited by the plugin settings and can be modified if desired.
Separate render channels is inherited by plugin’s Use Split Channels option
V-Ray raw image file is inherited by plugin’s Use Raw Image option
Enable built-in frame buffer is inherited by plugin’s Use Frame Buffer option
3ds Max main output format (from Common tab) is inherited by plugin’s Max image file format
V-Ray frame buffer output format (from Common tab) is inherited by plugin’s V-Ray image file format
Let’s take a look at several things you should keep in mind.
The behavior of 3ds Max and V-Ray Render Elements (even when you render on your computer):
The behavior of our plugin:
You can read more about various output setup scenarios in a scene and our plugin in the last chapter of this guide: Extra: Scene and plugin output settings (V-Ray)
Our plugin has additional settings that allow you to adjust your rendering workflow and experience.
To check and set your preferred settings for our 3ds Max plugin, you need to click the "Settings" button in the top right.
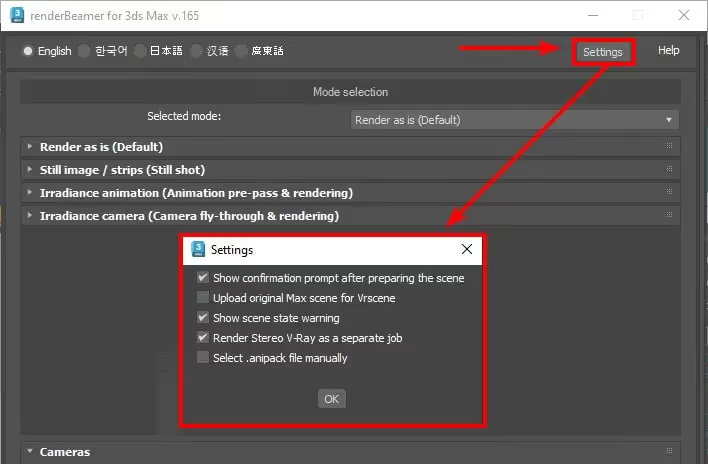
In the settings window, you will find options such as:
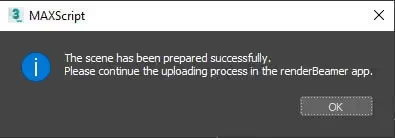
If you want the scene to reload automatically without being prompted everytime, turn off this option in the settings.
Once our plugin completes the scene export, your project will be redirected to renderBeamer to be uploaded. In a nutshell, renderBeamer is a standalone uploader/downloader application that works in conjunction with our plugins. Simply put, it takes care of the file transfers.
After the scene has been fully uploaded, the app will show you a window with a direct link to your scene on Web Manager (web dashboard). To continue, use the click here to submit job button. If for some reason, you closed the window with the link or it didn’t work, don’t worry, you can locate your project in the web dashboard and submit your scene by clicking on the scene file any time (more on that in the next step). You can also copy the link to the clipboard and manually paste it into your web browser.
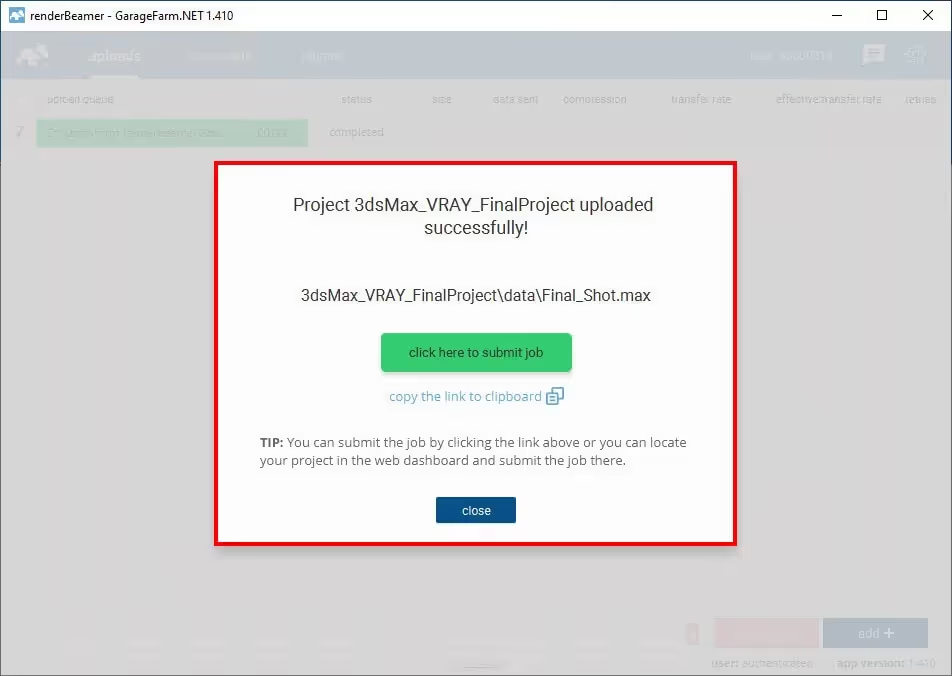
Now that your project is uploaded you will need to follow the final step - creating and submitting a job to render farm. Web Manager is a home to all your projects and render jobs.
If you followed the link generated earlier by renderBeamer, you will now see the job submission window with several fields and settings. If you didn’t follow the link or it didn’t work, you can do it manually by locating your project in the projects panel, finding the scene file within the project folder (in your folder structure look for the folder called “data”, i.e. Project_name/data/SceneName.max), and clicking on it to open the job window.
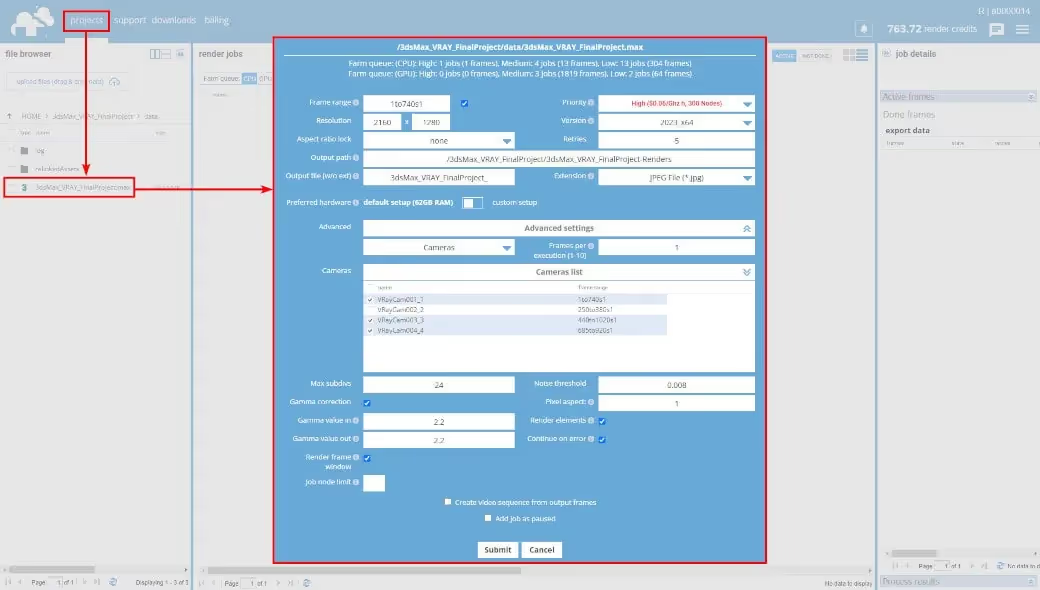
Our system automatically detects your settings in the scene and uses them to render the job. Before submitting the job to the render queue, please make sure that everything is correct and make adjustments if necessary.

Frame range - use this field to put in the frame range you want to render. Frame range example for animations: 1to740s1 - this is a sequence of 740 frames in total and all the frames 1 to 740 will be rendered. The parameter "s1" means that every subsequent frame in the given range will be rendered. If you want to do a test first, set a higher s value, e.g. "s20", which will result in every twentieth frame in the animation range to be rendered. So if you set the range to 1to740s20, then the frames 1,21,41,61,81,101,...,741,761 will be rendered.
If you have multiple cameras in your scene and you’d like to modify the frame range for all of them at once, you need to tick the checkbox to enable the frame range field.
If you only want to render a single frame (still image), you should input a single frame number into the field. For example, 1 will render the frame number 1.
Resolution - here you can set the output resolution in pixels.
Aspect ratio lock - if you need to change the resolution and want to keep a certain aspect ratio, you can use one of the available presets: 4:3; 16:9; 16:10; 21 9; 1:1. Leaving the option as "none" means that you are free to modify the values for the "Resolution" ignoring the aspect ratio.

Output path - here you can find the default save path for rendered frames in the given job. The default output path is based on the name of your project and scene. You can edit this path if you clone your job and need to render a different range in that project.
Output file (w/o ext) - by default, the frames file name is set based on the name of your scene. If you want to create a unique name and/or you need to customize naming for the output according to your pipeline, you can set your own name for the output file.
Extension - a format for the main output file is the same as in your scene settings. However, if you want to change the extension to a different one, you can choose from the available options, i.e: BMP, CIN, EPS, PS, EXR, FXR, HDR, PIC, JPG, JPE, JPEG, PNG, RGB, RGBA, SGI, INT, INTA, BW, RLA, RPF, RGA, TGA, VDA, ICB, VST, TIF, VRIMG, DDS, CXR.

Priority - before adding a job to the render queue, you can decide how you want to prioritize it. Depending on the queue and farm traffic, a higher priority may allow your job to quickly acquire nodes to render your project faster. Each priority has a different rate and gives you a different number of nodes - a detailed list can be found here: https://garagefarm.net/pricing
Version - by default, the version of 3ds Max is set to the same version you have uploaded the project with. However, if you need to use a different version of 3ds Max than the one detected, you can choose a specific version available on the list.
Retries - the value for this option is set to 5 by default. This means that if a rendering process fails or the software crashes, our system will perform five additional rendering attempts. We recommend leaving this option set to default (value 5) as this is the optimal setting to retry rendering in the case of some random 3rd party software errors.

Preferred hardware (node groups) - depending on whether you are rendering your project using V-Ray on CPU or GPU, our system will show you possible node configurations based on these settings. For CPU, in most cases, the default group is selected by default, but you can switch the node group button to a custom setup and select the particular group of nodes either based on CPU cores or RAM.


The full technical specification of nodes can be found here: https://garagefarm.net/pricing#specs

Advanced settings

Mode - If your scene contains only cameras, the Cameras mode is available and set as the default. However, if our system detects additional configurations such as Scene states, State sets, Batch render, or Render Stacks, no mode is preselected (the dropdown menu will show "Select mode"). In this case, you need to choose the appropriate mode for rendering.
Below are descriptions of the available modes, depending on your scene setup.

Cameras - in this part of the submit window (cameras list) you can select all the cameras that you want to render, and you can also set an individual frame range for each camera. Each selected camera will be added to the queue and rendered as a separate job.
In case you do not select any of the cameras from the list, then the camera selected in the scene will be used as the default camera for rendering.

Batch render - this mode allows to queue multiple render sets, each with its own camera, scene state, and frame range, following the Batch Render workflow from 3ds Max.
These render sets also include resolution, width, height, and preset from 3ds Max, which are displayed along with other settings. You can adjust parameters such as frame range and camera selection directly in Web Manager. Selected sets will be processed separately and added to the render queue.
With "Batch Render" mode enabled, you can manage render configurations in Web Manager. If needed, you can switch back to "Cameras", "Scene States" or “State Sets" modes.

Scene states - If your scene contains scene states, our plugin automatically detects them and forwards all states settings along with the job upload. You can render scene states by switching the mode to “Scene states” (instead of cameras).
For each state, you can set an individual camera and range of frames. Each selected state will be added to the queue and rendered as a separate job.
Mode switched to “Scene states”. You can still edit cameras and render range - directly on Web Manager, without the need to reupload the scene. Also, if you still want to render just a camera - you can switch the mode back to “Cameras”.

State sets - this mode gives a flexible way to manage and render multiple scene configurations in a single project. Each set can have its own camera and frame range, making it easy to organize different setups without manually changing scene settings every time.
State Sets are useful when working with multiple lighting conditions, material overrides, or object visibility changes, providing a structured approach to handling variations within a scene. Our plugin detects and uses settings directly from the native State Sets tool in 3ds Max, ensuring seamless integration with your existing workflow.
Once selected, each set is added to the queue as a separate job. You can tweak frame ranges and camera assignments directly in Web Manager before rendering, ensuring full control over each setup.

Each entry/pass in the “RenderStacks” mode includes a defined frame range and is processed as a separate job in the queue. It’s a practical solution for rendering multiple design iterations or testing different scene setups without manual adjustments.
Once uploaded, you can manage and modify frame ranges in Web Manager before rendering, ensuring full control over each variation.

When you add a scene to the queue, these values for Max subdivs and Noise threshold are read from the render settings in your scene. You can modify them if you want to get a higher quality output. Also, alternatively, you can perform a test with a lower quality to see if given objects are rendered correctly. Both values have a switch that when disabled allows you to always use the scene settings without overwriting the values (set in the web dashboard). This switch is useful when you want to clone a job but are not sure what the original settings were when you uploaded the scene.
Max subdivs - if you need to increase or decrease the number of samples taken for each pixel, you can do it by changing the value in this field.
Noise threshold - The value of sampling a pixel is set to the same you have in your render settings. You can adjust the value to a lower or higher one. According to Chaos Group documentation, the typical values should be in the range from 0.001 to 100. Our system allows to put values from 0 to 10000.

Gamma correction - our plugin reads your settings for gamma correction and automatically turns it ON when it detects it in your scene, while keeping the values for gamma in/out. In case you want to adjust these settings, you can do so by putting values into the fields, then the modified values will be used during rendering. Also, you can disable the gamma correction option altogether by unchecking the checkbox.

Image sampler min shading rate - this setting can be adjusted in Web Manager to control the minimum shading rate for image sampling, affecting noise levels and render quality.
Light cache retrace threshold - this setting helps refine GI accuracy by adjusting the retrace threshold for Light Cache, reducing artifacts in reflections and indirect lighting.

Render frame window - This option is equivalent to "frame buffer preview" in 3ds Max. When this option is enabled, you will be able to check the progress of rendering from 3ds Max's frame buffer window during rendering. By default, the "Render frame window" option is enabled for jobs with 3ds Max + V-Ray.
Job node limit - by default, the value for this option is empty and so the nodes are assigned automatically depending on the job priority and nodes availability on the farm. Nevertheless, if you want to limit the number of nodes for the given job, please put here the value of the maximum number of nodes you want to be used during rendering.

Pixel aspect - These settings are read from your settings in 3ds Max. You can adjust them here to fit the requirements of your output device, without the need to re-upload the scene.
Render elements - Our system automatically detects whether additional outputs (render elements) are set in your scene, and then it enables this option. In case you do not want to render additional render elements (despite the settings in the scene), you can disable this switch, then none of the additional outputs will be rendered or saved.
Continue on error - By default this switch is turned ON. This means that any error messages related to missing textures and other assets will be skipped. The calculations will continue and rendering will not be aborted. If you disable this option and, let’s say, your scene contains missing asset, rendering will not be possible and the process will fail.

The number of strips that is available depends on the scene resolution. By default, we set the number of strips you selected while submitting the scene via our plugin.
If you drop down (in the web dashboard) the list of available strips, you can see the "recommended" value for one of options.
The recommended value is calculated automatically by our system and it is the most optimal value as far as the cost and speed are concerned.
You can select any number of strips based on your preferences and needs. For example, you might want to choose more strips if you prefer speed over cost. Other time, fewer strips may be a viable option if you know that the scene loads a long time and the cost is your primary concern.

Frames per execution - this option is only available for animations. By default, the value for FPE is set to 1 for projects rendered on CPU. This means that each frame will be rendered as a new execution (a separate task), in other words, the scene will be loaded on each node every time a new frame starts.
The FPE (Frames Per Execution) option allows you to render several frames (the value you put in) in a row without the need to reload the scene on a render node, and potentially may improve rendering efficiency. If your scene has a long loading time but a short rendering time, you can set FPE to a higher value (for example 4). If the loading time is not long but the rendering time is long, leave the default value or set it to 1.
Detailed information on the use and examples of the FPE option in practice can be found in our dedicated guide: https://garagefarm.net/documentation/how-to-use-and-optimize-frame-per-execution-fpe

Add job as paused - if you tick this option and then submit your job, it will be added with the status “paused”. This means that it will not start rendering automatically. It is useful to use this option if you intend to add the job to the queue, but you do not intend to render it at the moment. After adding a "paused" job, you can resume it at any time by selecting the "resume job" option (right-click on the job).
Submit - when you press this button, the system will immediately add the job to the render queue. Please remember to check all settings before submitting a job!
Cancel - if you do not want to add the current job to the render queue or you want to reset your settings and add the scene again, you can use this option. The submission window with the settings for the given job will be closed and all changes will be cancelled.

Create video sequence from output fram - You can create animated video outputs right after rendering frames. Select “Create video sequence from output frames” switch and set all desired video output settings. With the switch ON, the farm will run an additional job to render the frames sequence to a single video output.

More info about the settings available in the "video sequence job" you can find in our dedicated article.
After giving your render settings a final check and choosing your preferred priority, hit Submit to add your job to the render queue. If you’re a first-time user, you will have received $25 worth of credit to test out our service. The credits should be enough to run a few test jobs and familiarize you with the service.

When the job has started rendering, you can check the real-time progress of currently processed frames. To do that, just select the render job from the main project list and click the arrow on the top right side to open the panel that shows jobs progress details.
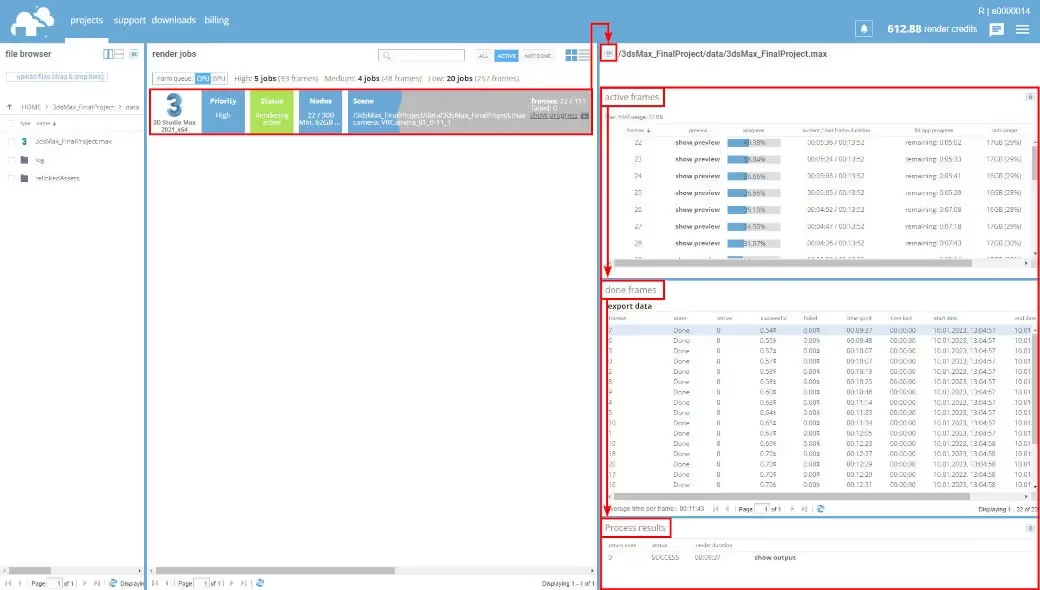
The Job Details (the panel on the right side of the screen) will show its content only when any of the jobs is selected. The panel is divided into 3 sections.
Active frames - it shows currently rendering frames. When a frame finishes, it is moved to the second section, Done frames. If you select any frame in the Done frames list, you can then access the render output process log in the bottom section called Process results.

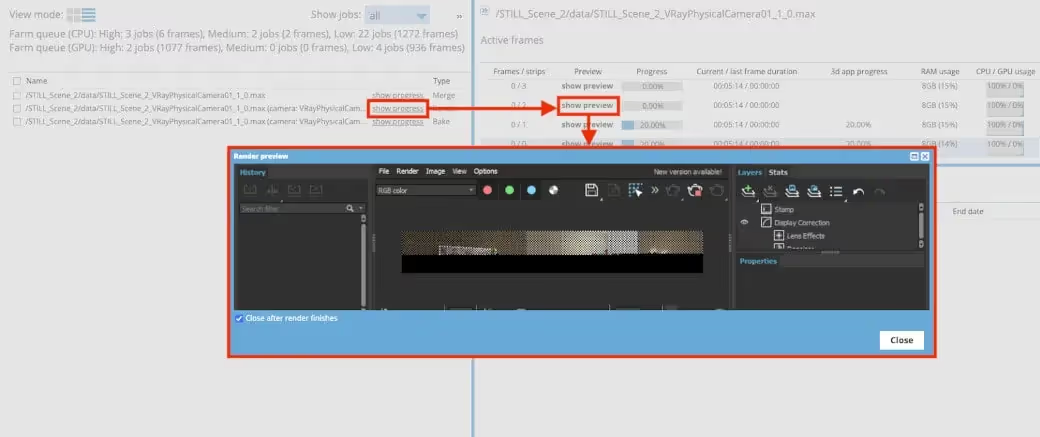

You can also select a preview for any particular frame directly by clicking on the "show preview" option in the active frame list.
Each frame completed rendering is downloaded automatically to your local drive to a directory you selected in the renderBeamer application. If you’re unsure where your download folder is located, you can double-check it or change it in renderBeamer’s settings (click on the cogwheel). Also, ensure you have auto download turned on to get the frames downloaded as soon as they are available. If this box is unchecked, you will have to click on each job in Beamer's "downloads" tab, and manually download the frames.
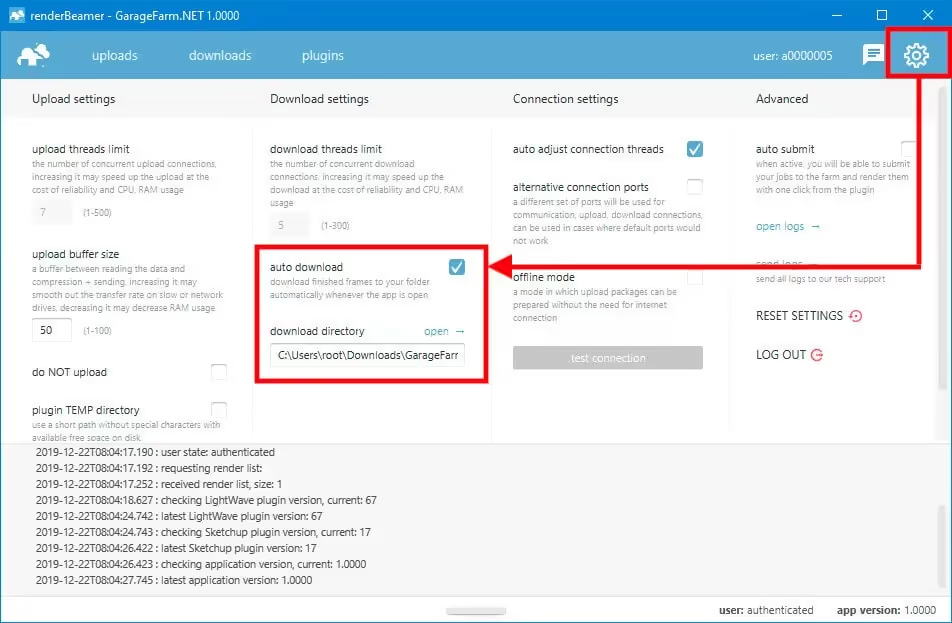
If you prefer more control over what to download and when you can also download your frames manually. To do that, just turn off the auto download switch in renderBeamer settings and go to the “downloads” tab. Next, select the desired render output using a checkbox, and click the download button.
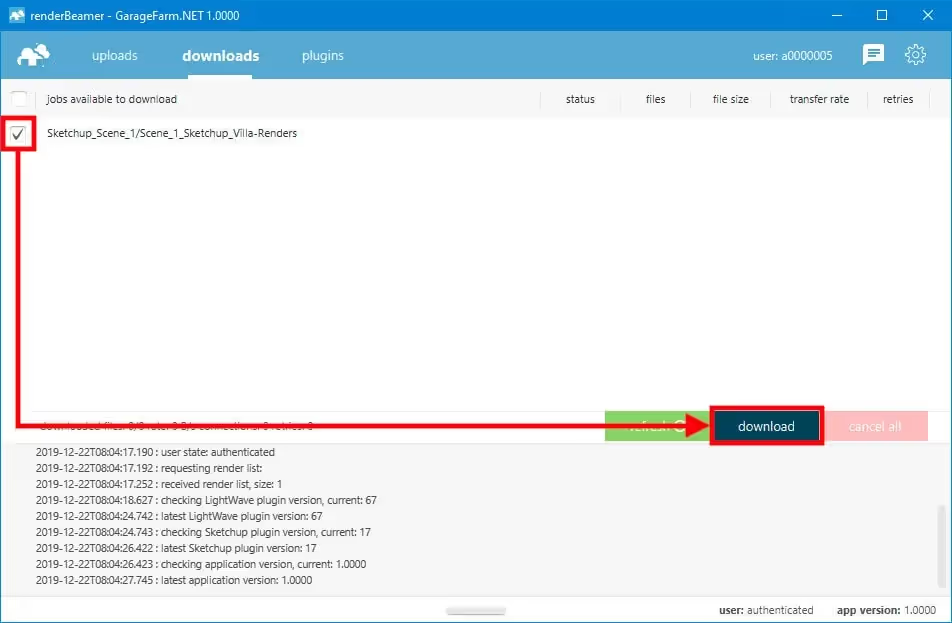
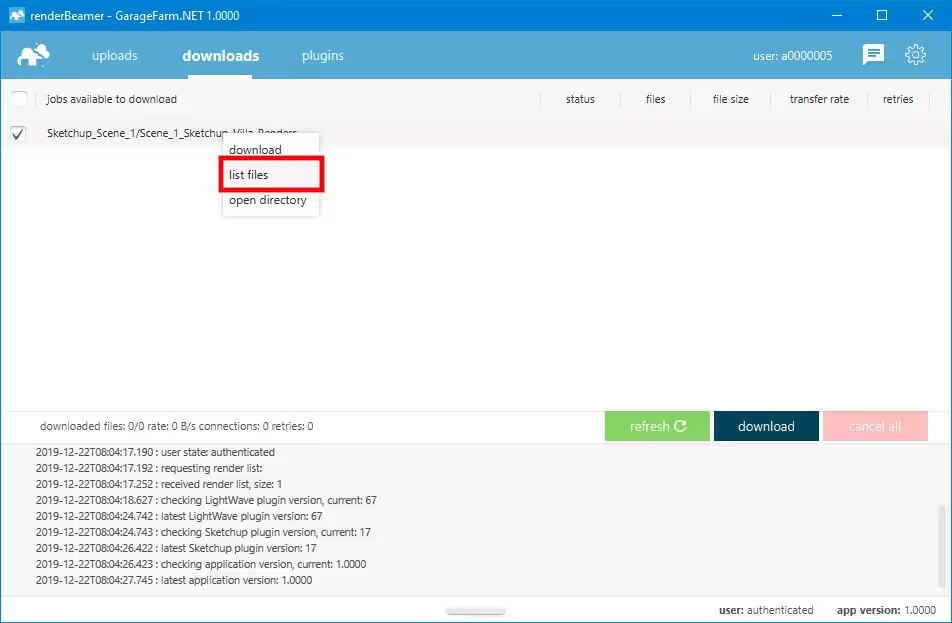
This workflow will download all rendered frames for the selected job or jobs. However, renderBeamer also gives you an option to download individual frames. You need to use the list files function under RMB to do that.
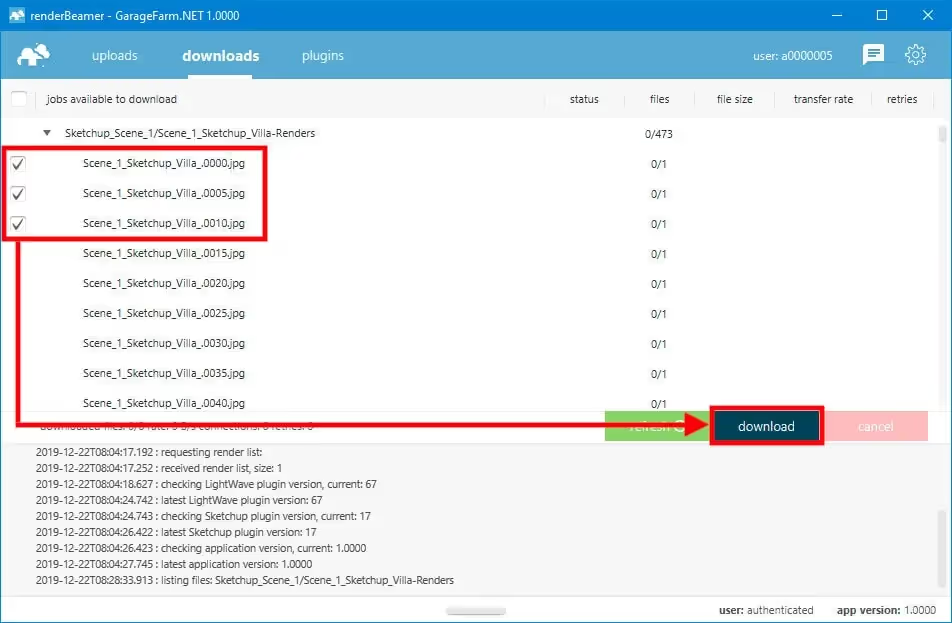
Once files for the selected job are listed, just roll down the list and select the files you’d like to download using checkboxes. Next, use the same download button.
Once your frames are downloaded, you can use the “open directory” option under RMB to open the folder where frames are saved.
You’ll need to charge your account to continue using the service when you use up all your trial credits. Please note that when your balance goes below $0, you won’t be able to download rendered frames or start new render jobs. You can make payments in the Billing panel in Web Manager. We accept debit cards, credit cards, and wire transfer payments. Also, you can purchase credits via Revolut, Zen, P24.
If your rendering needs are high or you plan to render regularly, please make sure to check out our volume discounts.

You can talk to GarageFarm.NET’s tech team any time of the day, any day of the week. We’re here to help you get started, answer your questions, and assist you in any way. Don’t hesitate to give us a shout.
You can contact us through our live chat accessible in the web dashboard or our desktop app when you log in to your account or message us here through the guest chat.
Here are some example scenarios that show how our plugin output options work.
3ds Max main output: turned ON
V-Ray outputs: Enable built-in frame buffer: OFF / Separate render channels: OFF / V-Ray raw image file: OFF
Render Elements: ON – With NO paths and format set
Plugin’s Overwrite extension switch: Not used
That’s the default 3ds Max setup – with no V-Ray Frame Buffer options used.
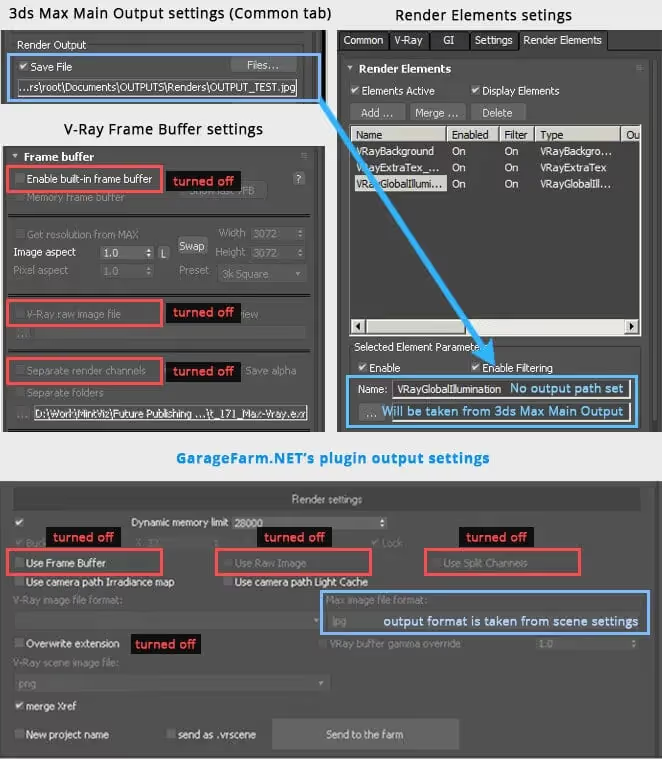
In this case, the plugin takes the 3ds Max main output setting from the scene (it’s set to .JPG). Therefore, all files will render to .JPG
After complete rendering, output files will look like this:

As you can see, everything is rendered correctly – the same way as it was set in the scene before running the plugin.
3ds Max main output: turned ON
V-Ray outputs: Enable built-in frame buffer: OFF / Separate render channels: OFF / V-Ray raw image file: OFF
Render Elements: ON – With paths and output format set
Plugin’s Overwrite extension switch: Not used
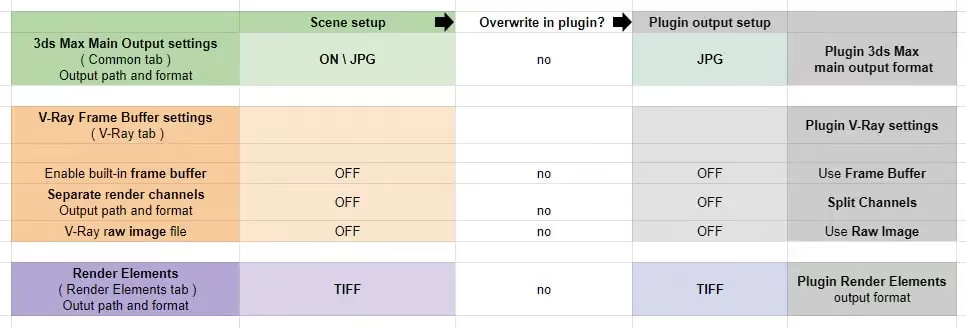
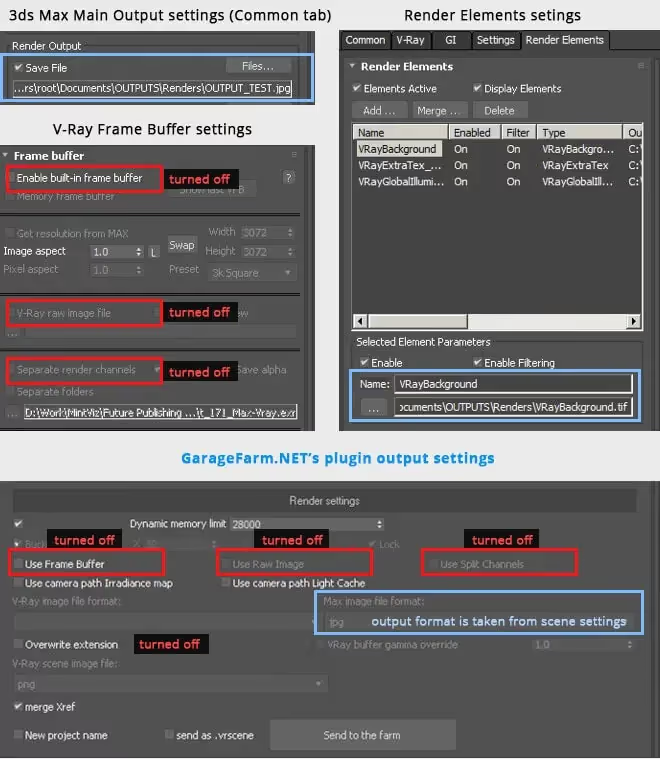
However, if you use the Overwrite extension switch (and change the 3ds Max main output image file format to a different one – (PNG for example),it will also change the extension for Render Elements!
After complete rendering, the output files will look like this:

3ds Max main output renders to JPG, and Render Elements render to TIF as it was set in the scene.
3ds Max main output: turned ON
V-Ray outputs: Enable built-in frame buffer:OFF / Separate render channels: OFF / V-Ray raw image file: OFF
Render Elements: ON – With paths and output format set.
Plugin’s Overwrite extension switch: Turned ON for 3ds Max main output.
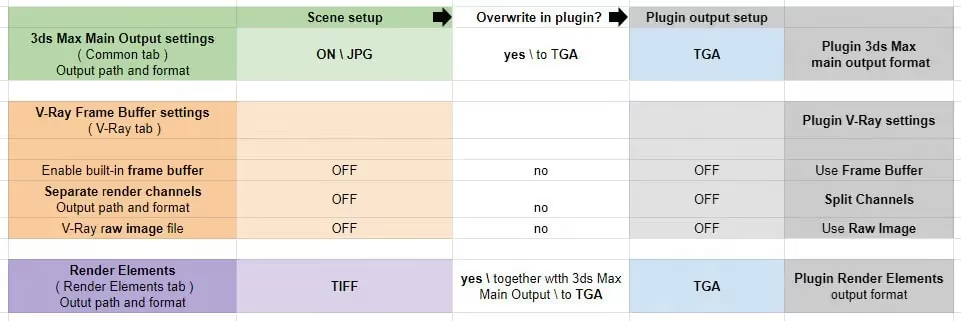
In this scenario, 3ds Max Main Output setup and Render Elements render setup stays the same as in Case 2 example.
In this case, only the plugin output settings will be set in a different way – we will use the Overwrite extension switch in our plugin. With this setting used, the scene outputs formats will be overwritten with a new one (.TGA.)
To select a new format for 3ds Max main output, you need to use the Max image file format drop down menu.
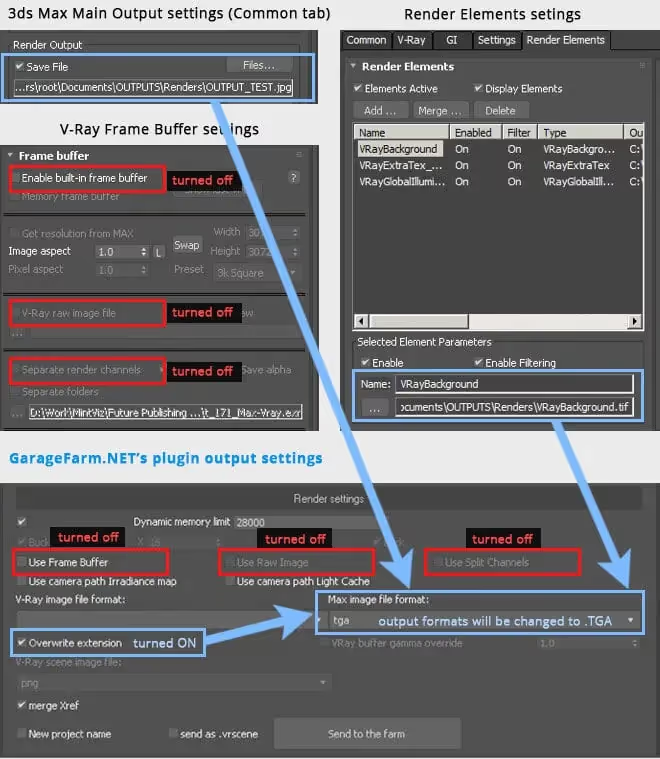
That’s how Overwrite extension works – it’s overwriting current selection to a new one.
After complete rendering, the output files will look like this:

As you can see, everything was overwritten to our selected format – TGA in this case.
Please keep in mind that CASE 1 – 3 scenarios are “dedicated” to users who are not using V-Ray built-in frame buffer in any form – neither standard VFB with Separate render channels switch, nor Raw image file saving options.
3ds Max main output: turned ON
V-Ray outputs: Enable built-in frame buffer: ON / Separate render channels: ON / V-Ray raw image file: OFF
Render Elements: ON – With paths and output format set.
Plugin’s Overwrite extension switch:Not used
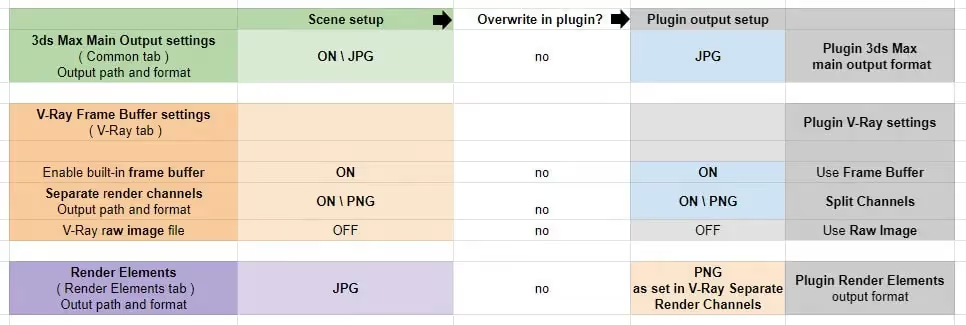
This is the most common setup for rendering with 3ds Max and V-Ray Frame Buffer. All the standard outputs are turned on.
So, we’ve got 3ds Max main output set to JPG, V-Ray built-in frame buffer turned on and set to PNG with standard, correct setup in Separate render channels ( the output path and the format are set), and some Render Elements added with the format set to JPG
The plugin setup window should look like this:
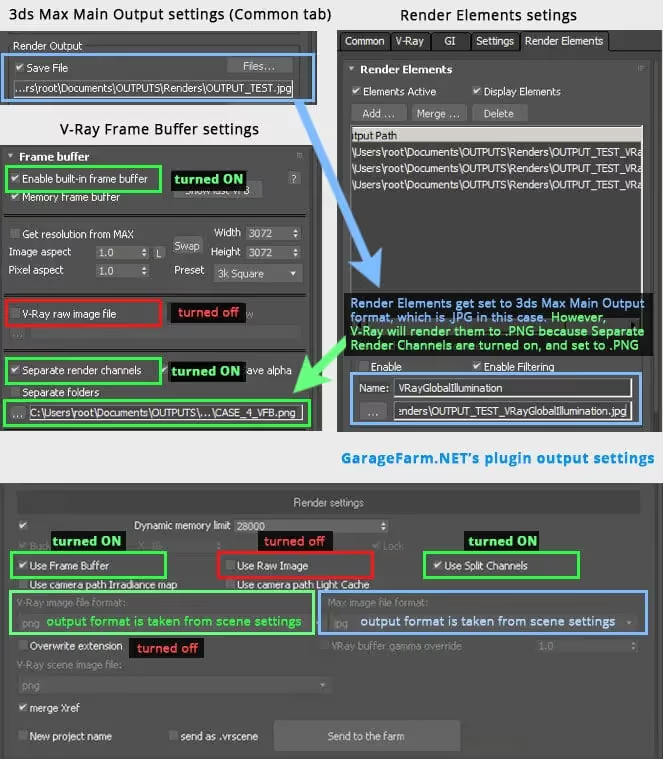
As you can see, the plugin reads all current scene output settings. Use Frame Buffer option is turned on and the same thing goes for Use Split Channels. For V-Ray frame buffer file format, the output formats are already set to PNG and for 3ds Max main output format to .JPG.
Since the Overwrite extension option in plugin’s settings isn’t used, the output formats will render as set in the scene.

So, we got the 3ds max main output rendered to JPG and the rest of the outputs (including Render Elements) to PNG.
3ds Max main output: turned ON
V-Ray outputs: Enable built-in frame buffer: ON / Separate render channels: ON / V-Ray raw image file: ON
Render Elements: ON – With output paths and format set
Plugin’s Overwrite extension switch:Used on 3ds Max main output and on V-Ray built-in frame buffer output
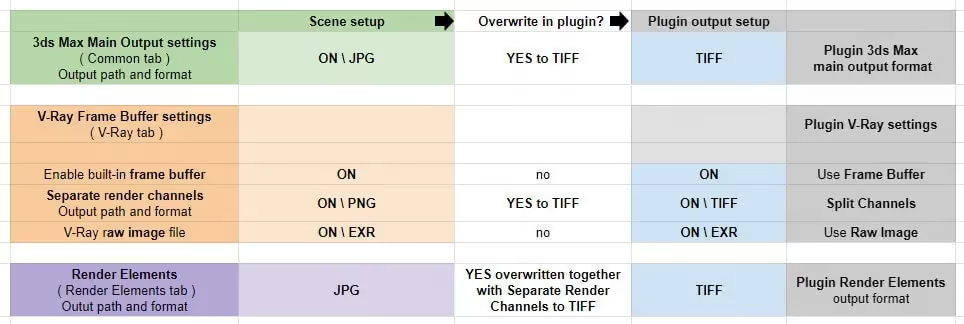
This is yet another type of standard render output settings.
In this example 3ds Max main output is set to JPG, V-Ray built-in frame buffer is turned on with all options set – Separate render channels is set to PNG and Use raw image file to EXR.
Render Elements – which are set like in Case 4 example – are set along with 3ds Max main output to JPG, but in “real world” – the output settings are controlled by V-Ray frame buffer output format.
In this case, we want to get all the outputs in the same format, let’s say we want TIFs everywhere + additional output with RAW (EXR).
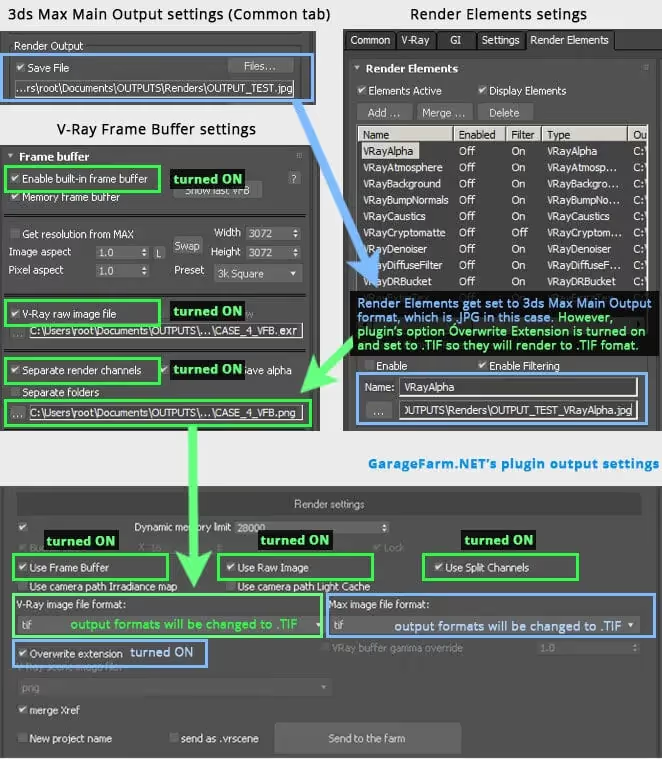
As you can see, we are using overwrite extension (to .TIF) in both outputs – 3ds Max main output & V-Ray frame buffer.
That type of setting will give us the certainty that all outputs are rendered to selected TIF in this case. Also, Use Raw Image is used and it will render to the format you have selected in your V-Ray Raw Image settings.
The scene has V-Ray Raw image output configured already, and we won’t overwrite it – even when the overwrite plugin option is turned on. V-Ray RAW buffer is more complicated, so we decided to not add an overwrite option to it.
After complete rendering you should receive files like this:
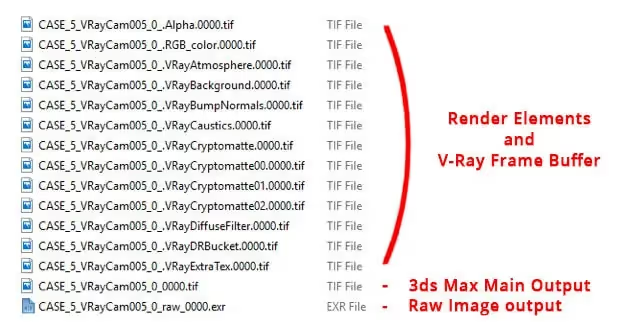
As you can see, we got all 3ds Max and V-Ray outputs saved as TIF and one additional output from V-Ray raw image file – EXR.