
Explore our newest YouTube guide and master the basics with ease
Need Help?
Auto submit overview
How to use and benefit from the auto submit feature in renderBeamer
When managing a large number of scenes or simply aiming to streamline your workflow, skipping repetitive steps like manually adding each scene to the render queue can make the process significantly more efficient. This is where the auto submit feature in renderBeamer comes into play.
What is auto submit and how does it work
Auto submit is an optional feature available in the renderBeamer application. When enabled, it automatically creates a render job and adds it to the queue in Web Manager dashboard immediately after the scene has been submitted via the plugin and uploaded through the renderBeamer app.
In the standard workflow, after the scene is uploaded via renderBeamer, you are redirected to the Web Manager where the job submission window is automatically opened. From there, you can review the settings and manually add the scene to the render queue. With auto submit enabled, this step is handled automatically – the job is created and added to the queue using your default or predefined settings.
This feature is particularly useful for users working on multiple scenes or when rendering large batches of projects, as it helps automate and accelerate the job queueing process.
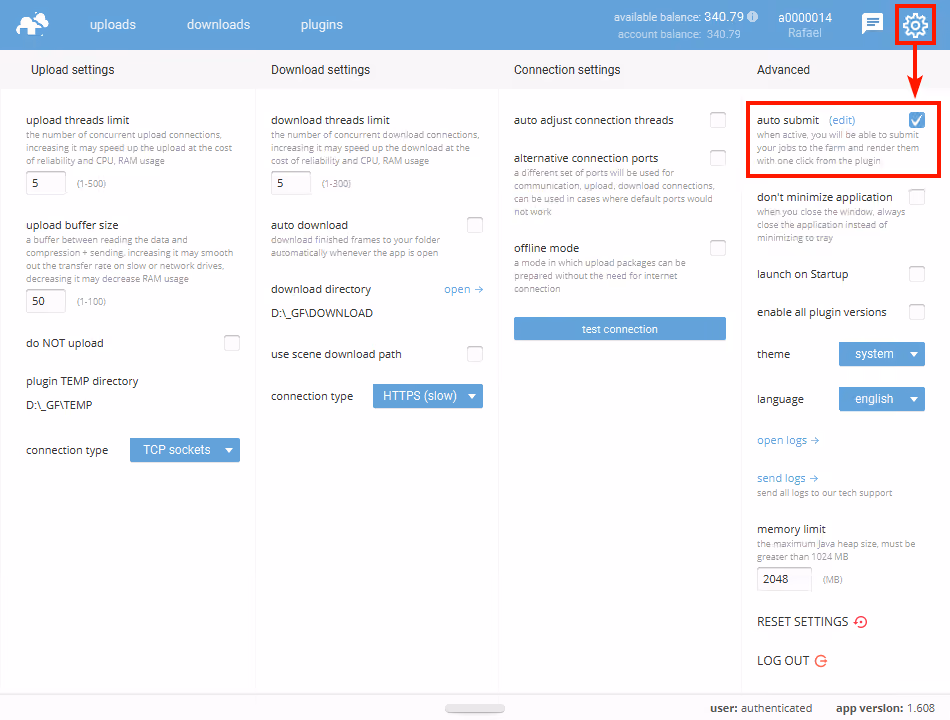
Where to enable auto submit (in renderBeamer)
Once the desktop renderBeamer app is running:
- Click the settings icon (gear icon) in the upper-right corner of the application.
- A settings window will open.
- Navigate to the "Advanced" section.
- To activate the default setup of auto submit, simply check the checkbox and confirm by clicking OK.
Below is a screenshot showing where to find the auto submit option in the renderBeamer settings window.
In section 3 (configuration options) of this article, you'll find a detailed explanation of each available setting and how to configure your own custom preset for automatically submitting scenes and adding them to the render queue.
How to configure auto submit: simple vs advanced
There are two configuration modes available for the auto submit option in renderBeamer: a simple default mode and an advanced mode for defining custom templates for complex scenarios.
I. Simple default settings
This mode becomes active immediately after enabling the auto submit option. It applies to all scenes, regardless of the 3D app or renderer used.
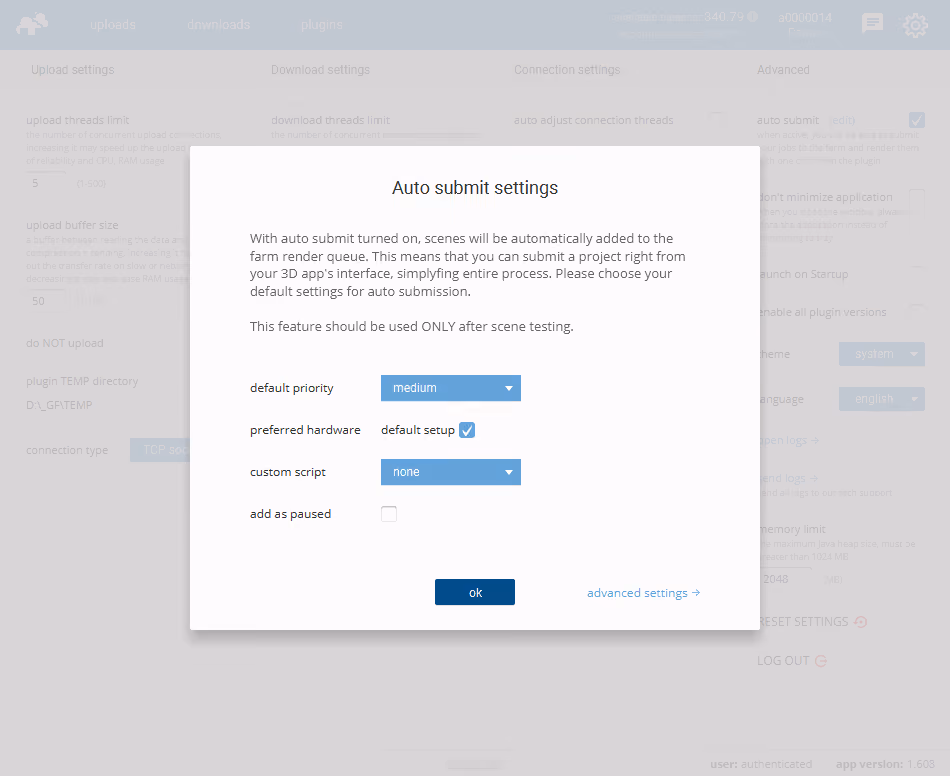
It's a convenient choice in most workflows, as it allows your scenes to be automatically added to the render queue right after being uploaded.
You can configure the following:
- default priority – choose how your job will be prioritized in the queue: Low, Medium, or High.
- preferred hardware – the default setup checkbox is enabled by default, meaning all available node groups will be assigned. If you'd like to set ndering to specific node types, simply uncheck this option and choose your preferred nodes based on RAM or CPU type.
- custom script – by default, this is set to none. If a custom script has been assigned to your account by our support team (e.g. plugin installation or job-specific configuration), it will appear in the dropdown.
- add as paused – if enabled, uploaded scenes will be added to the queue with a paused status. This is useful if you’d like to delay rendering, monitor the queue, or discuss anything with our support team before starting.
II. Advanced settings
If you need per-app or per-renderer configuration, click on the “Advanced settings” button. You’ll be redirected to the template manager, where you can define precise templates.

To create a new preset, click “create +”. In the Template settings window, you can define the following:
- app – choose the 3D software the preset applies to (e.g. 3ds Max, Blender, Cinema 4D, Maya, etc.).
- renderer – select a specific rendering engine for the app, or leave it as (any) to apply the preset to all renderers.
- priority, preferred hardware, custom script, add as paused – these settings behave identically to the ones described above in the simple mode.
Additional options exclusive to advanced settings:
- devices – this setting is available only for Blender with Cycles or LuxCore, specify whether to use CPU or GPU nodes automatically.
- FPE (Frames Per Execution) – set how many frames should be rendered in a single batch execution. Useful for optimizing performance on scenes with high load times. See our dedicated FPE article for details.
- mode – available for 3ds Max and Cinema 4D only. Defines the job type (e.g., cameras, batch render, takes, etc.)
- multi pass – for Cinema 4D only. You can leave this as (any) to use the scene setting, or override it by setting to "yes" or "no".
You can create and manage multiple templates for different software-renderer combinations. Templates can be updated, removed, or expanded any time. You can also switch back to the simple setup or disable auto submit entirely via the checkbox in the main renderBeamer settings panel.
Example Use Case
I. 3ds Max + Cameras
II. Cinema 4D + Takes
III. Blender + Scenes
What to keep in mind when using auto submit
The auto submit feature is a real time-saver, especially if you’re working on multiple scenes or want to automate your pipeline as much as possible. Once enabled, your scenes can go straight into the render queue after upload – no extra clicks, no switching tabs.
Before you fully dive in, here’s a short checklist of things worth keeping in mind:
- Check your render setup - make sure all the important elements in your scene are configured correctly: active cameras, takes, or scene selections. Auto submit will use exactly what’s set in your file.
- Double-check output settings - resolution, file format, and quality should match your final needs. What you set in your scene will be what’s rendered.
- First time uploading a project? - we strongly recommend running a test job first. It’s the best way to confirm that everything renders as expected before going full scale.
- Keep an eye on your account balance - if you’re using auto submit to launch jobs automatically, make sure you’ve got enough credits. Jobs may be paused or even stopped if your balance goes negative or hits the overdraft limit.
- Need different setups for different apps or renderers? - no problem, the auto submit feature works across all supported 3D apps by default, but you can easily switch to advanced mode and create custom presets per app, renderer, or device type.
- Changed your mind? - you can turn off auto submit anytime. Just uncheck it in the settings and you’re back to full manual mode.
We recommend giving auto submit a shot - especially if you’re looking to save time or speed up project delivery.
And if you ever get stuck, want to fine-tune your presets, or just have questions – reach out to our support team via live chat. We’re here for you 24/7 and always happy to help.
Register Now and Get $50 FREE Credits!

Frequently asked questions