Introduction
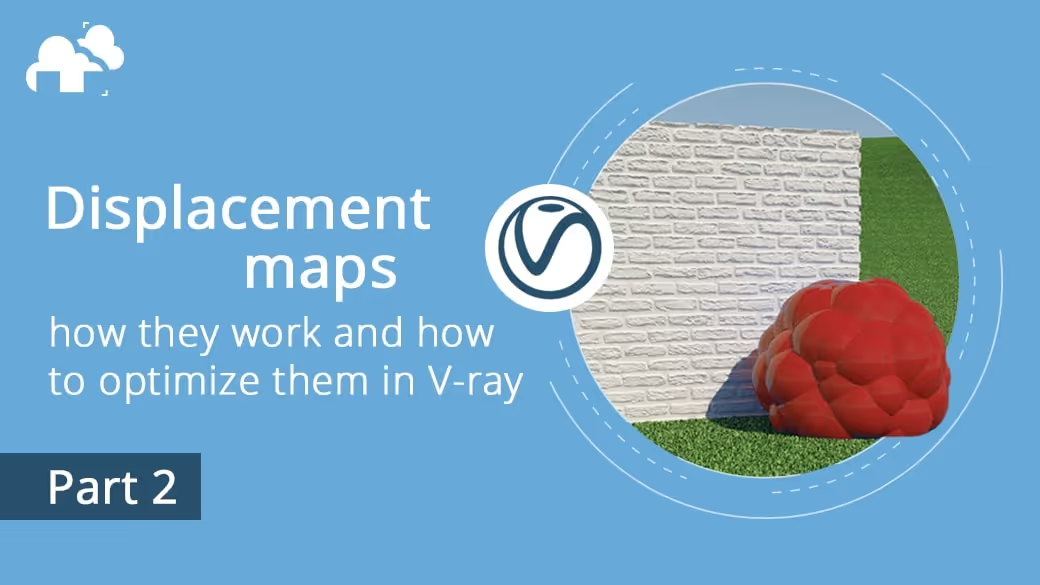
This guide shows how to optimize the settings of the V-Ray displacement feature for 3ds Max. Although, what can be learned about V-Ray here works on any compatible 3D application.
Vray displacement maps is used to add complex geometries on a surface without having to model them manually which is a very powerful tool. It allows you to add realistic details to your models beyond what “classic” poly modeling can do.
For example, with just a few clicks, you can transform a simple square into a wall with visible sculpted elements such as bricks, plaster, or moldings.
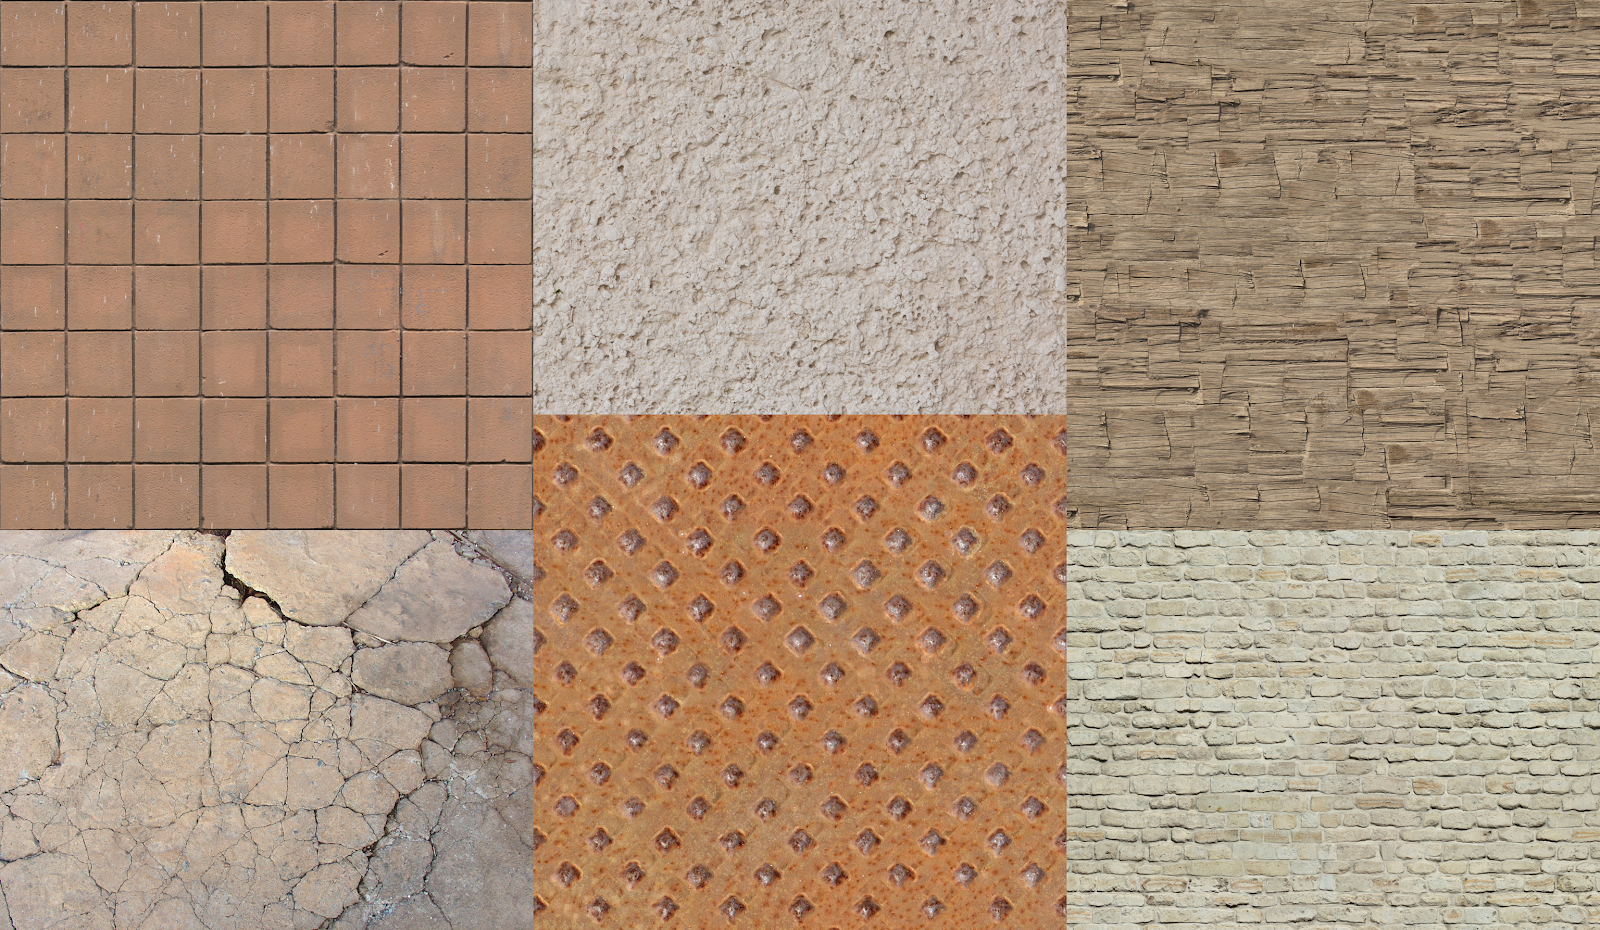
First, let’s have a look at how displacement works as opposed to bump and normal mapping.
Displacement maps, Bump maps, and Normal Mapping
It’s not only color and reflection. Each surface contains a 3D structure through which, slick or rough, we perceive texture by how light bounces off its bumps and scratches. It’s this essential trait in materials that make them look interesting and real.
Given this all-important feature in real surfaces, 3D applications quickly incorporated tools in their material editors necessary to generate such an effect.
One is the bump map. By taking the placement of light on the model into consideration, it imitates a sculptural relief on the surface, portraying shadows and highlights to simulate texture and depth.
However, bump mapping doesn’t create a real 3D structure. Instead, it creates an illusion of 3D, “faking” it during the render process by having light bounce off simulated features that are not actually there. It does the job for small, finer details, and only in some angles. You wouldn’t, for example, see changes to the contour of the object. There are cases where it doesn’t look all that convincing.
Another method is the normal map (normal bump). It does the same job as bump mapping, except the details are created based on an RGB color map that encodes the angles of the surface. Like bump mapping though, the effect is purely based on rendering; it doesn’t add real detail to the geometry. It’s thus mostly used in computer games to add detail to models while keeping a low polycount.
Contrary to those methods, displacement maps help create real 3D geometry; it casts real shadows and looks realistic from every angle. It does so by dividing the model’s polygons into a much denser mesh during the rendering process, which is either elevated or depressed on an up/down axis based on your chosen texture. The downside of this method is that it can create very heavy meshes that require a lot of RAM to process.
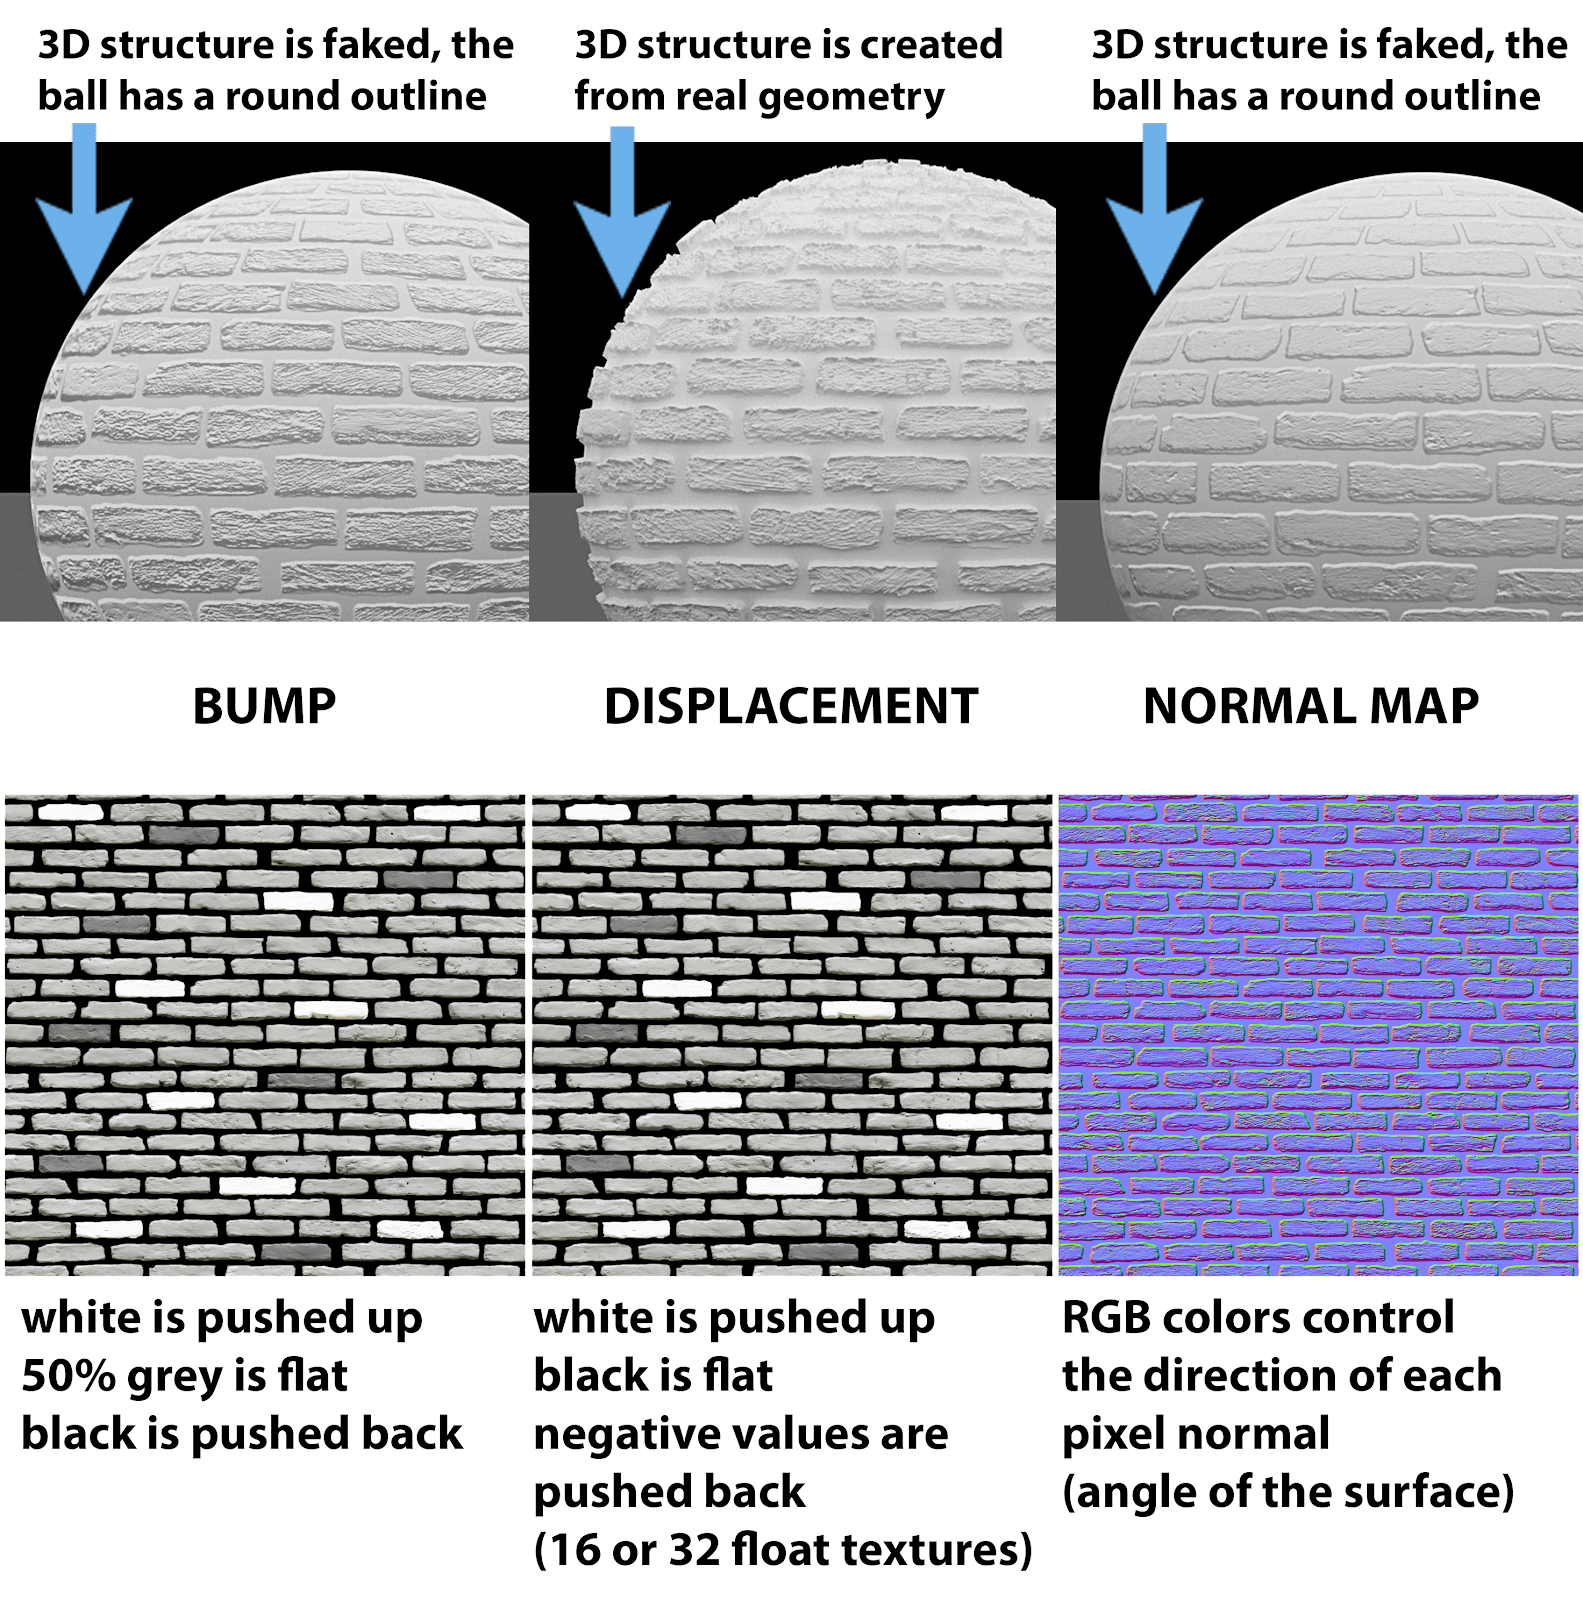
You can create a displacement map in Photoshop using photos of reference materials, sculpt it and bake in programs like Zbrush or Mudbox, or by using quick displacement map creators like CrazyBump or NormalMapOnline (Check out the software list at the end of the guide for creating such maps.)
You can also use Integer or Float maps. Artists working on character creation and other complicated sculptures usually export Float maps from software like Zbrush. In simpler modeling tasks like ArchViz, you can get away with Integer maps created from pictures of various surfaces.
Where to set up Displacement maps in 3ds Max and V-Ray
There are two methods of setting up displacement maps in 3ds Max and V-Ray.
- The first is to set it in Render Setup (V-Ray) -> Settings -> Default displacement in conjunction with Material Editor -> Maps -> Displace
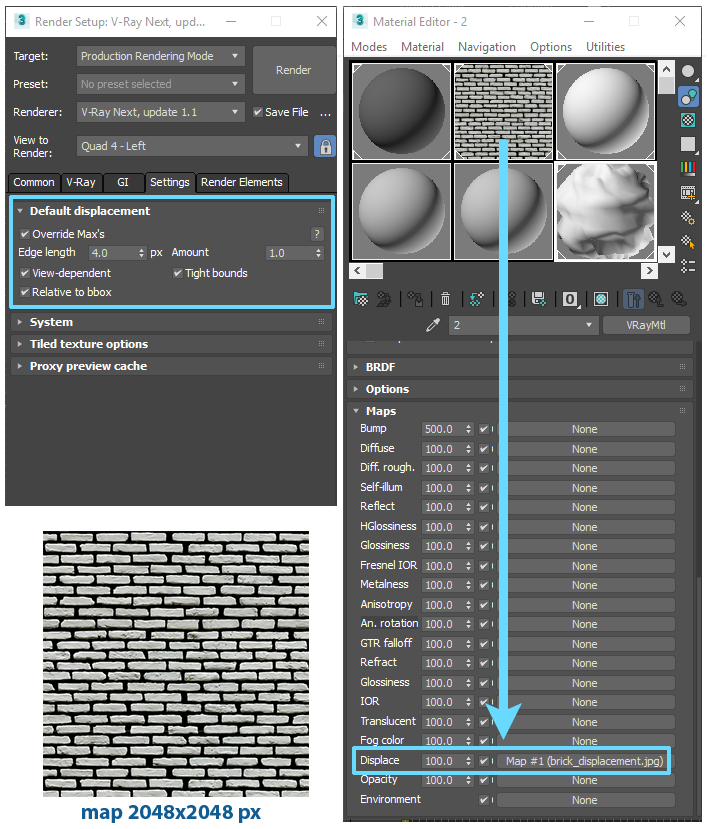
- The second way is adding the Vray Displacement Mod modifier and linking a map from Material Editor to the “Texmap” slot (as Instance)
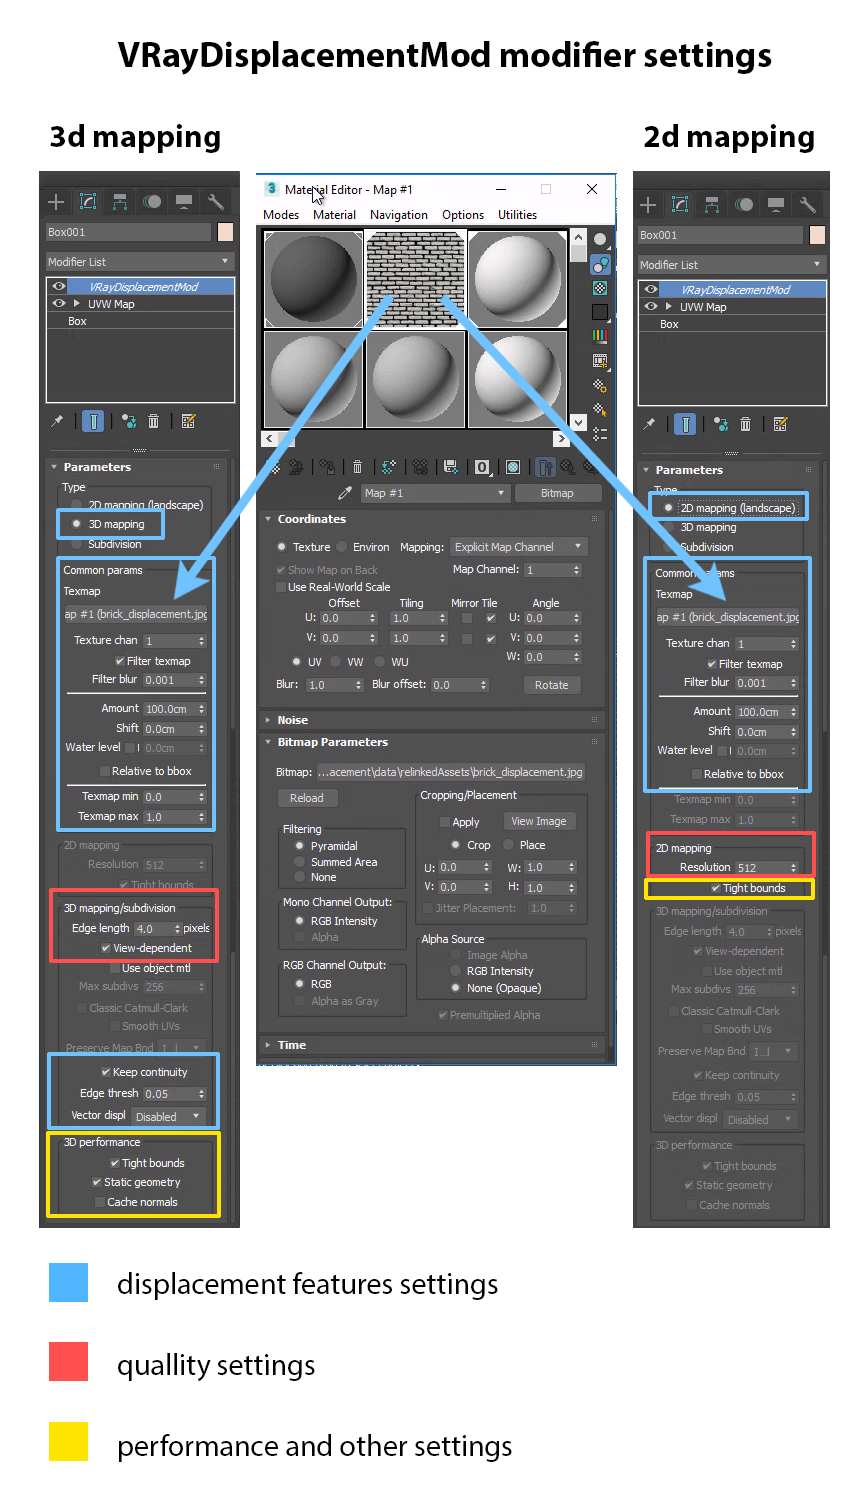
Using the VRay Displacement Mod modifier provides more flexibility in setting up displacement features and managing resources necessary for rendering.
Displacement features settings – These influence render times and RAM used by the scene. They need to be set to specific values to get the exact look of the displaced model you want. Therefore, these values should not be compromised for the sake of optimization. Please turn to the other settings listed below instead.
Quality settings – These set the displacement’s level of detail, number of subdivisions, and mesh density. They are decisive in the number of resources your scene needs for rendering, and we will optimize them in the next chapters of the guide.
Performance and other settings – These are special settings that affect rendering performance; they can be used in rare scenarios for debugging displacement-related issues, like artifacts or unusually high resources usage. We will talk about them at the end of the guide.
According to the V-ray manual, there are three types of mapping in VRay Displacement Mod:
- 3D mapping – A general method that takes the original surface geometry and subdivides its triangles into smaller sub triangles which are then displaced.
- 2D mapping – Bases the displacement on a texture map that is known in advance. The displaced surface is rendered as a warped height-field based on that texture map. The actual raytracing of the displaced surface is done in texture space, and the result is mapped back into 3D space.
- Subdivision – Similar to the 3D mapping method, with the difference that it applies a subdivision scheme to edges (similar to a MeshSmooth modifier). We will skip that method in this guide.
We will use Vray Displacement Mod modifier setup for tests because it has all the options which displacement from render settings provide and more, and it allows you to set displacement options separately for each model in a scene.
We will use various variants of the scene below for tests.
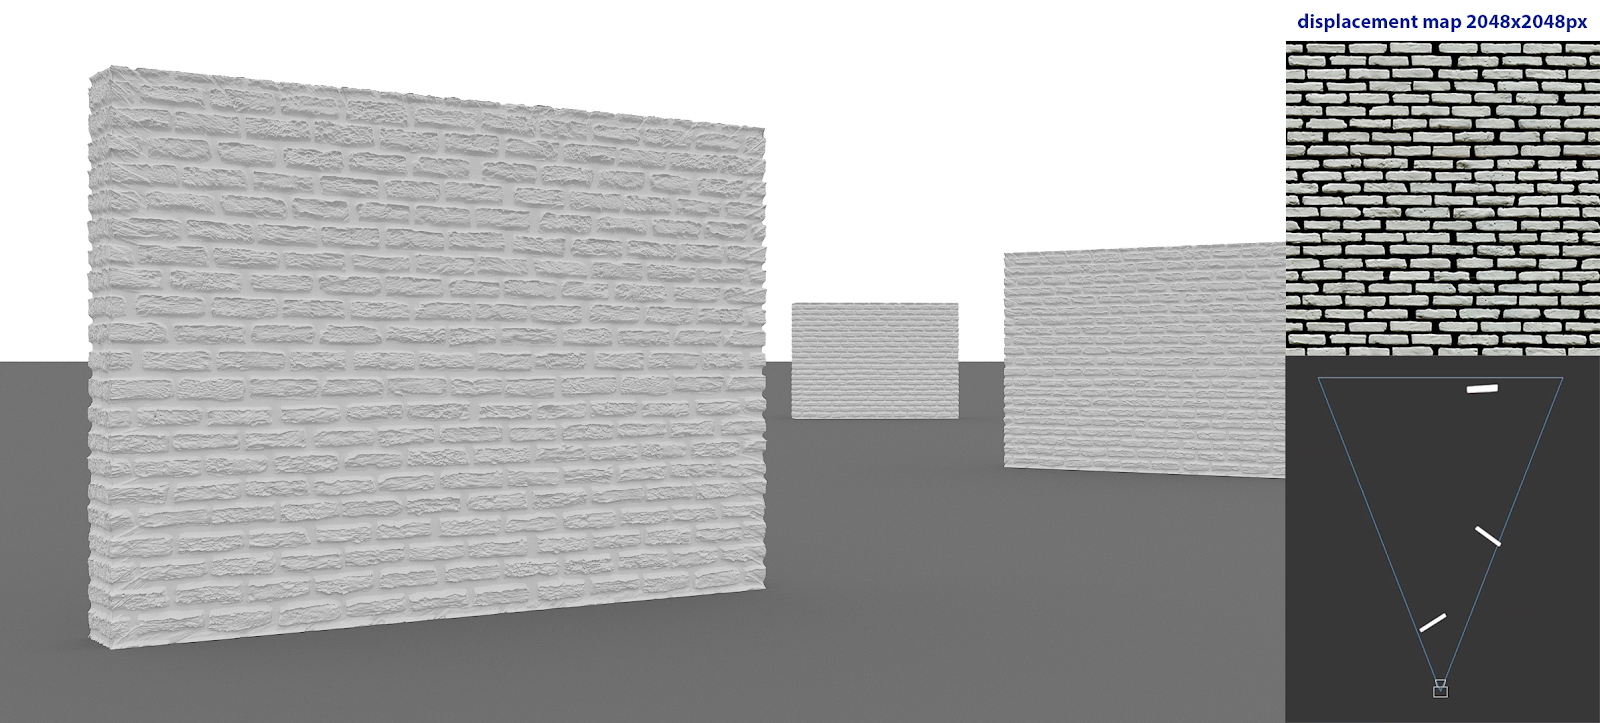
Tests setup:
Hardware: Intel V2 processor, 2.80 GHz, 128 GB RAM
Software: 3dsMax 2017 + V-ray 4.10.02
GI was set to Light Cache + Brute Force, default settings
All other settings were left as default.
Typical symptoms of poorly optimized displacement settings (AKA scene uses too much RAM)
- 3ds Max crashes or freezes
- Rendering falls into an endless loop of calculating Light Cache / presampling displacement / Unloading geometry
- Rendering gets stuck at the “compiling scene geometry” stage or at “building Embree static accelerator”
- The CPU usage is low or irregular
- In the event of RAM shortage, 3ds Max uses the hard drive as additional storage for displacement data and swaps it between HDD and the processor. This substantially lengthens a scene’s render time.
In the following tests and examples, we will have a look at V-Ray displacement options and find a way to create a render as detailed as we need it to be while using the least amount of computer resources possible.
Vray Displacement Mod modifier -> 3D mapping -> View-dependent turned on
The main quality setting in Vray Displacement Mod set to 3D mapping is Edge Length, which, by default, has View-dependent option enabled.
Before displacing the geometry, VRay Displacement Mod subdivides the triangles of the object into smaller ones. When the View-dependent option is on, the Edge Length value determines the maximum length of a sub-triangle edge in pixels.
For example, a value of 1.0 means that the longest edge of each sub-triangle will be about one pixel long when projected onscreen (i.e., the rendered image).
More, smaller sub-triangles are created at smaller values. That directly means more detail in displacement, slower render times, and, most importantly, more memory usage.
Let’s check the quality of displaced geometry and the number of used resources when this setting is set at various values.

As we can see, shortening the Edge Length value allows for more detailed geometry, though at the cost of using more RAM. This is because the shorter the Edge Length, the denser and heavier the geometry meshes created by VRay Displacement Mod become.
The scene’s render time becomes disproportionately high, too. This happens when we reach a critical value (in this case, the 0.25 Edge Length) in which the RAM used by V-Ray reached the 120GB limit, causing 3ds Max to start using HDD as virtual memory to swap data. This is precisely the scenario we want to avoid when we render scenes using displacement.
Now, let’s see what happens when we keep the Edge Length constant at 1px but render the image in various resolutions.
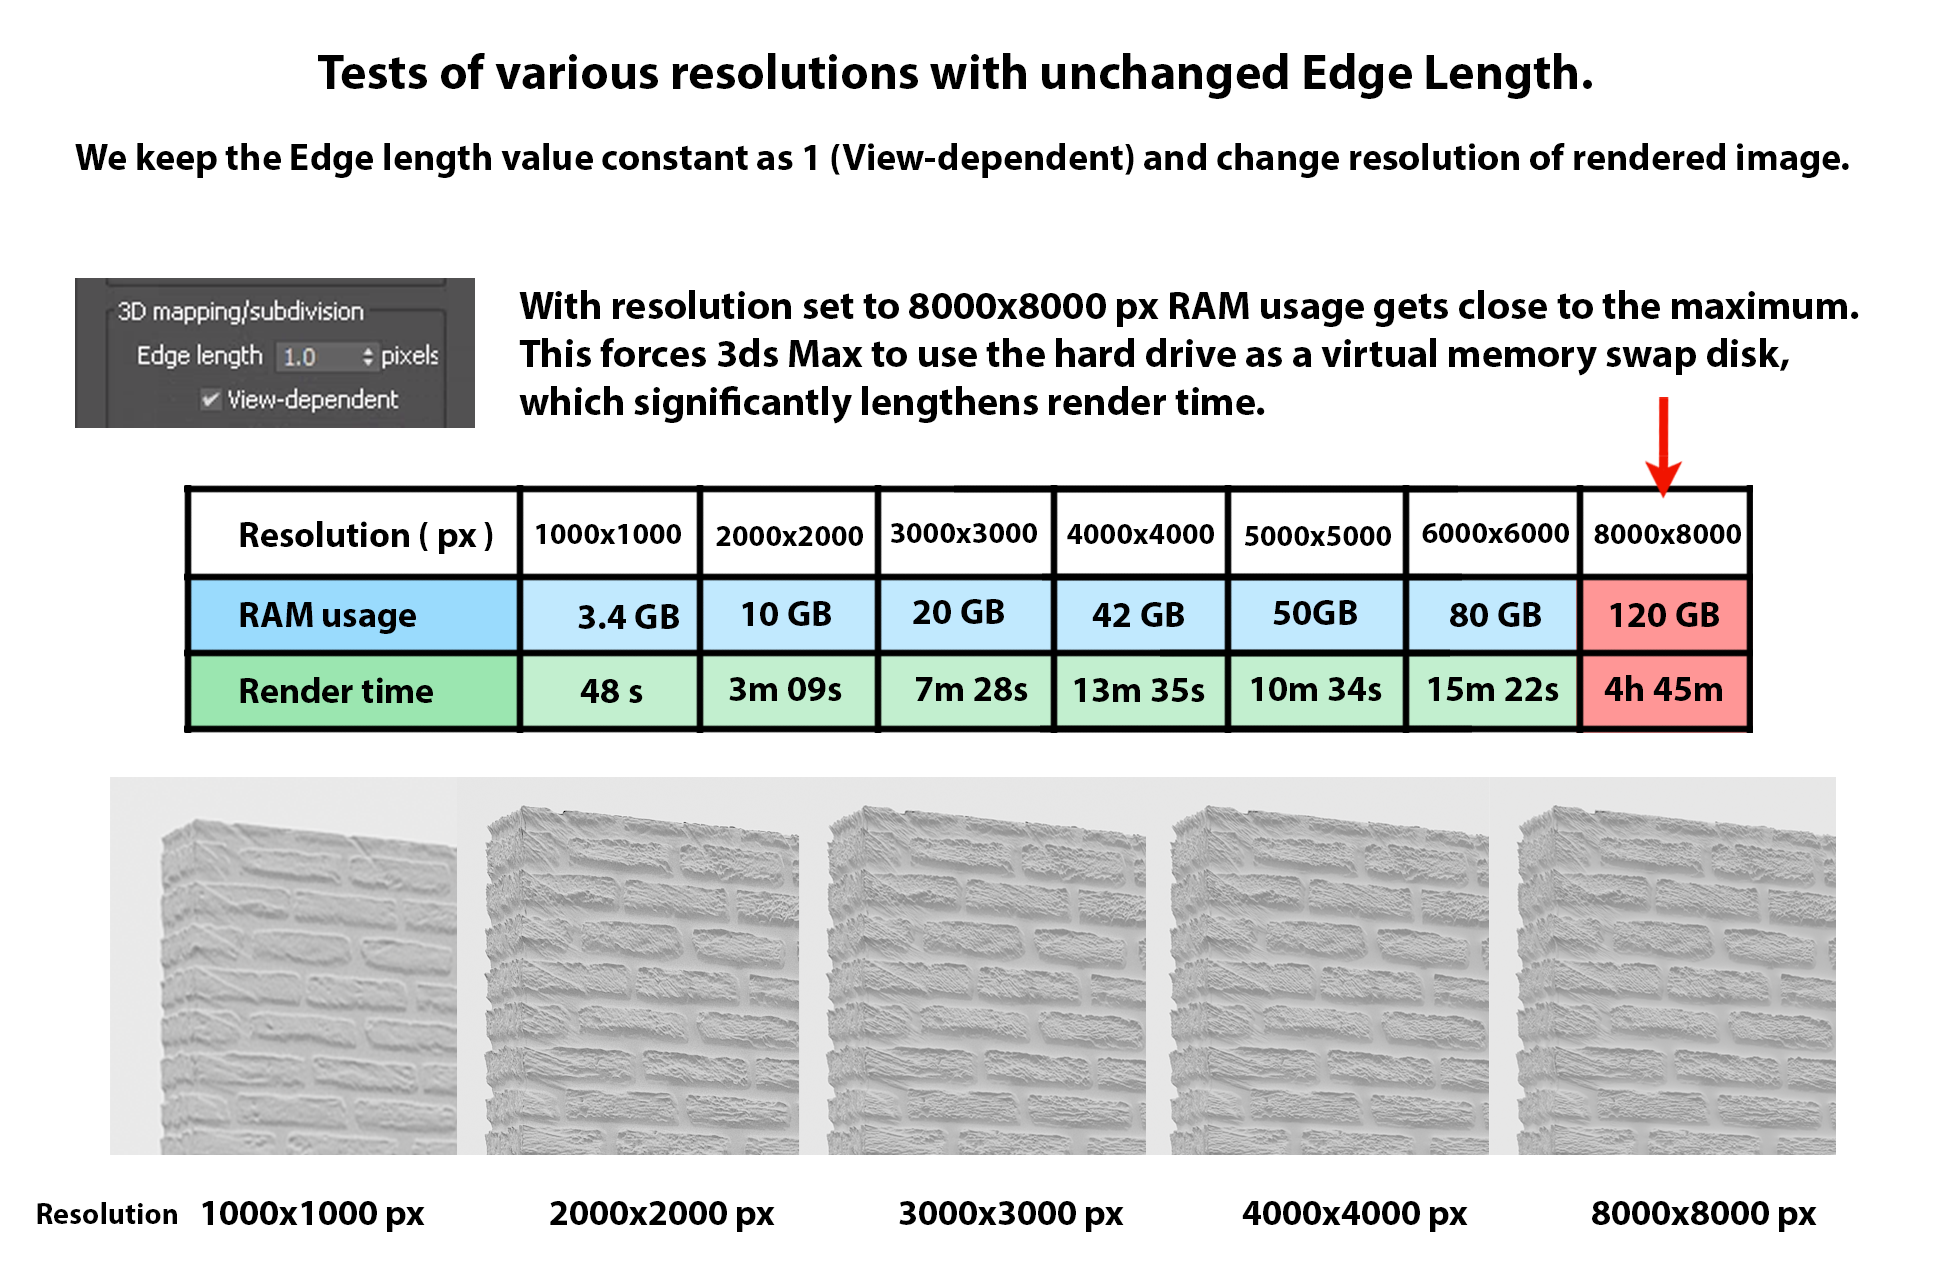
The amount of resources V-Ray uses gets bigger with higher resolutions and a constant Edge Length set in VRay Displacement Mod.
This is because the View-dependent option casts the mesh of rendered image pixels onto the scene; the mesh is the basis of the set maximum length of the subdivided triangle. The bigger the resolution, the denser the displacement mesh—even if we retain the same Edge Length value for all resolutions.
In most cases, Edge Length = 1px is a high-quality setting, but you may need to consider that the higher the resolution of your image, the better displacement quality you get from using the same Edge Length value. This similarly affects RAM usage.

If you want to send your scene to a third-party render farm, and it has its Edge Length = 4px at 4000x4000px to render at 20K resolution (for example), you would need to adjust the Edge Length to a new resolution. (As long as View-dependent is on.)
This is because leaving the Edge Length value proportionate to a low-resolution test but having the scene set to render at a much higher resolution causes your scene to crash or long render times and high costs. It’s a common mistake among cloud render farm users.
In general, if you multiply your resolution n-times, you will need to multiply the Edge Length n-times as well to get the same displacement density. For example, if you start with a resolution of 1000x1000 and an Edge Length of 1px and then decide to render the image in 4000x4000 resolution, the Edge Length should be set to 4px to get the same amount of geometry as in the previous resolution.
It doesn’t necessarily mean that the displaced model will look exactly the same in higher resolutions. In higher resolutions, much more detail would be visible in a 4 x 4 px square compared with that of a 1 x 1. Take note, also: the amount of RAM needed to render an image in various resolutions doesn’t depend solely on displacement mesh densities.
Below is an example of scaling resolution and Edge Length proportionally:
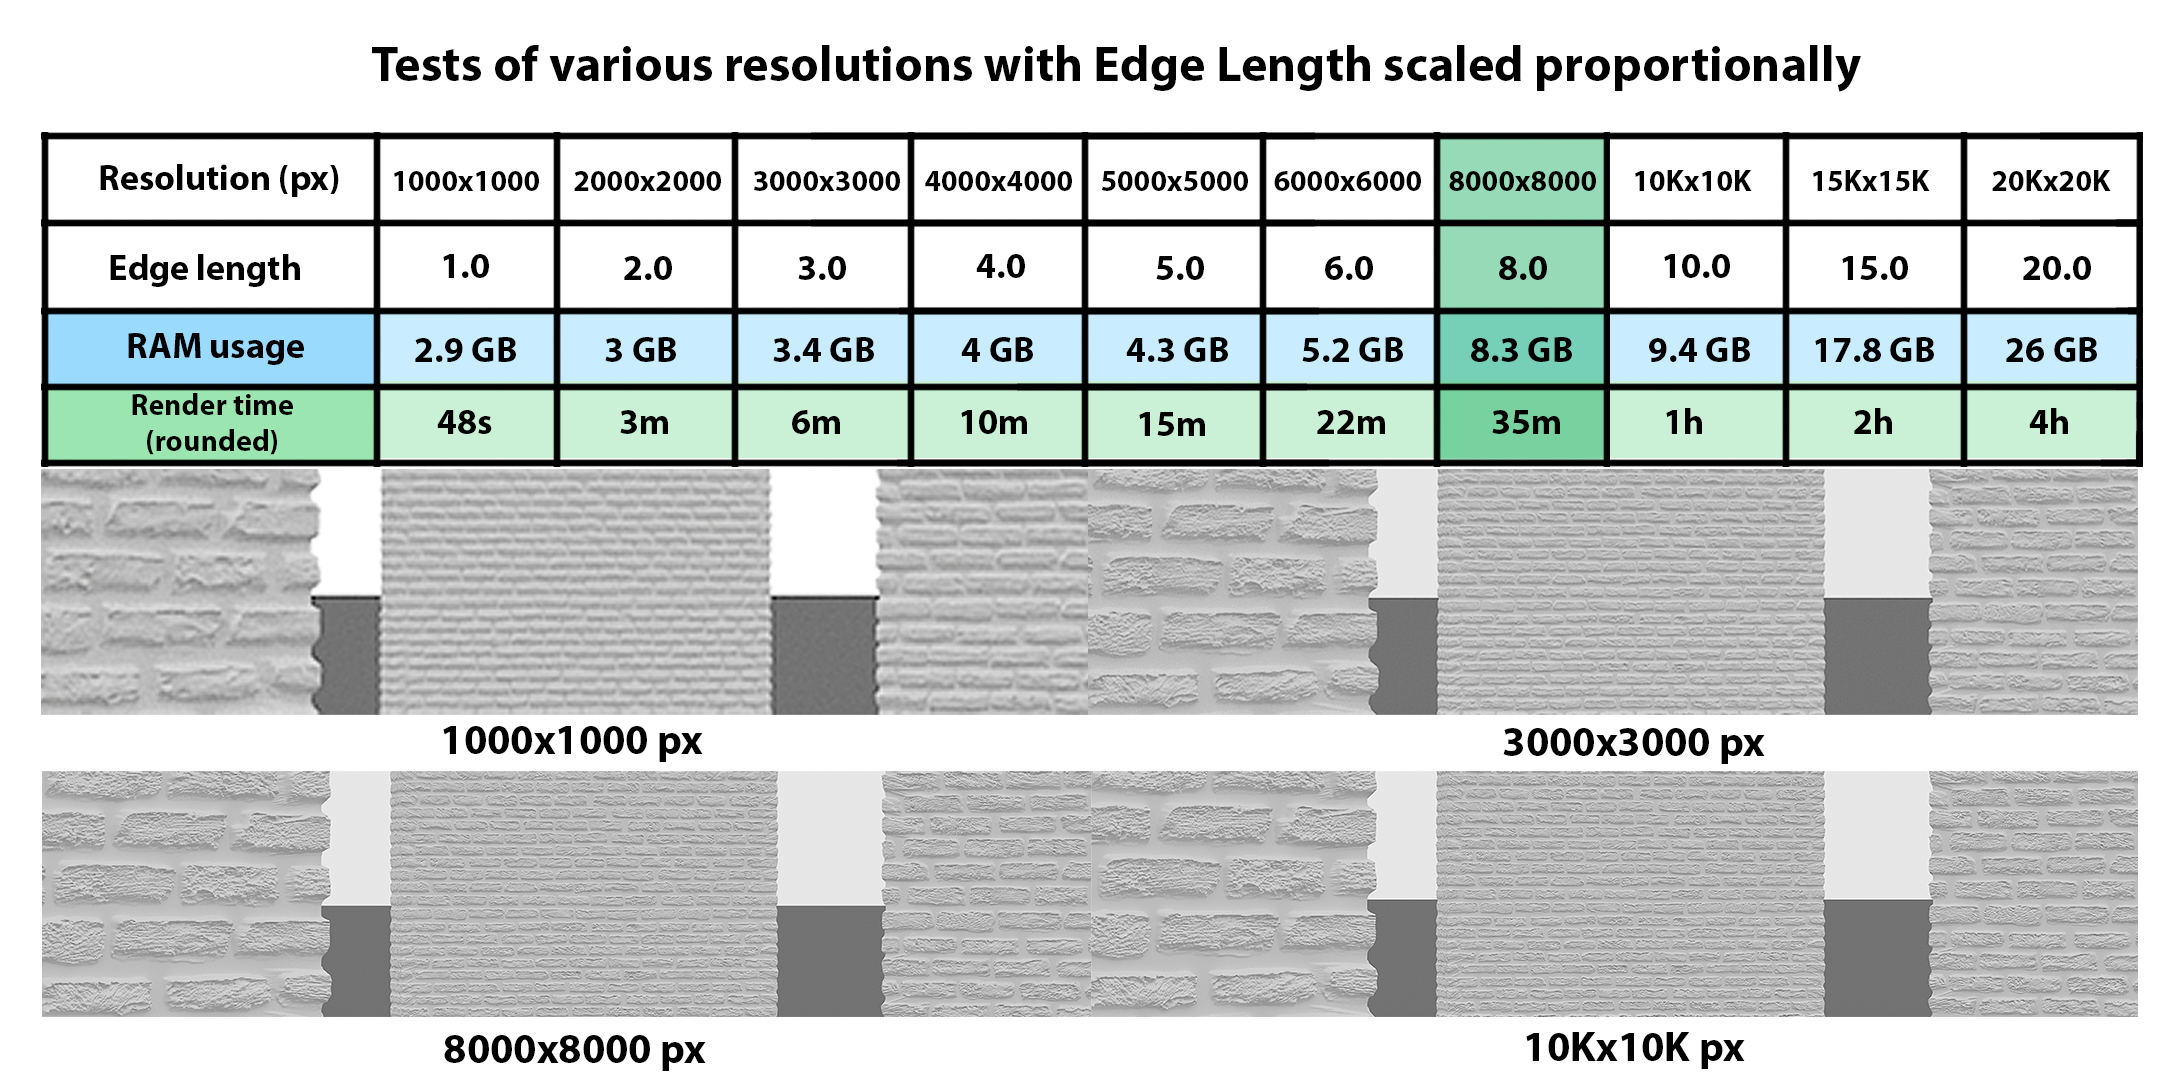
As you can see, while the amount of used RAM goes up, it’s not as fast as when the Edge Length remained constant; also, it didn’t reach a critical point in which the render speed drastically starts to slow down.
Consider this multiplier only as a starting point for setting up displacement at higher resolutions and as a way to avoid that drastic jump in RAM usage and render time. You can always tweak the multiplier accordingly to your desired look and the amount of RAM your computer has.
Now, let’s try to find ways to optimize the amount of RAM needed to render the test scene with the level of detail we need. In this case, we will work with an 8000x8000px resolution.
First, we will render the scene using various Edge Lengths to see what kind of quality we get and the number of resources it needs.

Based on these samples rendered with a region of the images, we can now choose which settings are optimal for the desired quality and available RAM. We’ll choose the third column (2.0) for the center object, the seventh column for the object on the right, and the 11th column for the object on the left. Now, on to rendering the whole image.
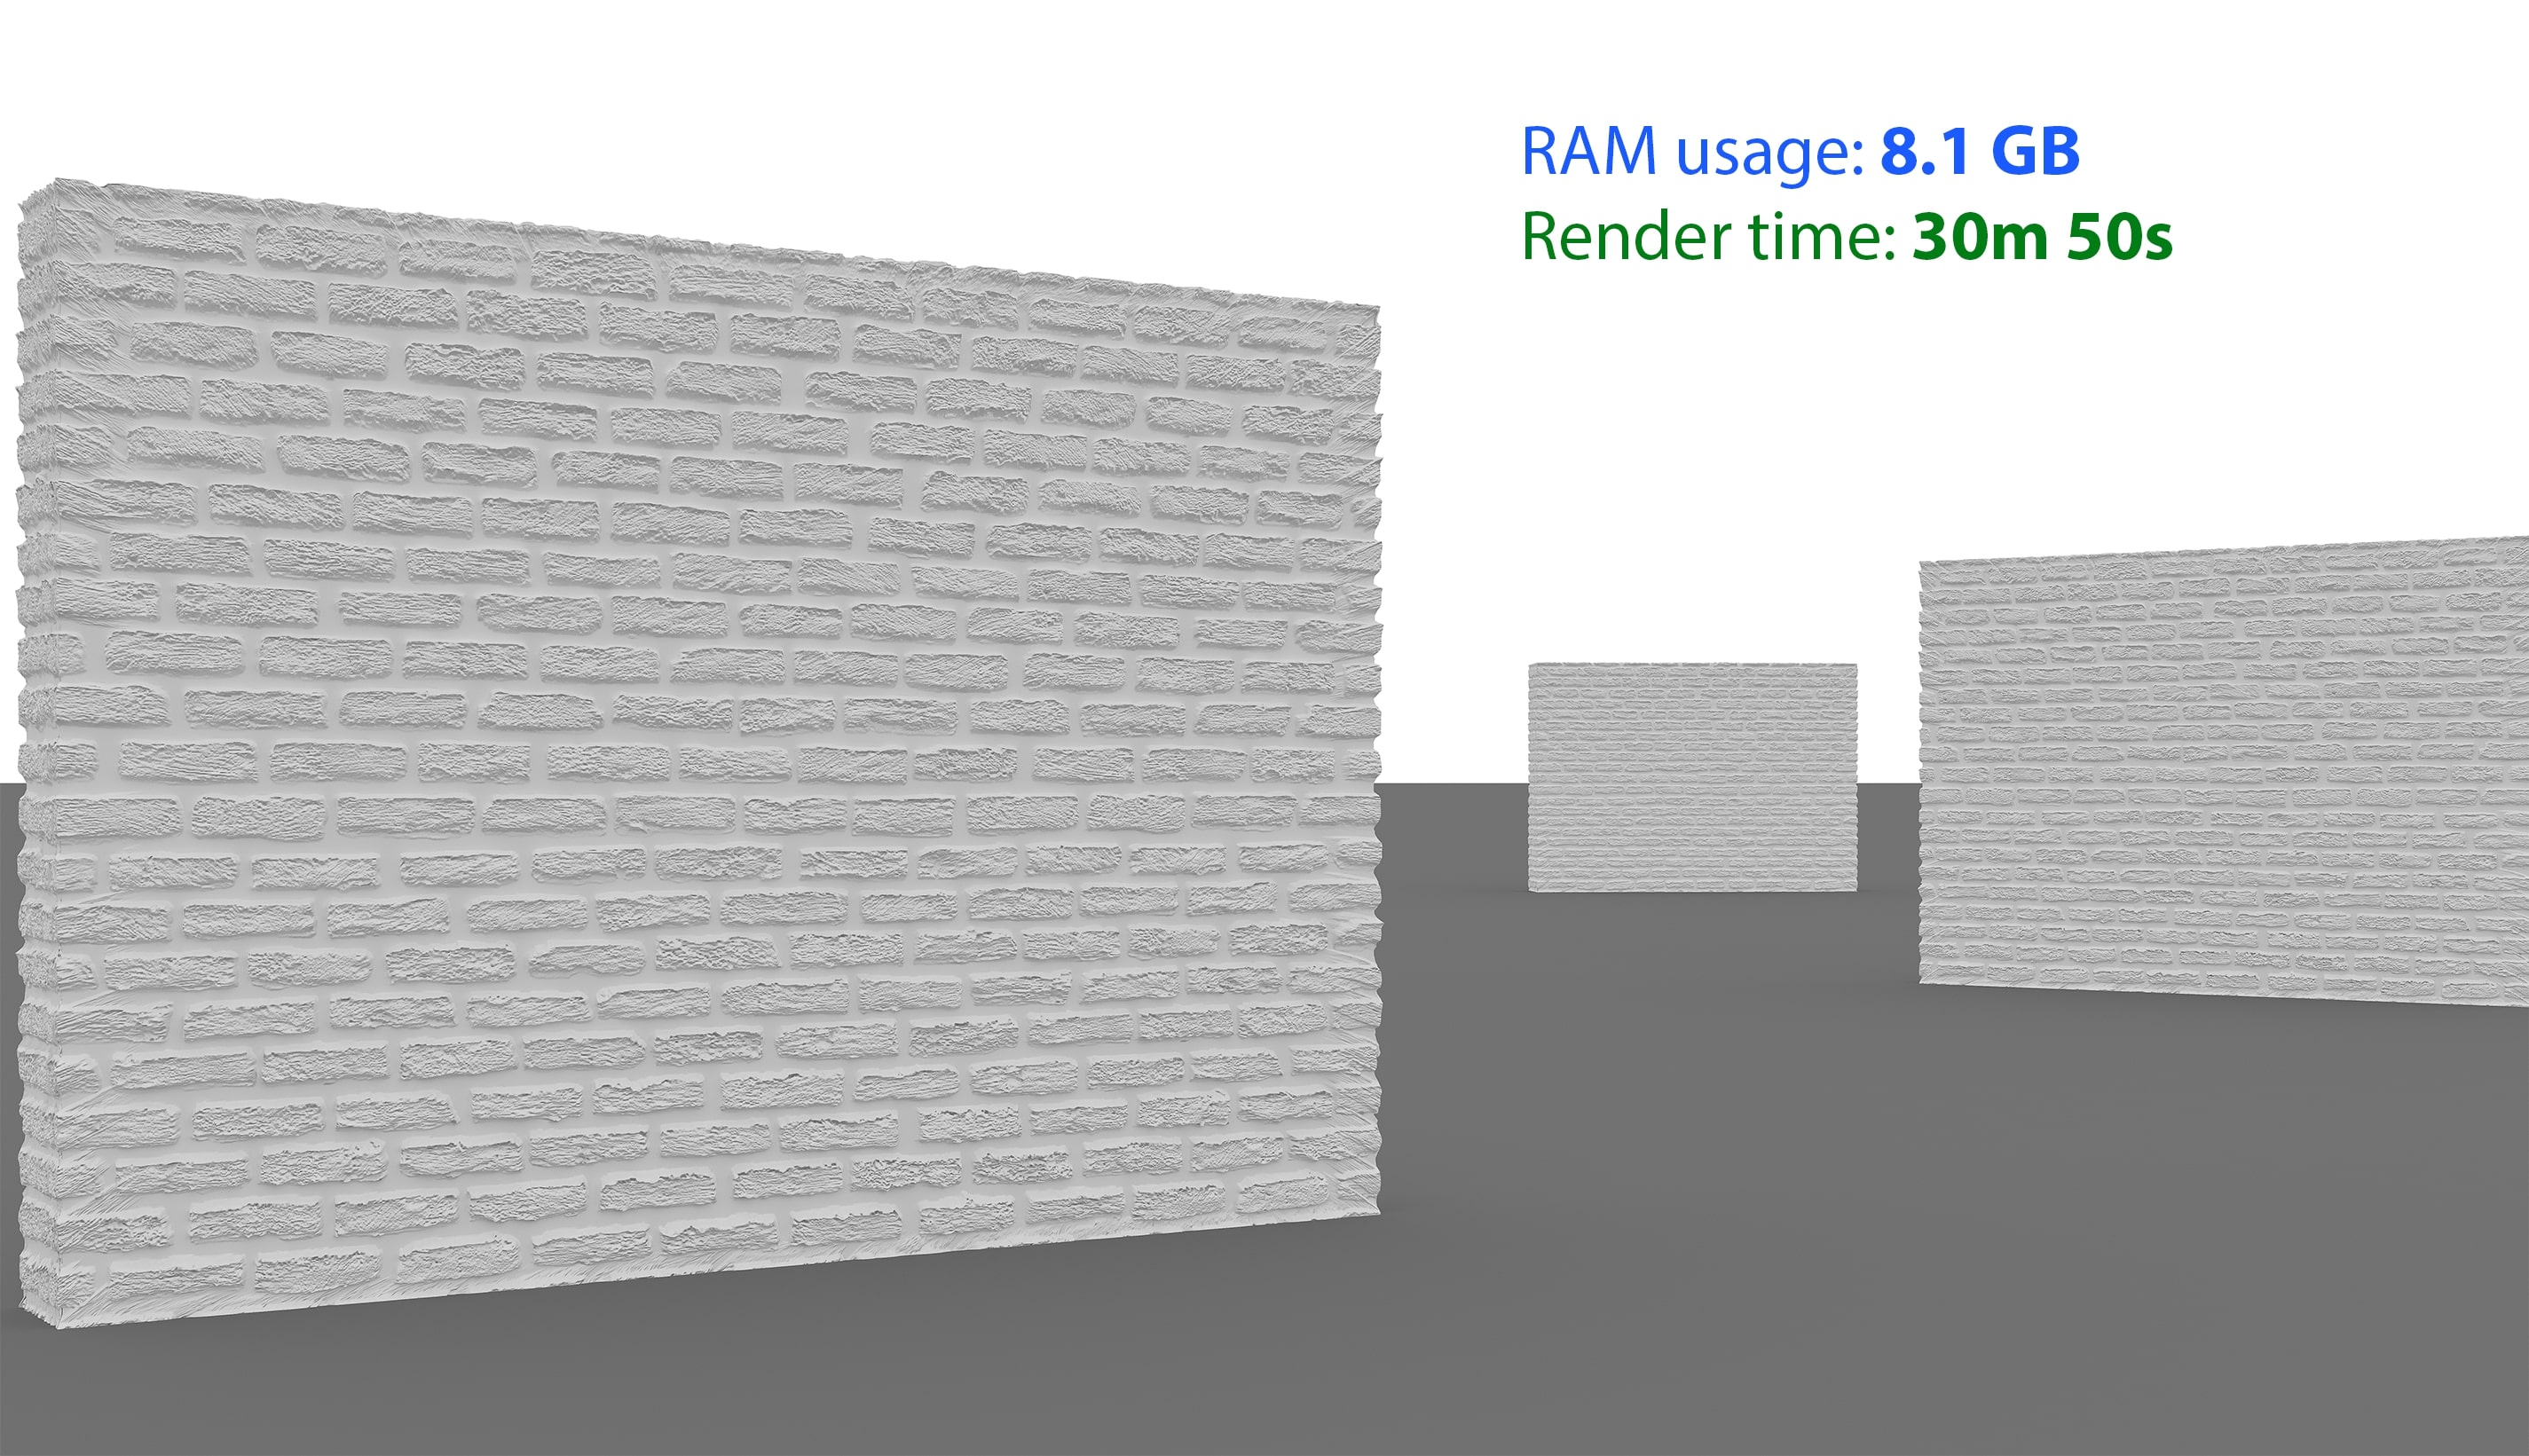
We now have the desired result through optimized settings.
Advantages and disadvantages of Vray Displacement Mod set to 3D mapping with View-Dependent Edge Length turned on:
Advantages
- Easy setup and scale
- 3D displacement maps with a View-Dependent Edge Length set optimizes displacement automatically—objects farther away from the camera will receive fewer subdivisions and less detail compared to objects at the fore.
Disadvantages
- You need to set the Edge Length value independently for every resolution you render your image with. This is especially a concern for when you locally send in a low-resolution image to a render farm and have it rendered in a very high resolution.
- If the scene is animated, the level of detail on the displaced models will change from frame to frame accordingly to the spaces occupied in the rendered image. So, the look of the objects may change slightly during the animation.
If you don’t want to recalculate the Edge Length value for every resolution you render your image in, or if you need the models to look exactly the same from every point of view, you can turn off the “View-Dependent” option and set displacement quality in world-scale units instead.
Vray Displacement Mod Modifier -> 3D mapping -> View-dependent turned off
When the View-dependent feature is off, the maximum size of the subdivided triangle’s mesh will be set to constant values in real 3D space, not values based on the image resolution.
You can check and set the world-scale units in the Units Setup window under the Customize tab. This is not the same as changing the values in the Display Units settings, as those determine what’s displayed in viewports; System Units, on the other hand, affect the actual geometry.
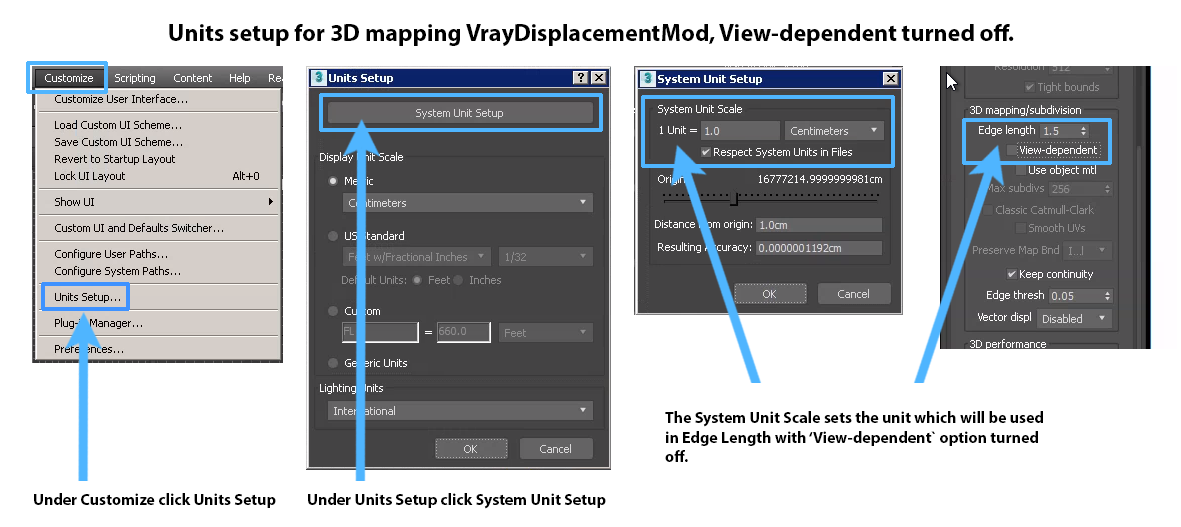
Let’s see how RAM usage reacts to different resolutions of the image with Edge Length set at the same value as real-world units.
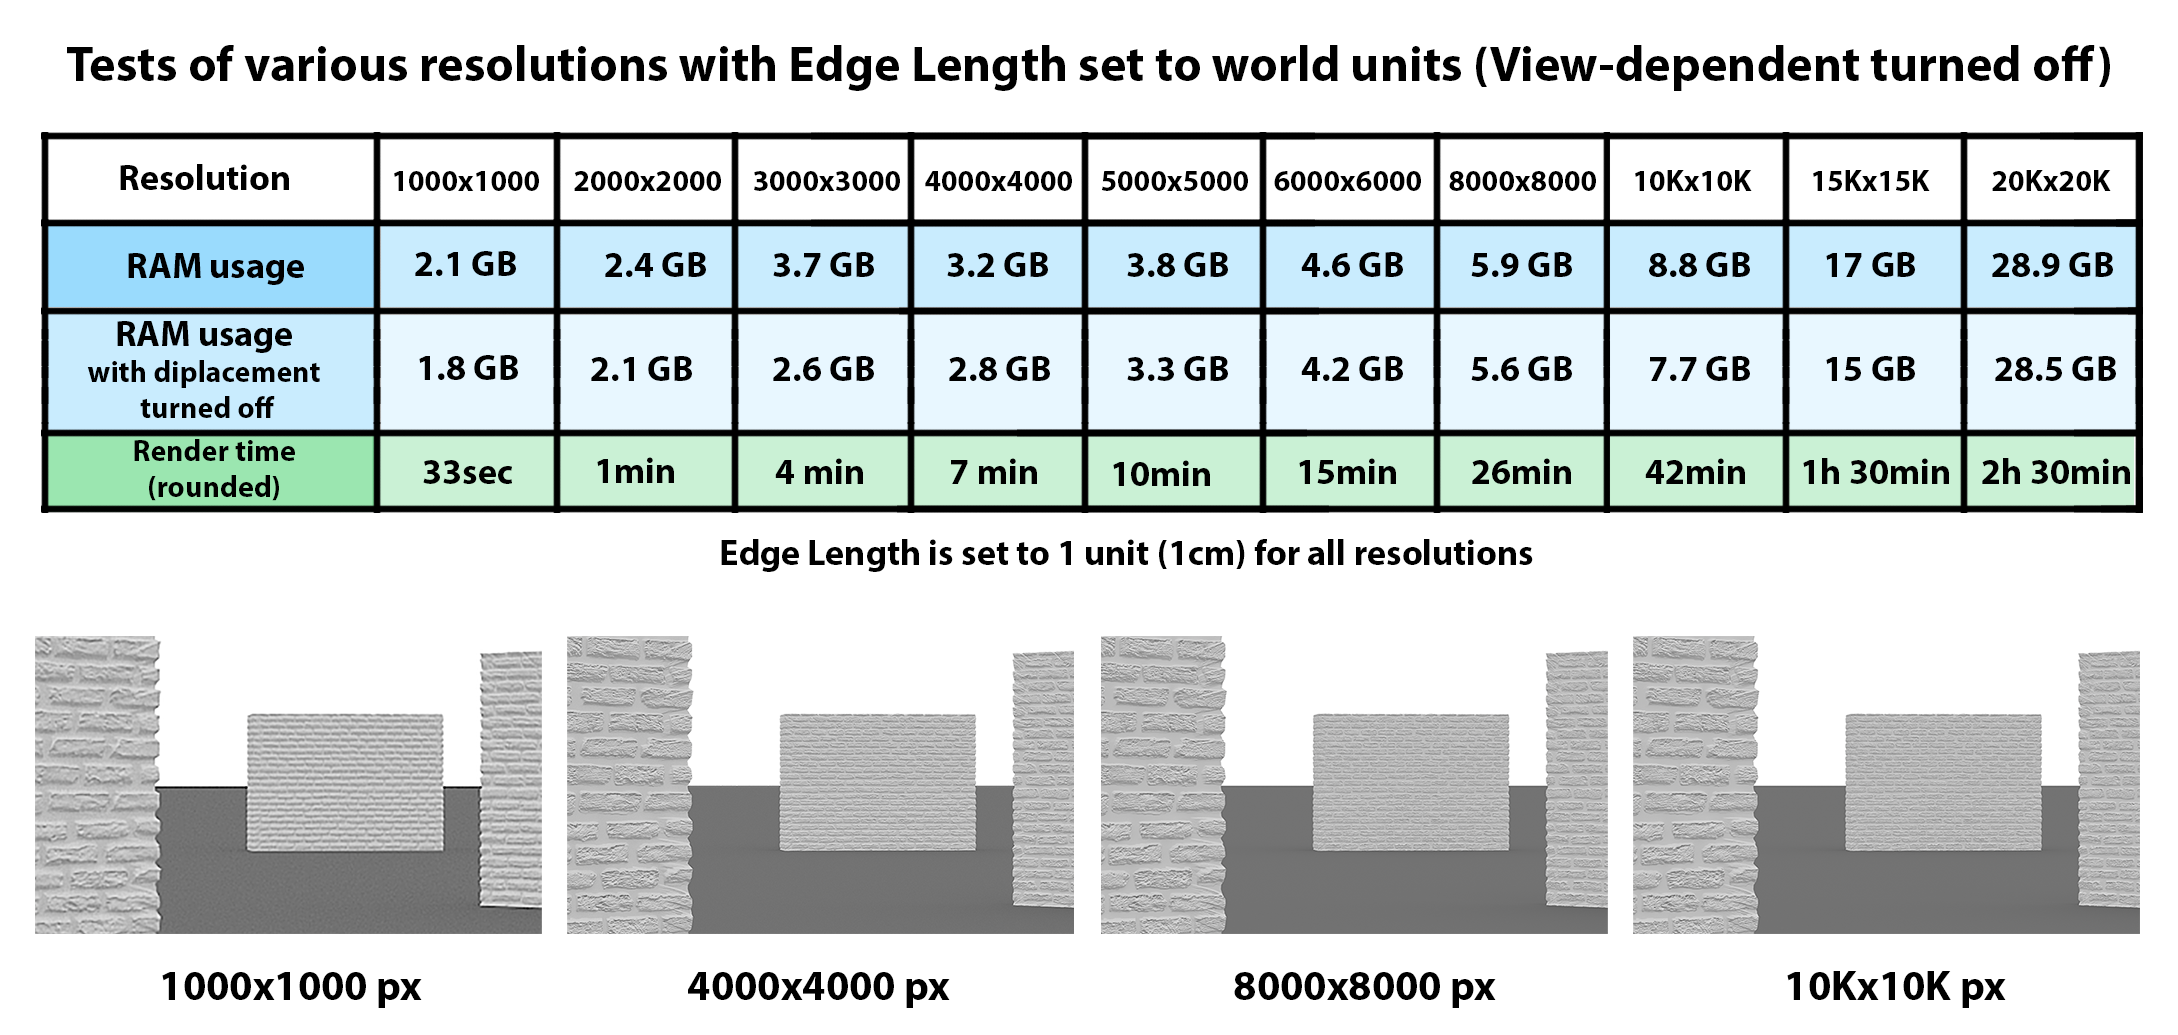
Compared to the RAM usage with displacement turned off, the standard RAM usage has a relatively stable rise of 300-400MB. Of course, the render time rises mostly because of rendering a larger image on the same machine.
Displacement quality doesn’t change with resolution. Although, in higher resolution images, details that were not visible in lower resolutions may lack some quality. In such a case, you need to set the Edge Length to a lower value.
Now, let’s see what happens to computer resources and the quality of displacement when we change the Edge Length value but retain resolution.

The rendering time, required RAM, and detail quality all rise as the Edge Length shortens. This goes the opposite way, too: with a very long Edge Length and minimal detail, the brick surface still renders on the model. However, the mesh would not be subdivided, resulting in an effect similar to bump mapping.
Let’s try to render the same scene from different camera angles.

While the render times differ because the models occupy different areas in the image, the RAM usage roughly stays the same.
This is because the amount of geometry generated by Vray Displacement Mod doesn’t change according to the camera position when we turn off the View-dependent option. That’s great for rendering animations. With View-dependent turned off, you can fix the look of the model regardless of where in the scene it will be rendered. When using the view-dependent setting, on the other hand, the quality of the displacement on a model changes as well.
So, in the case of animation, we can set all world-scale Edge Lengths to a value. If the computer’s RAM isn’t exceeded in one camera position, it won’t exceed for other positions as well (at least concerning displacement).
However, we need to ensure that the displacement quality is good enough for frames when the camera is closest to the displaced object. Incidentally, the quality would look good in frames where the camera is farther away.
Let’s make a simple camera animation and try to optimize the displacement settings.
Below are three test frames on the timeline where the camera is closest to a given displaced model and set optimal settings for satisfactory quality.
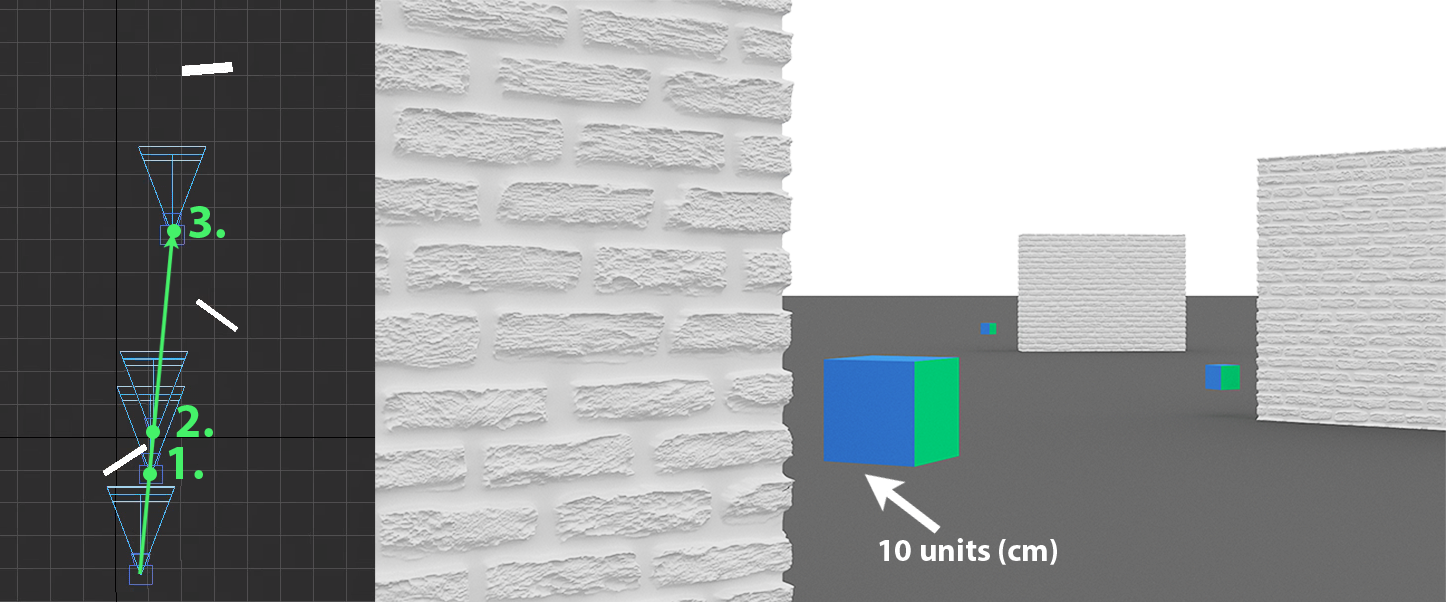
- The edge of the colored cube has exactly 10 units (cm); that same unit will be used for the Edge Length setting.
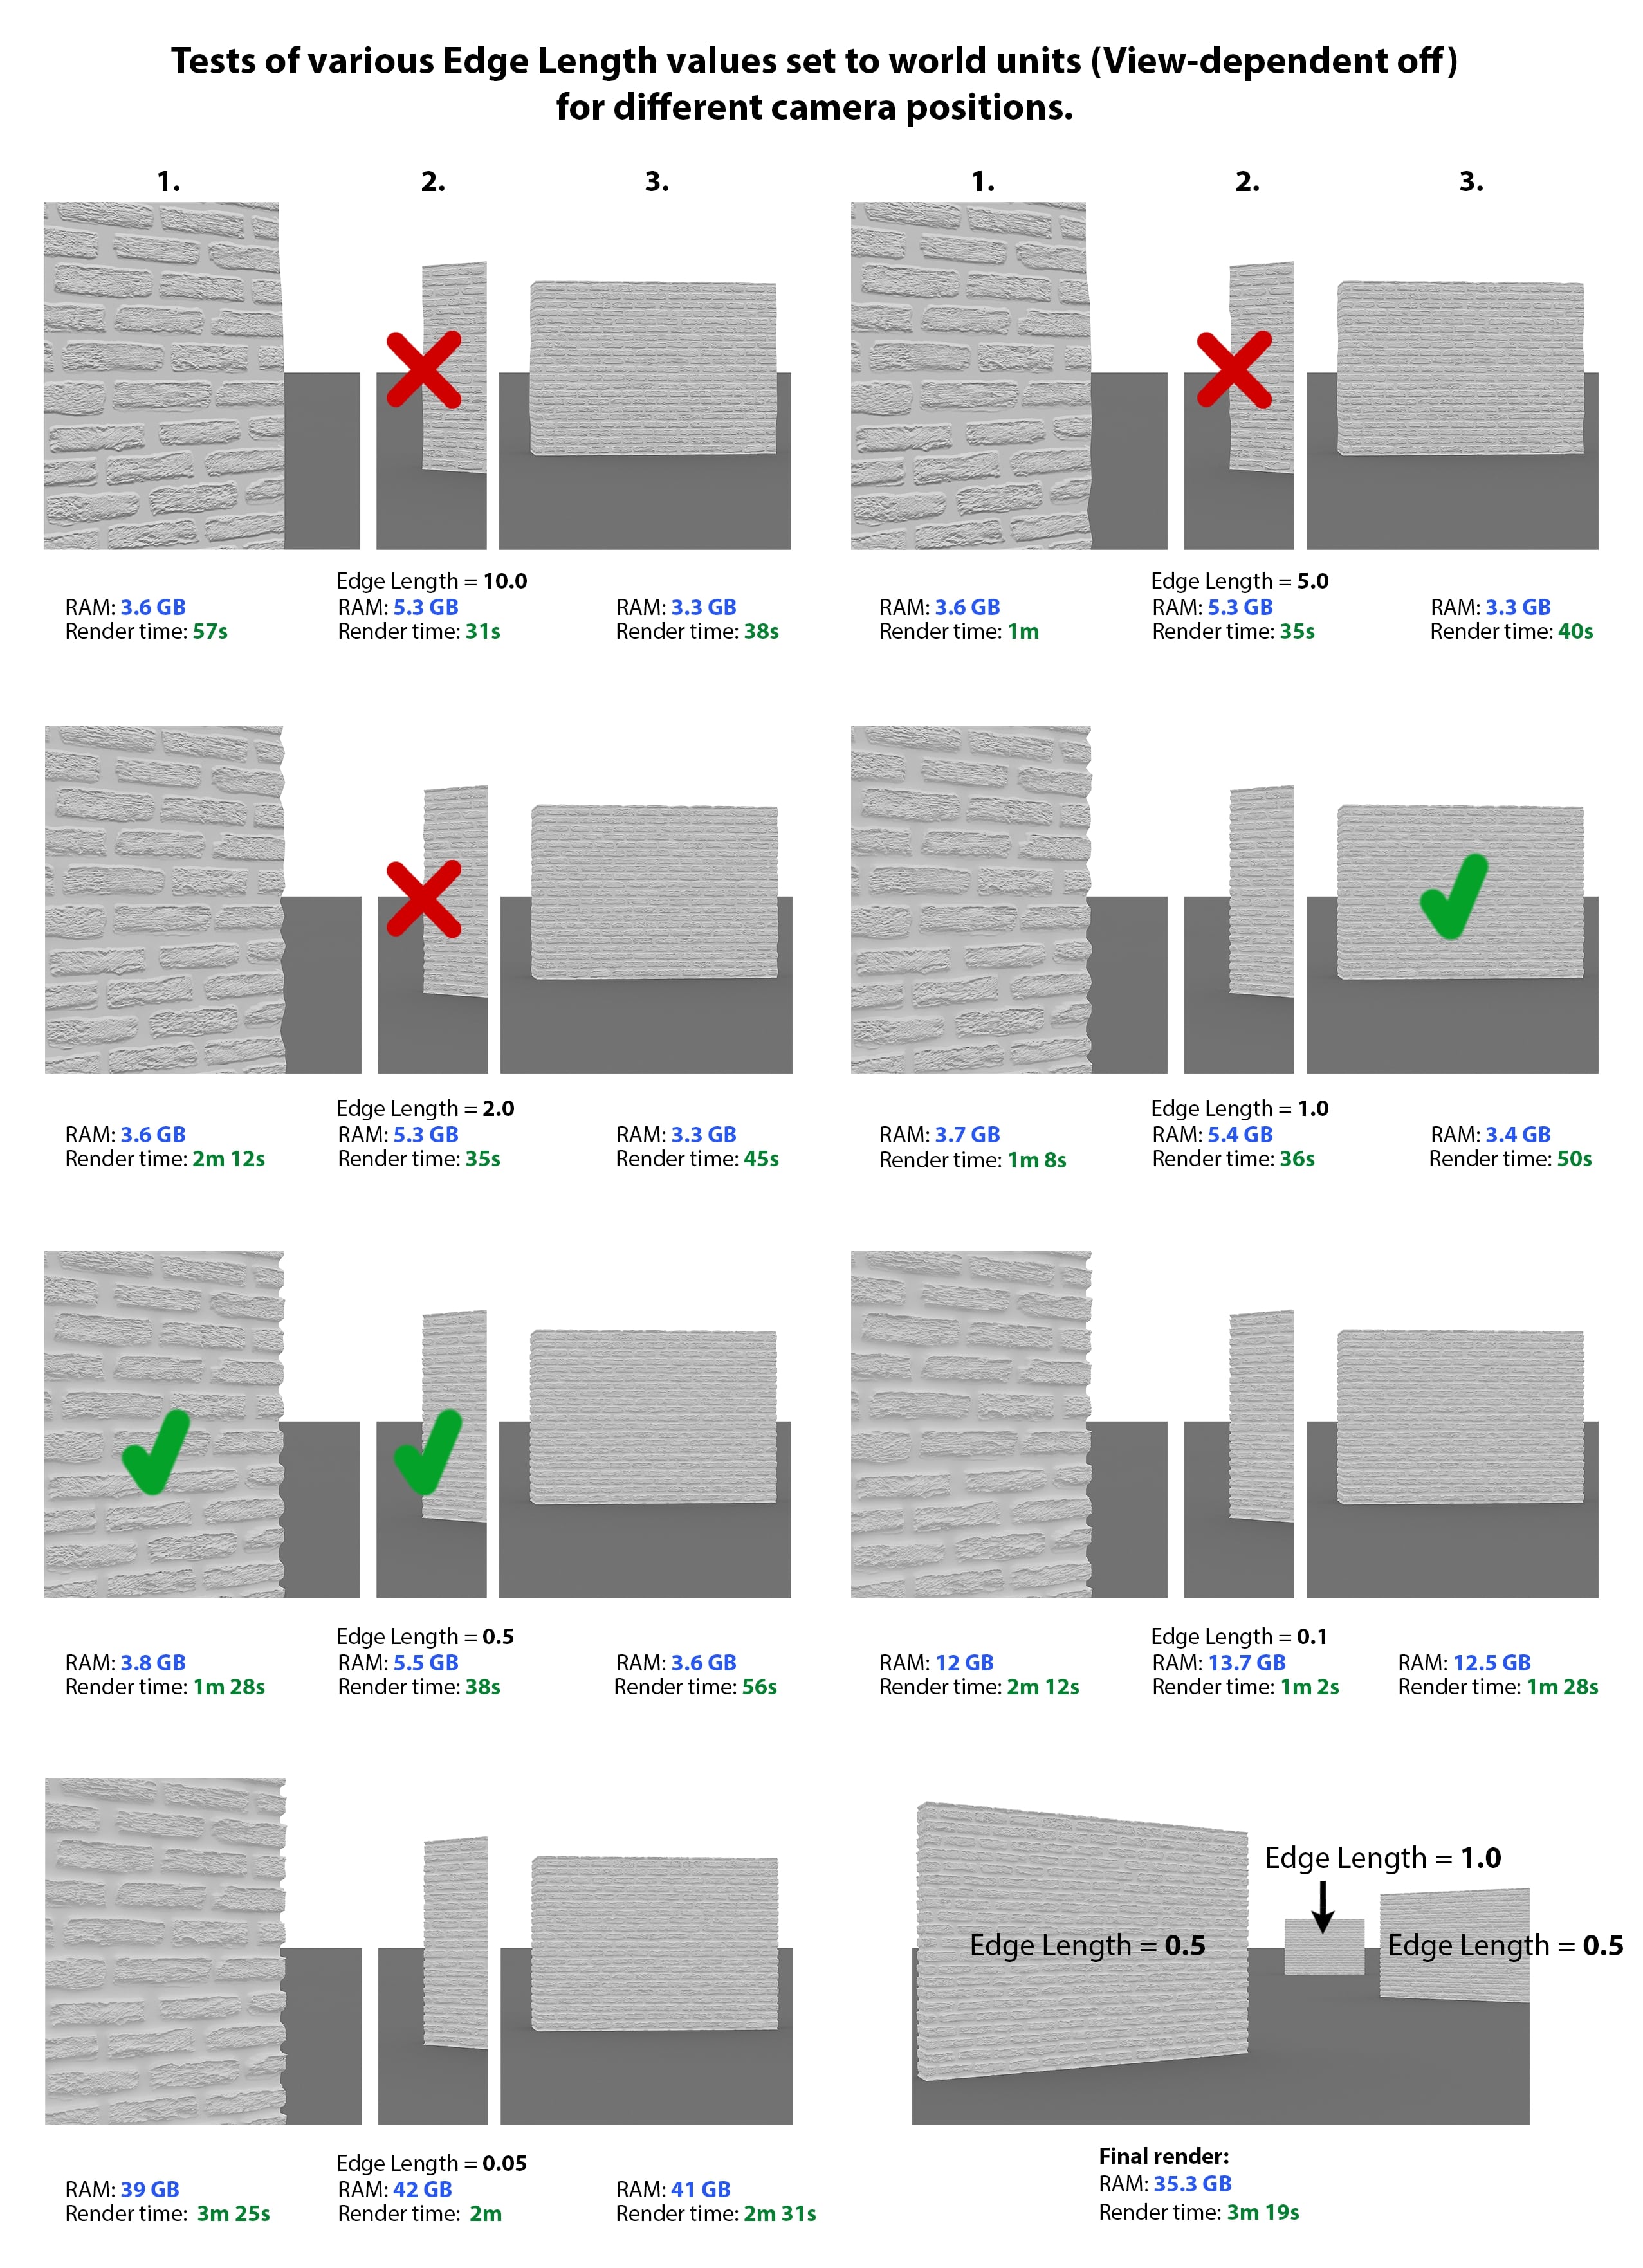
For all model tests, displacement was turned off for the other models. Therefore, RAM usage and render times of the tests are different compared to the final render in which all three models have displacement applied.
- Edge Lengths 10.0 and 5.0 generated quality too low for use.
- Edge Length 2.0 would do for the model farthest away, but it gave the wall a deformed shape in general.
- Edge Length 1.0 was enough for the model farthest away, but not enough for the two models at the fore.
- The models looked better with an Edge Length of 0.5.
- Edge Length 0.1 and 0.05 would be overkill for all the models. Although these values would create more detail, it would be too much for this particular map resolution. In effect, the map would have to be blurred in map or displacement settings.
We rendered the image with the chosen Edge Lengths (1.0 and 0.5). If the camera were placed in any other position than the three points we tested, the displacement will have quality at least as high as in the test frames.
Below are the listed advantages and disadvantages of Vray Displacement Mod set to 3D mapping with world-scale Edge Length (View-dependent off):
Advantages
- RAM usage is resolution independent
- A consistent quality of detail regardless of camera angle, in stills and animations distance of
- Using this method can help you avoid problems we tackled, such as setting your scene in a lower resolution because of insufficient RAM, then rendering higher ones on a local render farm or a cloud render farm (for example)
- Real-world units (such as cm) are easier to understand and apply than units dependent on the resolution
Disadvantages
- Rendering can use a lot of RAM if the mesh is dense and heavy
- You may overshoot with the settings for a model distant from the camera.
- It’s more time consuming to set the appropriate Edge Length for all models with displacement.
Summary
3D mapping with View-dependent Edge Length settings is a handy way to set displacement quality. Objects closer to the camera undergo more subdivisions than those farther away. The downside of this is that you will often need to adjust the setting depending on the set resolution of your render. If you leave the settings to provide high quality to a low-resolution image, the scene can crash, freeze, or take forever to render in high res.
Also, the number of subdivisions is set based on the model’s size on the rendered image. If during an animation, the model draws closer or moves farther away from the camera, its level of detail will change. Sometimes, the changes can be unwanted.
You can always turn off the View-dependent option in Edge Length settings and set the size of displaced features in real-world units instead. In this case, you would need to manually set every model to look good at the resolution you render in, as the level of detail won’t be dependent on resolution. However, RAM usage for rendering won’t spike as resolution increases.
In the next part of the guide, we will test 2D mapping in VRay Displacement Mod and try various optimization techniques that are not connected to any specific mapping mode, like deleting not visible faces, using bump instead of displacement for models placed far away from the camera, and other optimization tips.
Sources
https://www.cggallery.com/tutorials/displacement/
https://docs.chaosgroup.com/display/VRAY3MAX/Displacement+Modifier+%7C+VRayDisplacementMod - V-Ray 3.6 documentation
https://docs.chaosgroup.com/display/VRAY4MAX/VRayDisplacementMod - V-ray 4 documentation
https://forums.chaosgroup.com/forum/ - Chaos Group forums
Own experience and tests
Textures used for illustrations and tests are taken from https://www.textures.com/ and https://texturehaven.com/
Useful links
https://pixologic.com - Zbrush (a 3D sculpting tool ideal for creating displacement maps)
https://www.autodesk.com/products/mudbox/overview - Mudbox (a tool similar to Zbrush)
https://cpetry.github.io/NormalMap-Online/ - Free online tool for creating displacement, bump, AO, and normal maps
http://www.crazybump.com - application for automatic creation of all kind of maps from photos, including displacement
https://github.com/kmkolasinski/AwesomeBump - AwesomeBump - a free alternative to CrazyBump
https://www.foundry.com/products/mari Mari - 3D texture painting software
https://3dcoat.com - 3D model texturing software
Credits
This guide has been created by Michał Moś and edited with the help of the team at GarageFarm.NET. We derived most of the knowledge used in this guide from an extensive experience running a render farm for almost a decade as well as from the Autodesk Knowledge Network and Chaos Group V-ray documentation. Textures used in the tests are from https://www.textures.com/.

Michał Moś ( aka ‘Andrew’ ) is part of GarageFarm.NET team specializing in 3d rendering topics from animation and troubleshooting to technical writing. He has worked for numerous design and architectural companies as a CG artist, designer, and instructor. Weapon of choice – 3ds Max, C4D, V-Ray and Octane. He loves drawing, creative writing, and tabletop RPGs.
https://michalmos.carbonmade.com
https://blog.garagefarm.net/
Register Now and Get $50 FREE Credits!


