Key Takeaways
- Use Simple Deform when you need to bend an object in Blender through a controlled angle while keeping the result editable.
- Use the Curve Modifier when a long object, such as a pipe, cable, road, rail, or trim, needs to follow a specific path.
- Use the Bend transform for fast, direct edits in Edit Mode when you do not need a non-destructive setup.
- Use the Lattice Modifier when you want to reshape a broad or localized part of a mesh without manually moving large numbers of vertices.
- Use Geometry Nodes when the bend needs reusable parameters or procedural control.
- Use an Armature when the object needs to bend as part of an animation.
- Before switching tools, check scale, local axes, origin placement, topology, and modifier order. Many Blender bending problems start with the object setup rather than the modifier itself.
TL;DR: Which Blender bending object method should you use?
Introduction
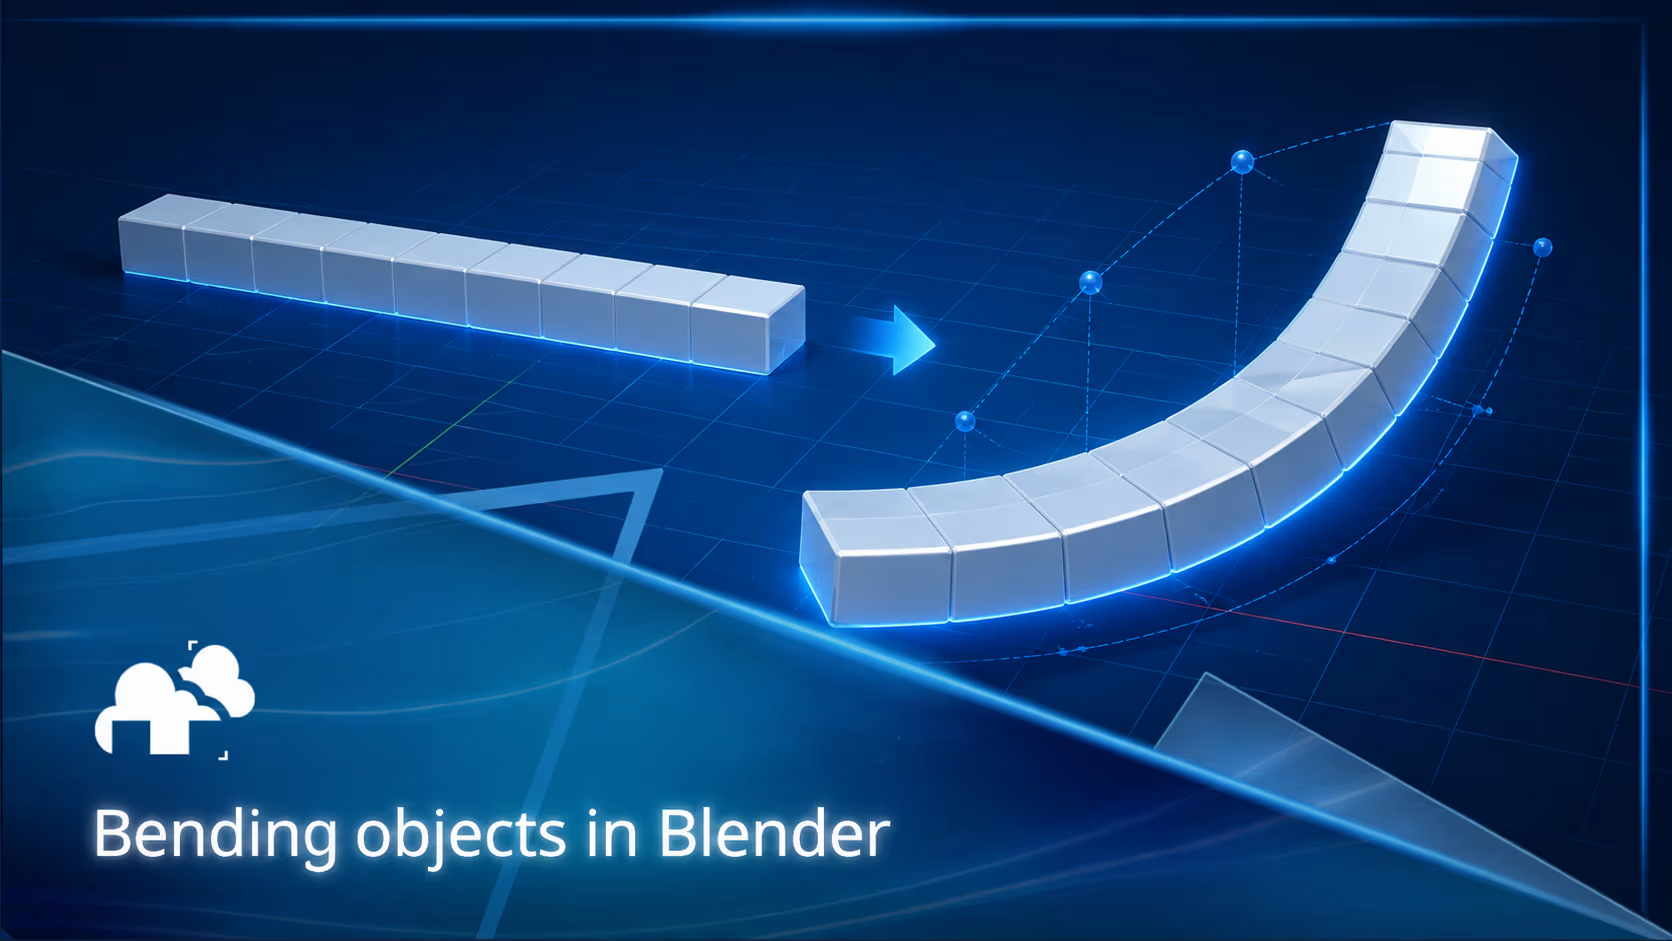
Bending objects in Blender can be done in several ways, and the right method depends on the shape and control you need.
A bracket that needs a clean 90-degree bend has different requirements from a cable that must follow a winding path. A curved product panel may only need a Simple Deform modifier, while a detailed prop that needs a broader correction may be easier to reshape with a Lattice.
Blender gives you several ways to bend and deform a mesh because these are different modeling problems.
In this guide, we will look at six practical methods for bending objects in Blender, including the Simple Deform Modifier, Curve Modifier, Lattice Modifier, Bend tool, Geometry Nodes, and Armatures. We will also cover the setup problems that commonly cause stretching, twisting, pinching, unexpected offsets, or a Blender Curve Modifier that seems not to be working at all.
Keeping these deformations non-destructive can also make later revisions easier, especially when the scene eventually needs to move from modeling into lighting, animation, and final rendering on a Blender render farm.
Why Blender offers different ways to bend objects
It is tempting to look for a single "Blender bend modifier," but bending can describe several different operations.
You might need to:
- bend a straight object through a fixed angle
- curve a mesh along a custom path
- bend only one part of an object
- reshape an already detailed model
- create several versions of the same curved asset
- animate the bend later
Each problem benefits from a different kind of control.
For most straightforward bends, start with Simple Deform. If the object needs to follow an irregular path rather than form a simple arc, the Curve Modifier is usually the better choice. If the object is already detailed and you only need to push a larger region into shape, a Lattice Modifier may save you from editing the underlying mesh directly.
Before bending: prepare the object
A surprising number of failed bends are caused by the object setup rather than the deformation tool.
Before adding modifiers, check the following.
Add geometry in the direction of the bend
Blender can only deform the geometry that already exists.
Imagine trying to bend a long rectangular box that only has vertices at each end. Blender has no intermediate points to create a smooth arc, so the result will either stay rigid or form a sharp corner.
Add evenly spaced loop cuts or subdivisions along the direction that needs to bend.
The important part is where the geometry is placed, not simply having a high polygon count. Twenty useful segments running across the bend can produce a cleaner result than hundreds of polygons concentrated somewhere else.
For a deeper explanation of why polygon distribution affects deformation, see our guide to topology in 3D modeling.
Apply scale and check rotation
In Object Mode, use:
Ctrl + A > Scale
Apply Rotation as well if the object's local axes no longer match the direction in which you expect it to deform.
Non-uniform scale is one of the first things worth checking when a bend looks uneven. A mesh that appears visually correct in the viewport can still have object-level scale values such as X: 1, Y: 0.4, Z: 2. Blender's deformation calculations still see those values.
Before adding more subdivisions or rebuilding the mesh, check the transforms first.
Check the origin and local axes
The object's origin can change where a bend appears to pivot.
Simple Deform normally calculates its bend relative to the object's origin unless another object is assigned through the Origin field.
The Curve Modifier is also highly dependent on orientation. The mesh's local axis, the curve's position, and the relative origins of both objects all affect the result.
If your object suddenly jumps, bends backward, rotates unexpectedly, or starts curving from the wrong place, do not immediately start moving vertices. Check the axis and origin first.
Plan the modifier order
Blender evaluates modifiers from top to bottom.
That matters when one modifier creates geometry that another modifier needs.
For example:
Subdivision Surface → Simple Deform
means the additional geometry created by Subdivision Surface can participate in the bend.
Changing the order to:
Simple Deform → Subdivision Surface
means Blender bends the lower-resolution mesh first and smooths it afterward.
Neither order is universally correct. They simply produce different results.
The same principle applies to Solidify, Bevel, Boolean, Curve, and other modifiers.
A useful rule is to separate your stack into three jobs:
- modifiers that create the geometry needed for deformation
- modifiers that create the major shape change
- modifiers that add final thickness, smoothing, or edge treatment
Then test exceptions rather than assuming one stack order works for every model.
Method 1: Bend an object with the Simple Deform modifier
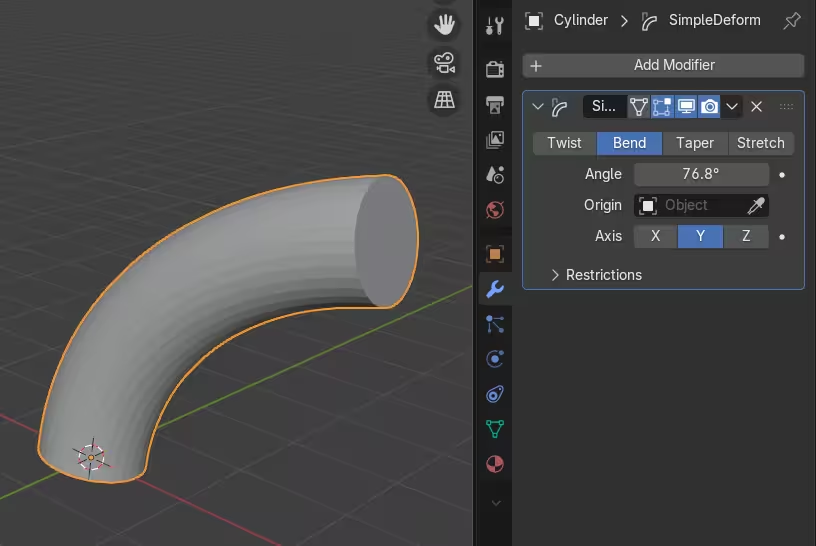
If you are looking for the closest thing to a dedicated Blender bend modifier, start with Simple Deform.
The Simple Deform Modifier has several deformation modes, but Bend is designed for creating a uniform arc around an axis.
It works especially well when the desired shape can be described with a clear angle.
How to use Simple Deform in Bend mode
- Select the object in Object Mode.
- Apply its scale using Ctrl + A > Scale.
- Apply Rotation if the object's local axes no longer match its visible orientation.
- Add enough loop cuts or subdivisions along the direction that needs to bend.
- Open Modifier Properties.
- Choose Add Modifier > Deform > Simple Deform.
- Set the deformation method to Bend.
- Choose the appropriate X, Y, or Z deform axis.
- Adjust Angle until you get the required bend.
- Use Limits if only part of the mesh should bend.
- Use a vertex group if you need more control over which vertices are affected.
You can also assign an Empty through the modifier's Origin field. Moving or rotating the Empty changes the center and orientation used for the deformation without changing the original mesh.
When Simple Deform is the right choice
Use Simple Deform for things such as:
- curved brackets
- handles
- signs
- product components
- metal strips
- curved panels
- rings and partial rings
- architectural details
- simple mechanical parts
It is particularly useful when you want a bend that remains adjustable.
For example, if a client changes a curved panel from 45 degrees to 60 degrees, changing one modifier value is much easier than manually rebuilding the shape.
Bending a cylinder, pipe, tube, or plane
The same basic principle works whether you are trying to bend a cylinder in Blender, bend a plane, or curve a rectangular mesh.
The key requirement is enough geometry along the direction of the bend.
For a cylinder or tube, make sure there are enough longitudinal segments. Increasing the number of radial sides will make the cylinder rounder, but it will not necessarily make the bend smoother.
That distinction is easy to miss.
If the bend runs along the cylinder's length, it is the segments along that length that matter most.
Method 2: Use the Bend transform in Edit Mode
Blender also includes a direct Bend tool for mesh editing.
Unlike Simple Deform, this method changes the selected vertices directly.
It is useful when you need a quick shape adjustment and do not expect to change the bend repeatedly later.
How to use the Bend tool in Blender
- Enter Edit Mode.
- Select the vertices you want to bend.
- Position the 3D Cursor if you need a particular center of rotation.
- Choose the appropriate Transform Pivot Point.
- Move to a clear orthographic view.
- Press Shift + W to use the Blender Bend shortcut.
- Move the pointer to adjust the angle.
- Click to confirm.
- Open the Adjust Last Operation panel if you want to enter an exact value.
The viewing angle matters because the operation uses the current view plane when determining the bend.
If the tool appears to bend in a completely unexpected direction, first check your view and pivot rather than assuming the mesh is at fault.
When to use the Bend transform
The Bend transform works well for:
- blockouts
- quick modeling changes
- simple low-poly edits
- one-off corrections
- shapes that do not need an editable modifier afterward
If you think the angle may change later, Simple Deform is usually safer.
Method 3: Bend an object along a path with the Curve modifier
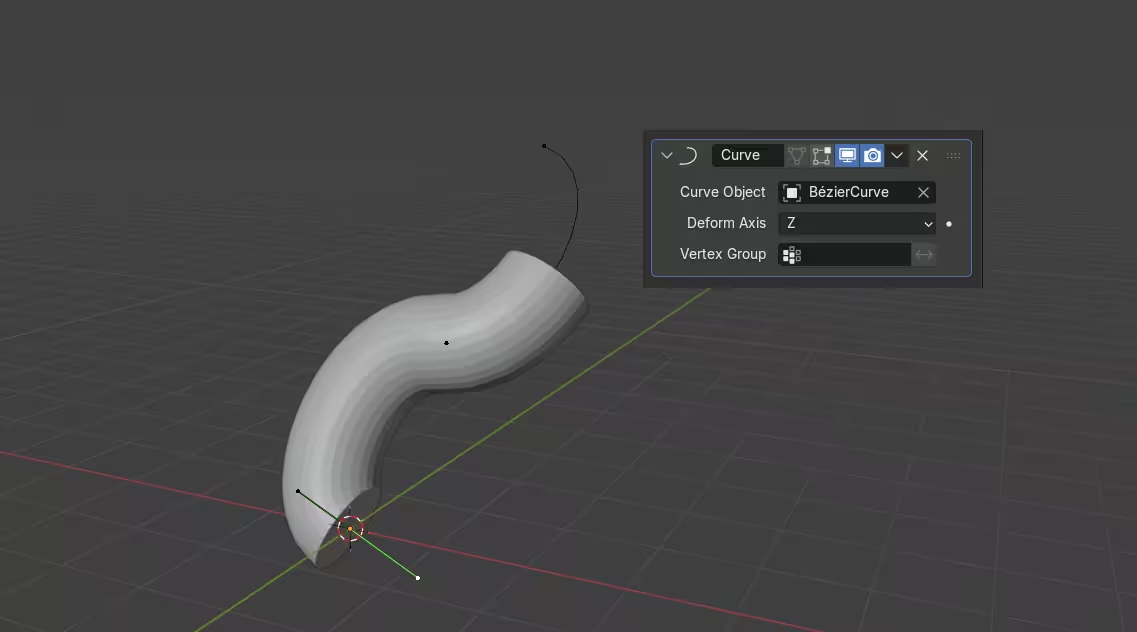
The Blender Curve Modifier is usually the better option when an object must follow a path rather than bend through one uniform angle.
Typical examples include:
- pipes
- cables
- hoses
- roads
- rails
- ropes
- trim
- decorative strips
- repeated linear details
Instead of manually bending the mesh, you shape a curve and let the mesh deform along it.
This gives you a useful separation between the object's cross-section and its path.
How to use the Curve Modifier in Blender
- Model the mesh straight along one primary local axis, commonly X.
- Add enough subdivisions along the length of the mesh.
- Add a Bezier or NURBS curve.
- Edit the curve into the path you want the object to follow.
- Apply scale to both the mesh and curve.
- Position their origins sensibly before adding the deformation.
- Select the mesh and add a Curve Modifier.
- Choose the curve as the modifier's target Object.
- Set the Deform Axis to match the direction in which the mesh was modeled.
- Try the negative axis option if the deformation runs backward.
- Edit the curve's control points to refine the final shape.
You can continue editing the curve after the modifier is added. That is one of the main advantages of this setup.
Move a control point and the object follows.
Making an object follow a curve in Blender
If your actual goal is to make an object follow a curve, it helps to think of the setup as two separate components:
Mesh: determines what the object looks like.
Curve: determines where the object goes.
Keeping those jobs separate makes the system much easier to adjust.
For example, you can refine the cross-section of a cable without rebuilding its route, or reshape the route without remodeling the cable itself.
This is different from general curve modeling, where the curve itself may be used to generate the object's visible geometry. If you want more background on meshes and curves as modeling methods, see our guide to modeling in Blender.
Why the Blender Curve Modifier is not working
The Curve Modifier is simple once configured correctly, but its dependence on orientation makes it one of the easier deformation tools to set up incorrectly.
If the Blender Curve Modifier is not working as expected, check these before rebuilding anything:
1. Deform Axis
Make sure the selected axis matches the direction in which the mesh was originally modeled.
2. Negative axis
If the object deforms in the opposite direction, test the negative version of that axis.
3. Applied scale
Apply scale to both the mesh and curve.
4. Origins
Unexpected offsets are often related to the relative positions of the two objects and their origins.
5. Curve tilt
If the mesh rolls or twists unexpectedly along the curve, inspect the curve's tilt.
6. Mesh subdivisions
The modifier cannot smoothly deform a mesh that does not have enough vertices along its length.
Blender Curve Modifier distortion
A common Curve Modifier problem is distortion near tighter bends.
The outside of the bend needs to stretch while the inside compresses. If the topology is uneven, very sparse, or contains long faces, that compression can produce visible artifacts.
Before adding huge amounts of geometry, check whether the existing segments are evenly distributed.
Uniform topology usually gives the modifier a more predictable surface to work with.
Method 4: Use a Lattice for localized bending
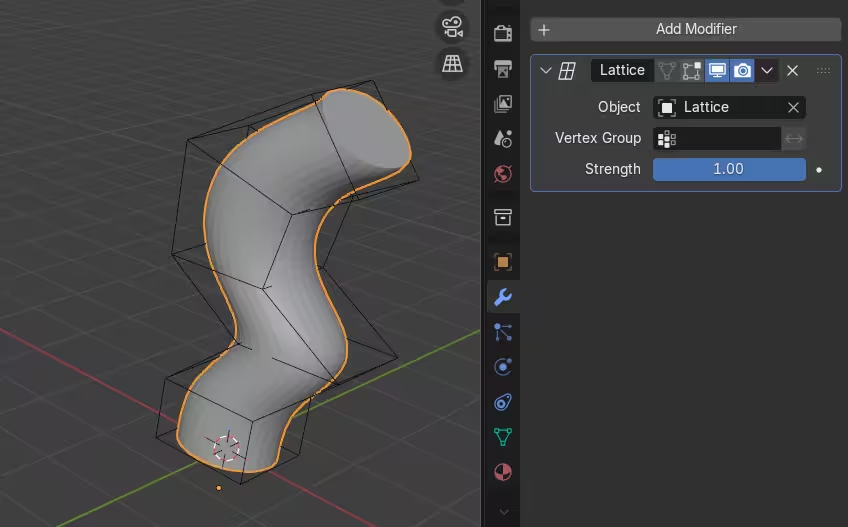
The Blender Lattice Modifier approaches deformation differently.
Instead of operating directly on every mesh vertex, a lattice acts as a simplified control cage surrounding the model.
You manipulate a small number of lattice control points, and the enclosed geometry follows.
This makes lattices especially useful when you already have a detailed object and do not want to select or move hundreds of vertices manually.
How to use the Lattice Modifier in Blender
- Add a Lattice object.
- Scale it so the lattice surrounds the area you want to deform.
- Open the Lattice Object Data Properties.
- Increase the U, V, or W control-point count where additional control is needed.
- Select the mesh you want to deform.
- Add a Lattice Modifier.
- Choose the lattice as the modifier's Object.
- Enter Edit Mode on the lattice.
- Move, rotate, or scale its control points to reshape the enclosed mesh.
- Use a vertex group on the modifier if the effect needs to be restricted further.
When a Lattice works better than Simple Deform
Simple Deform is excellent for mathematically consistent bending.
A lattice is better when the change is more visual than mathematical.
Imagine an already detailed packaging model that needs a subtle bow through the middle, or a prop that needs its silhouette pushed slightly without rebuilding its topology.
A lattice lets you make that broad adjustment while leaving the underlying object intact.
It is also useful when several separate objects need to appear as though they were bent together.
Lattice Modifier vs Curve Modifier
Use the Curve Modifier when the path itself is important.
Use the Lattice Modifier when the overall volume or silhouette is important.
For example:
Cable following a winding route: Curve Modifier
Product package needing a subtle overall warp: Lattice Modifier
Rail following a designed path: Curve Modifier
Detailed assembled prop needing a broad shape adjustment: Lattice Modifier
That distinction usually makes the choice much easier.
Method 5: Bend objects procedurally with Geometry Nodes
Geometry Nodes becomes useful when bending is part of a repeatable system instead of a single modeling operation.
A node group can expose parameters for things such as:
- bend angle
- radius
- direction
- affected length
- falloff
- deformation strength
That makes the same setup reusable across multiple objects or variations.
A basic procedural bend can use each point's Position, calculate a progressive rotation from one coordinate, rotate the remaining coordinates around a chosen center, then update the geometry with Set Position.
For one bracket or panel, this is usually unnecessary complexity.
For a configurable asset system, repeated architectural element, procedural product family, or animated parameter-driven setup, it can make much more sense.
Use Geometry Nodes when
- several assets need the same deformation controls
- the bend needs to respond to selections or attributes
- you need many controlled variations
- other scene data needs to drive the deformation
- the bend parameters will be animated
- you want to reuse the setup later
We cover the underlying concepts in much more detail in our Blender Geometry Nodes guide, including fields, attributes, curves, Set Position, node groups, and reusable procedural systems.
For this reason, it usually makes more sense to keep the procedural setup there and use Geometry Nodes in this workflow only when its extra control is actually useful.
Method 6: Use an Armature for animated bending
Use an Armature when the object needs to bend in different poses or over time.
This is useful for:
- limbs
- tentacles
- flexible machinery
- hoses
- cables
- tails
- mechanical joints
- animated props
Unlike a modeling modifier, the Armature gives an animator a control system that can be posed and keyed.
Basic Armature workflow
- Add an armature.
- Create a bone chain through the part of the object that needs to bend.
- Parent the mesh to the armature using automatic weights, or assign vertex-group weights manually.
- Enter Pose Mode.
- Test the deformation through the full expected range of motion.
- Correct the weights if the mesh collapses, pinches, or stretches unexpectedly.
- For long flexible objects, consider Bendy Bones or spline-based controls rather than using a large number of individually posed rigid bones.
Armatures require more setup than Simple Deform or Curve, but they solve a different problem.
If the bend needs to become part of an animation workflow, that extra setup is usually worth it.
Blender bending objects: common problems and fixes
Switching deformation tools is not always the answer.
A better troubleshooting sequence is:
transforms → axes → origin → topology → modifier settings → modifier order
That prevents you from adding complexity before fixing the underlying problem.
The object bends in the wrong direction
Try another deform axis.
If the modifier supports it, test the negative axis as well.
If the result still appears unrelated to the visible orientation of the object, apply Rotation and inspect the local axes.
An object that looks horizontal in the viewport is not necessarily aligned to its local X axis.
The bend is blocky or forms sharp corners
Add geometry along the direction of the bend.
For a long plane, pipe, tube, or cylinder, make sure you are subdividing the length that actually needs to curve.
A Subdivision Surface modifier can also generate more geometry, but its place in the modifier stack matters.
If you need those newly generated vertices to participate in the deformation, Subdivision Surface needs to be evaluated before the bend.
The mesh stretches, pinches, or changes thickness
Start by applying Scale.
Then inspect the topology.
Look for:
- unevenly spaced edge loops
- extremely long faces
- abrupt changes in polygon density
- complex details crossing the tightest part of the bend
Also test the relationship between Solidify, Bevel, Subdivision Surface, and your deformation modifier.
Sometimes bending a thin surface first and adding thickness afterward produces a cleaner result than deforming geometry that is already thick.
Only part of the object bends
Check the modifier's Limits and vertex group.
A vertex group with gradual weights can create a softer transition between the deformed and undeformed parts.
If you need a broad visual adjustment in more than one direction, a Lattice may give you more intuitive control.
The Curve Modifier twists or offsets the mesh
If the Curve Modifier causes the object to jump, rotate, or twist:
- apply scale to both objects
- check the deform axis
- compare the origins of the mesh and curve
- inspect the mesh's local orientation
- check curve tilt
- confirm that the object was modeled along the axis you are trying to deform
Changing random values usually makes this problem harder to diagnose.
Check one variable at a time.
The end caps look distorted
The inside of a bend compresses while the outside stretches.
That becomes particularly noticeable near capped ends or detailed sections.
Add supporting loops around important shapes and avoid putting complicated topology directly across the strongest compression area when possible.
If an end must remain perfectly rigid, consider separating the deforming region from the rigid portion or controlling the affected area with a vertex group.
Topology and modifier order: a practical example
Suppose you are making a curved metal strip.
A straightforward stack might begin like this:
Base strip → added segments → Simple Deform → Solidify → Bevel
Start with a straight strip whose length follows one local axis.
Add evenly spaced segments along that length.
Apply scale.
Add Simple Deform in Bend mode and create the major curve.
If the strip needs thickness, try Solidify after the deformation so Blender generates the shell from the already curved surface.
Then add Bevel if you want the edge treatment to follow the final shape.
This is a useful starting point, but it is not a universal modifier stack.
If the model contains Boolean operations, custom normals, subdivision, or detailed edge work, test the stack systematically.
Move one modifier at a time and check:
- silhouette
- thickness
- shading
- edge consistency
- end-cap shape
This often tells you more than blindly copying a modifier order from another model.
A useful production principle is to keep the major form editable for as long as possible.
If a bend angle changes after bevels, booleans, and other finishing work have already been applied destructively, even a small revision can turn into unnecessary remodeling.
Frequently asked questions
How do I bend an object in Blender?
For a simple controlled bend, add enough subdivisions along the object, apply its scale, then add a Simple Deform Modifier and set the deformation method to Bend.
If the object needs to follow an irregular path, use a Curve Modifier instead.
How do I bend a mesh in Blender without permanently changing it?
Use a non-destructive modifier such as:
- Simple Deform
- Curve
- Lattice
Leave the modifier unapplied.
You can continue editing the original mesh and adjust or disable the deformation later.
How do I curve an object in Blender?
For a uniform curved object, Simple Deform is usually the quickest solution.
If you need the object to follow a specific curve or route, create a Bezier or NURBS curve and use the Curve Modifier.
How do I curve a mesh in Blender along a path?
Model the mesh straight along one local axis, give it enough subdivisions, then use a Curve Modifier with a Bezier or NURBS curve as the target.
The curve determines the path while the mesh provides the shape being deformed.
How do I bend only one part of an object?
Use the Limits controls or a vertex group in Simple Deform.
For a larger localized shape adjustment, a Lattice Modifier can provide more visual control.
How do I bend an object around a circle?
Use Simple Deform in Bend mode.
A 360-degree bend can create a complete loop if the dimensions, origin, axis, and topology are suitable.
For only part of a circle, reduce the angle.
Why is my Simple Deform modifier not working correctly?
Check:
- applied scale
- local axes
- selected deform axis
- origin position
- number of subdivisions
- Limits
- vertex groups
- modifier order
Most unexpected Simple Deform results come from one of these setup issues.
Can I bend text in Blender?
Yes.
Text can follow a curve through Blender's text-on-curve controls.
Keep the text editable as long as possible and convert it to a mesh only when a later modeling operation specifically requires mesh geometry.
Should I apply a deformation modifier before rendering?
Usually, no.
Blender evaluates enabled modifiers during rendering, so Simple Deform, Curve, Lattice, and similar modifiers can normally remain live.
Apply them only when a later part of the workflow requires fixed geometry, such as a particular export process or manual topology edit.
Keep a backup before applying a complicated modifier stack.
How bending affects production and rendering
Non-destructive deformation makes revisions easier, but every live modifier still has to be evaluated.
That can matter when a model has:
- high render-time subdivision
- several deformation modifiers
- Geometry Nodes
- many duplicated instances
- animated deformation
- complicated procedural dependencies
The goal is not to minimize polygon count at all costs. It is to put enough geometry where it affects the final silhouette and shading without carrying unnecessary complexity everywhere else.
Before rendering a larger Blender project, check the actual render-time settings rather than relying only on the viewport.
A model may look lightweight while you work if viewport subdivision is set to 1, then become dramatically heavier when the render level jumps to 3 or 4.
Also test a representative frame before committing an animation to a Blender render farm. This is particularly useful when deformation depends on modifier order, procedural data, animation, or other scene dependencies that may only become obvious in the evaluated render.
For an example of Blender being used as part of a larger production and rendering workflow, our case study with VFX artist Ray Wakui looks at how Blender and Cycles were used for 3D-driven music-video work and how cloud rendering fit into that process: How Ray Wakui uses Blender to push the limits of VFX in music.
The modeling technique may be a small part of the overall production, but keeping the setup predictable before rendering can prevent a small deformation problem from appearing across dozens or hundreds of frames.
Final Thoughts
There is no single best way to bend every object in Blender.
Simple Deform is usually the best starting point for a clean angular bend.
Use the Curve Modifier when an object needs to follow a custom path.
Use the Bend tool for fast direct edits.
Use the Lattice Modifier when you need broad or localized reshaping without manually editing the underlying mesh.
Use Geometry Nodes when the deformation needs to become a reusable system.
Use an Armature when the bend needs to animate.
Whichever method you choose, the same fundamentals matter: apply scale, understand the object's local axes, place the origin deliberately, add useful geometry along the bend, and pay attention to modifier order.
If a bend looks wrong, check those fundamentals before switching tools. In many cases, the modifier is doing exactly what it should. The object simply needs to be prepared for the kind of deformation you are asking Blender to make.
Register Now and Get $50 FREE Credits!