Creating animated content is always a big deal. Even tackling a short that lasts a minute is a task riddled with pitfalls and uncertainty, demanding the psychological fortitude of a Tibetan Monk (or a willingness to develop a serious coffee addiction). But if you’ve ever managed to complete a short film or even a small skit in Blender, or any DCC in general, you’d know that all that stress is worth it. Besides, 3d animation programs are becoming more and more forgiving with every release, and whether you’ve done it before or not, now is probably a good time for making animations in 3d. It will take time, there will be sweat, tears, and possibly loss of hair color, but it will be worth it, and with these five tips in mind, probably not even as bad as I’ve made it out to be so far.
These Blender tips are taken from the Blender tutorial on our Blender Academy Youtube channel. If you’d like to see these tips in action, check it out!
Here, then, are Five Tips for Retaining Sanity When Making Animation In Blender:
1. Camera Binding
Instead of rendering each shot separately, then comping them into a video editor just to get a preview of an entire sequence, you can tell Blender to switch between your cameras at any point in your timeline. To do this, select a camera, make it active, and on your timeline hit ctrl B. You can do this for as many shots as you want, and Once you reach the frame with a camera bound to it, Blender sets the bound camera to active.


You can also move the markers around in the timeline after, thereby extending or cutting a shot’s duration directly in your viewport!
2. Using Blender Scenes
It may sometimes be a good idea to layout an entire set in one file if you need to check the scaling for your assets, or if you’re setting up for wide shots or one-shot sequences with a moving camera, but for shots that don’t include all the elements in your set, it will save you some render time to just take the visible elements and place them in new Blender Scenes. This way, you only render what you need, and no memory is lost on meshes or textures that won’t be missed in the shot anyway.


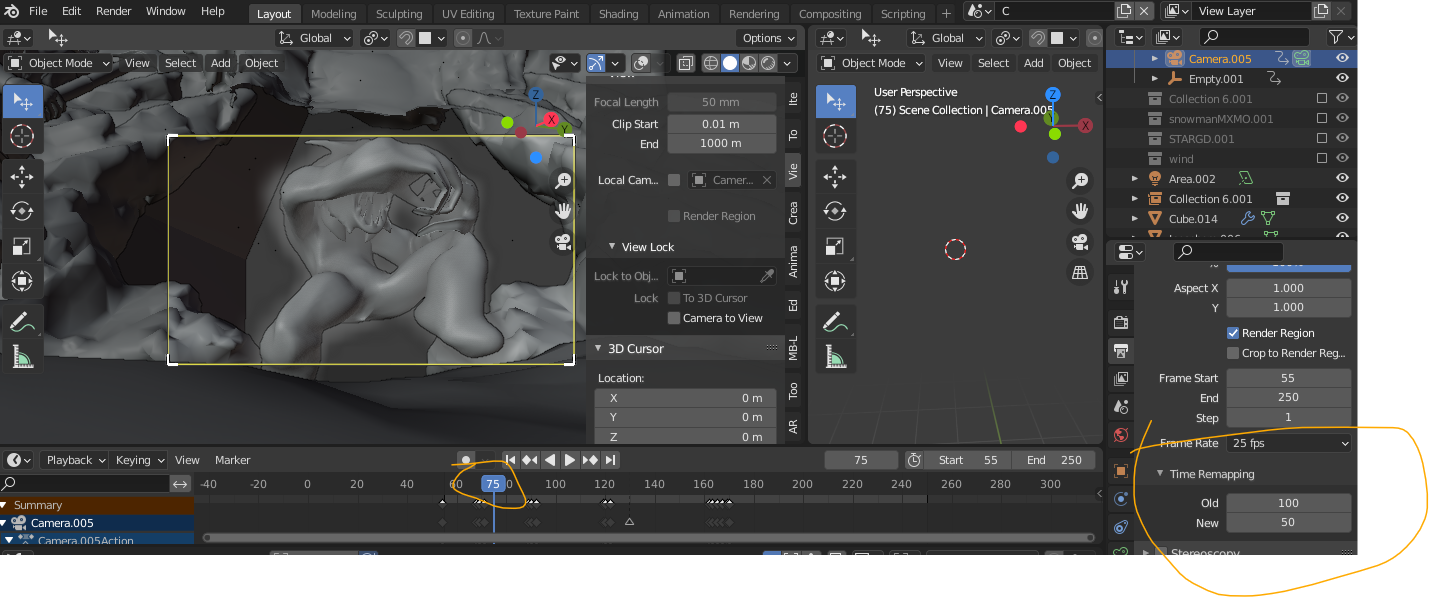
3. Time remapping
If you have a lot of animated elements in your scene, and would rather not individually scale keyframes to slow or speed things up, use the time remapping option in the render settings. Increase the number of frames in the “New” field to slow your animations down and vice versa.


4. Purge All
As you refine each shot you’ll likely have a few materials, maps, or other data in your scene that you might not need. Use Purge all to get rid of orphan data and keep your scenes optimized.

5. Let the community help
If time is short, there’s no reason to model everything yourself! BlendSwap, Sketchfab, and other asset libraries may just have what you need! Since a lot of community members share their work for free, give them credit, and let them know their work is appreciated!

Bonus - User a render farm!
Render Farms are essential to get renders done in time for a deadline, but if you’re looking to try one out on a personal project, check out our render farm!
Uploading is easy and when you register you get free starting render credits! To get as much as $50 rendering credits, register through this link.
So I hope this video was helpful to you, and I hope it least inspires you to mess around in Blender over the holidays, and come up with something of your own! For more Blender guides and tips for faster and hassle-free Blender rendering, check out GarageFarm Academy on Youtube, or the rest of our blog!
Register Now and Get $50 FREE Credits!