


Key takeaways
- Preparing simulations for a render farm means making the project portable, predictable, and easy for render nodes to read.
- Bake or export simulations before uploading so the farm does not need to solve fluids, smoke, cloth, particles, or rigid bodies again.
- Keep all scene files, textures, caches, plugins, scripts, and references inside a clean project directory.
- Avoid local-only file paths that point to your desktop, downloads folder, or private drive.
- Test the hardest frame before submitting the full frame range, especially when the shot includes dense volumes, debris, particles, splash, or motion blur.
- Compare the farm output with a local reference render before letting the full render queue continue.
TL;DR
Preparing simulations for a render farm means making the scene predictable before it leaves the local machine. Bake the simulation, organize the cache, check the directory structure, confirm plugins and render software, test a render frame, then submit the full frame range only when the result is stable. A good workflow reduces failed render jobs, broken dependencies, missing files, and unexpected render time.
Why simulation prep matters before rendering
A normal 3D rendering job can often be split across render nodes because each frame can be calculated on its own. A simulation on the other hand is more delicate with fluids, smoke, fire, cloth, rigid bodies, hair, particles, crowds, and other dynamic effects that often depend on what happened in earlier frames. If those results are not baked or cached for example, every node may try to solve the same effect differently, or it may fail because the required computer file is missing.
This is why simulation prep is important, and that you want the render farm to read the same data that your desktop computer or laptop already approved. You also want the rendering service to find every cache, texture, plugin, blend file, and dependency without guessing.
Prepare common simulation types
Different simulation types fail in different ways. The safest approach is to understand what each effect needs before you send it to the render farm.
Fluid and ocean simulations
Bake or export fluid meshes, particles, whitewater, foam, bubbles, spray, and mist. Check that the cache is complete and that the renderer can read every file.
Master Fluid Simulations In Blender in Just 2 Minutes - by Wimpythekat
For large water shots, test a frame with the most splash or whitewater. Water can produce heavy file size and long render time, especially with transparency, refraction, and motion blur.
Smoke and fire simulations
Smoke and fire usually rely on volume caches. VDB files are common because they can travel well between render software and 3D software.
Blender | EASY Fire Simulation | Beginners Tutorial - by PIXXO 3D
Test volume density, color, lighting, and shadow settings on the farm. A volume may render locally but disappear on a node if the directory is wrong or the cache path is missing.
Cloth and soft body simulations
Master Soft Body Physics in Blender in Just 2 Minutes - by Wimpythekat
Bake cloth and soft body motion before upload. Confirm that collision objects are included and that scale values have not changed after the cache was created. If the cloth is final, consider exporting it as geometry cache. This can make the render job less dependent on live solver behavior.
Hair, fur, and groom simulations
Create Fur/Hair in Blender in 1 Minute! - by BlenderVitals
Hair and fur can depend on plugins, maps, guides, and procedural generation. Cache dynamics where possible. Include density maps, guide files, groom assets, and any plugin data. If a plugin is not available on the render farm, convert the result into a supported cache format or choose another rendering service that supports the required tools.
Rigid bodies, particles, and crowds
Blender Crowd Simulation Addon | Procedural Crowds - by CG Vortex
Rigid body destruction, particle systems, and crowd setups can involve many objects. Check instancing, random seeds, IDs, and object visibility before upload. For a dense array of particles or crowd agents, test a frame with the highest count.
Start with a clean 3D software workflow
Before you upload anything, create a clean version of the scene. This matters whether you work in Blender, Cinema 4D, Houdini, Maya, or another 3D software package. The render farm should receive a clear production version, not a messy work file full of old tests.
Save a dedicated farm version
Make a new scene file for the render farm. Keep your working file separate from the version you upload. If you use Blender software, save a dedicated blend file with final render settings, final camera, final frame range, and final cache paths.

This also helps when you need support from a cloud rendering service. A clean scene makes it easier for a render manager or support artist to find the problem if something goes wrong.
Remove unused tests
Delete old simulations, unused cache folders, abandoned geometry, extra cameras, and old render settings. This reduces file size and makes the upload easier. If you use cloud storage, Dropbox, shared storage, or a drag and drop uploader, a smaller and cleaner project folder is less likely to break during transfer.
Keep the approved result stable
After baking or exporting a simulation, avoid changing the objects that drive it. Collision meshes, particle emitters, force fields, scale values, and timing changes can invalidate the cache or cause errors. If a small change is needed, bake again.
Prepare the cache before upload
The cache is the heart of a farm ready simulation. It is the stored result of the simulation that the renderer can read during final rendering. Without it, render nodes may be asked to solve the effect again, which can increase render time or create inconsistent frames.
Bake simulations in Blender
For simulations in Blender, bake the data before sending the file to a blender render farm. This applies to fluid, smoke, fire, cloth, particles, rigid bodies, and other time based effects. If the cache is stored externally, make sure the cache folder is included in the upload.
Bake Rigid Body Physics in Blender - by Blender Dojo
Also check whether the cache is saved inside the blend file or written to disk. Disk cache is often easier to manage for render farm services because the files are visible in the project directory.
Export heavy simulations
For complex scenes, exported caches can be safer than live simulations. Use formats such as Alembic for animated geometry, VDB for volumes, and USD for asset exchange when your renderer and render software support them. This can help with distributed rendering because each node reads stored computer data storage files instead of solving dynamics again.
Alembic Abc In Blender Explained Import & Export Baked Animations and Simulations - by Islam Mhran
This approach is especially useful for smoke, fire, water, destruction, crowds, hair, and dense particle effects. GPU rendering and CPU rendering can both benefit from a stable cache because the expensive solving step has already been completed.
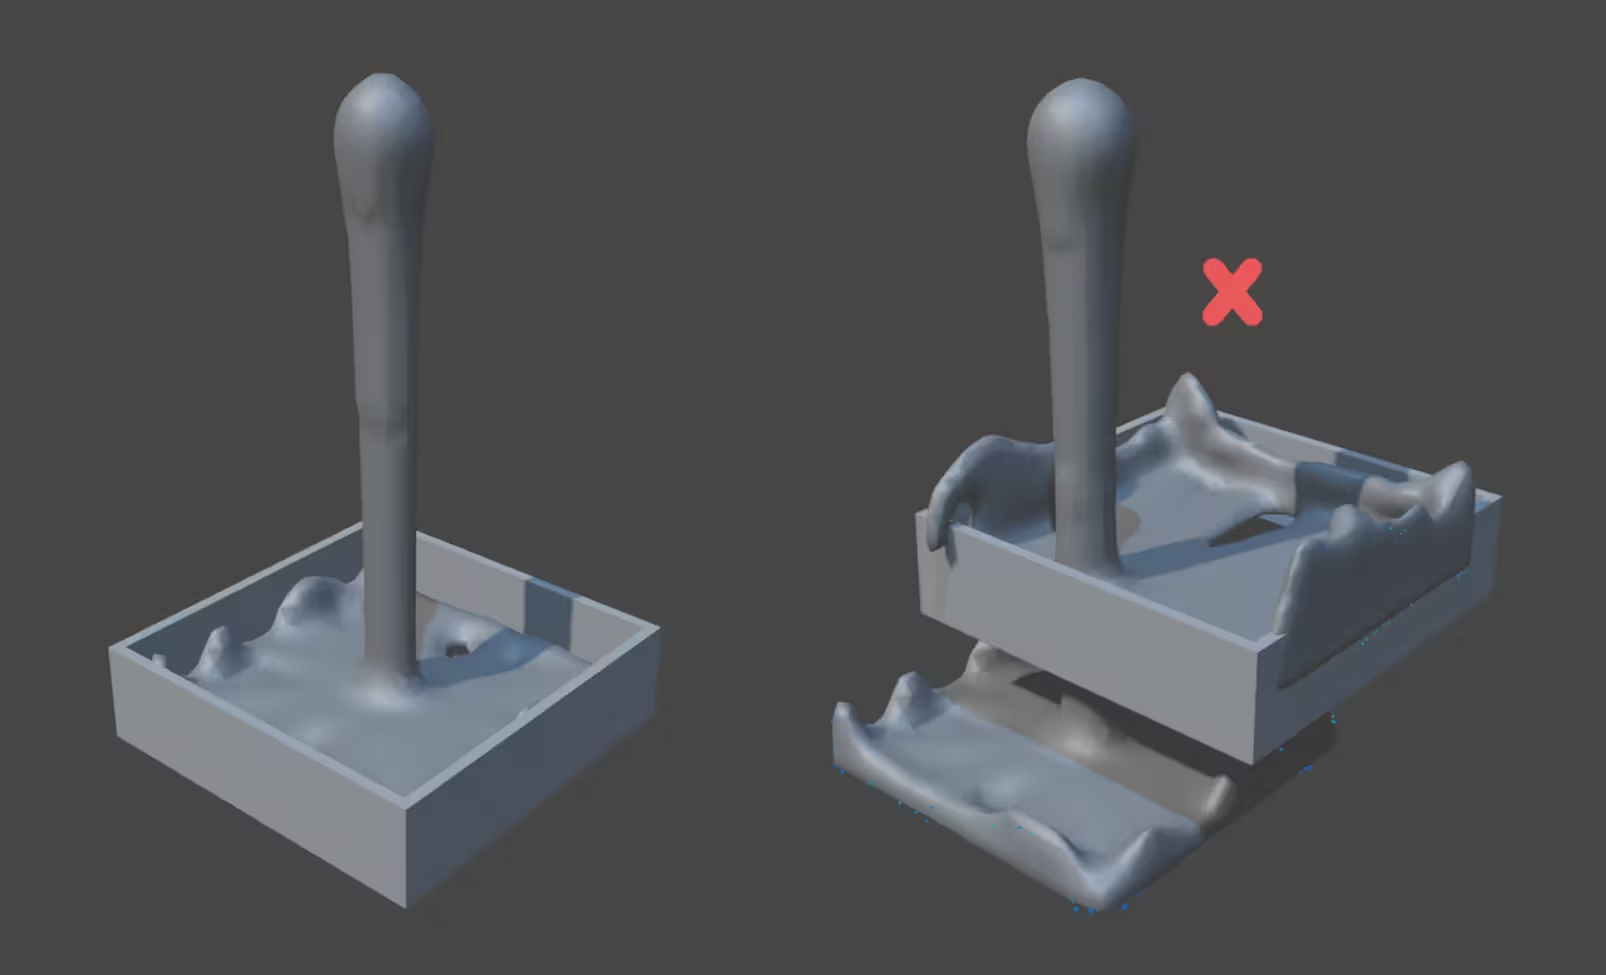
Check the frame range
A cache must cover the full frame range you plan to render. If your animation starts before the visible shot, include the needed preroll. If the final frame depends on earlier motion, make sure the cache begins early enough for the simulation to settle. A missing first frame, shifted cache, or wrong frame padding can cause popping, disappearing particles, or mismatched motion blur.
Keep the directory easy to read
A render farm does not know your desktop habits. It reads paths, directories, and files. If your project points to a folder on your local machine that the render nodes cannot access, the job can fail even if the scene works perfectly on your computer.
Avoid local only paths
Local paths are one of the most common problems in 3D and visual effects workflows. A path that works on macOS, Windows, or a Mac Pro in your studio may not exist on a remote desktop, Linux node, or cloud rendering service.
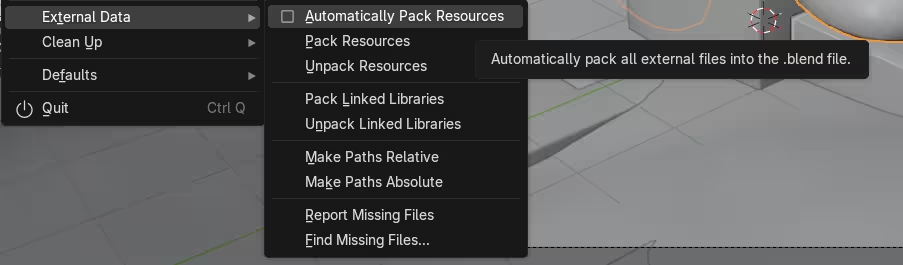
Avoid paths that point to your downloads folder, desktop, or a private drive. Keep the project portable or pack all the resources.
Use a project directory
Put the scene, textures, cache, geometry, references, scripts, and composite elements inside one clear project directory. If you need to use cloud storage, make sure the folder structure stays the same after upload. In Directory in computing terms, this is about making the project understandable to another machine. A render node should be able to open the scene and find the cache without your local machine being present.
Watch file size
Simulation caches can become large very quickly. VDB volumes, particle arrays, fluid meshes, cloth caches, and high density geometry can all increase file size. Remove old cache versions before upload, but keep the final approved cache and any required dependency.
Choose the right render farm setup
Different projects need different levels of render power. Some artists can finish on a single workstation. Others need a local farm, a cloud rendering service like GarageFarm, or a more advanced setup with shared storage and render management software.
Single workstation
A single workstation can be enough for previews, look development, and small render jobs. A desktop computer with strong GPUs, NVIDIA graphics cards, high CPU cores, and enough memory can handle many 3D art scenes. The limit is scale. When the render time becomes too long, or when a simulation needs more memory than one computer can handle, a render farm becomes more practical.
Local render farm
A local render farm uses multiple desktops, workstations, or rack machines connected through ethernet. With gigabit ethernet or faster networking, shared storage, SMB paths, and a queue manager, a studio can send render jobs to several render nodes. A local farm can use Xeon processors, high GHz desktop CPUs, multiple GPUs, or a mix of CPU and GPU machines. The important part is consistency. The same software installation, plugins, renderer, and cache access must exist across the farm.
Cloud rendering service
When you use online render farms, you rent render power instead of maintaining every node yourself. This is useful for freelancers, small teams, and studios with sudden deadline pressure.
A cloud rendering service can provide many render nodes, large GPU arrays, CPU rendering capacity, and a render queue that scales beyond a single workstation. The tradeoff is preparation. The upload must include every required computer file, cache, plugin requirement, and render setting.
Advanced setup
An advanced setup may combine local machines, remote desktop access, RDP, SSH, shared storage, distributed file access, and render management software. Larger teams may also need multi user permissions, storage rules, project naming standards, and queue policies. The goal is to orchestrate render jobs so that artists, supervisors, and production staff can see what is running, what is waiting, and what failed.
Check render settings before final rendering
Render settings are easy to overlook because they feel separate from simulation prep. In practice, they are connected as a simulation can look correct in the viewport and still fail at final quality if motion blur, subdivision, displacement, volume sampling, or memory settings are too heavy.
Match the renderer
Confirm that the renderer used on your local machine is available on the farm. This includes Cycles, Arnold, V Ray, Redshift, RenderMan, Karma, Octane, or another network renderer. Also check whether the farm supports the same plugin versions. A missing plugin can break materials, particles, hair, fluids, cache readers, or custom tools.
Choose CPU rendering or GPU rendering intentionally
CPU rendering is often flexible and can handle large memory scenes well. GPU rendering can be faster for many shots, but it depends on graphics cards, GPU memory, and renderer support. If the scene uses NVIDIA GPUs locally, confirm that the farm has compatible GPUs and drivers. If the scene is designed for CPU cores, make sure it is not accidentally submitted to GPU only render nodes.
Test the hardest frame
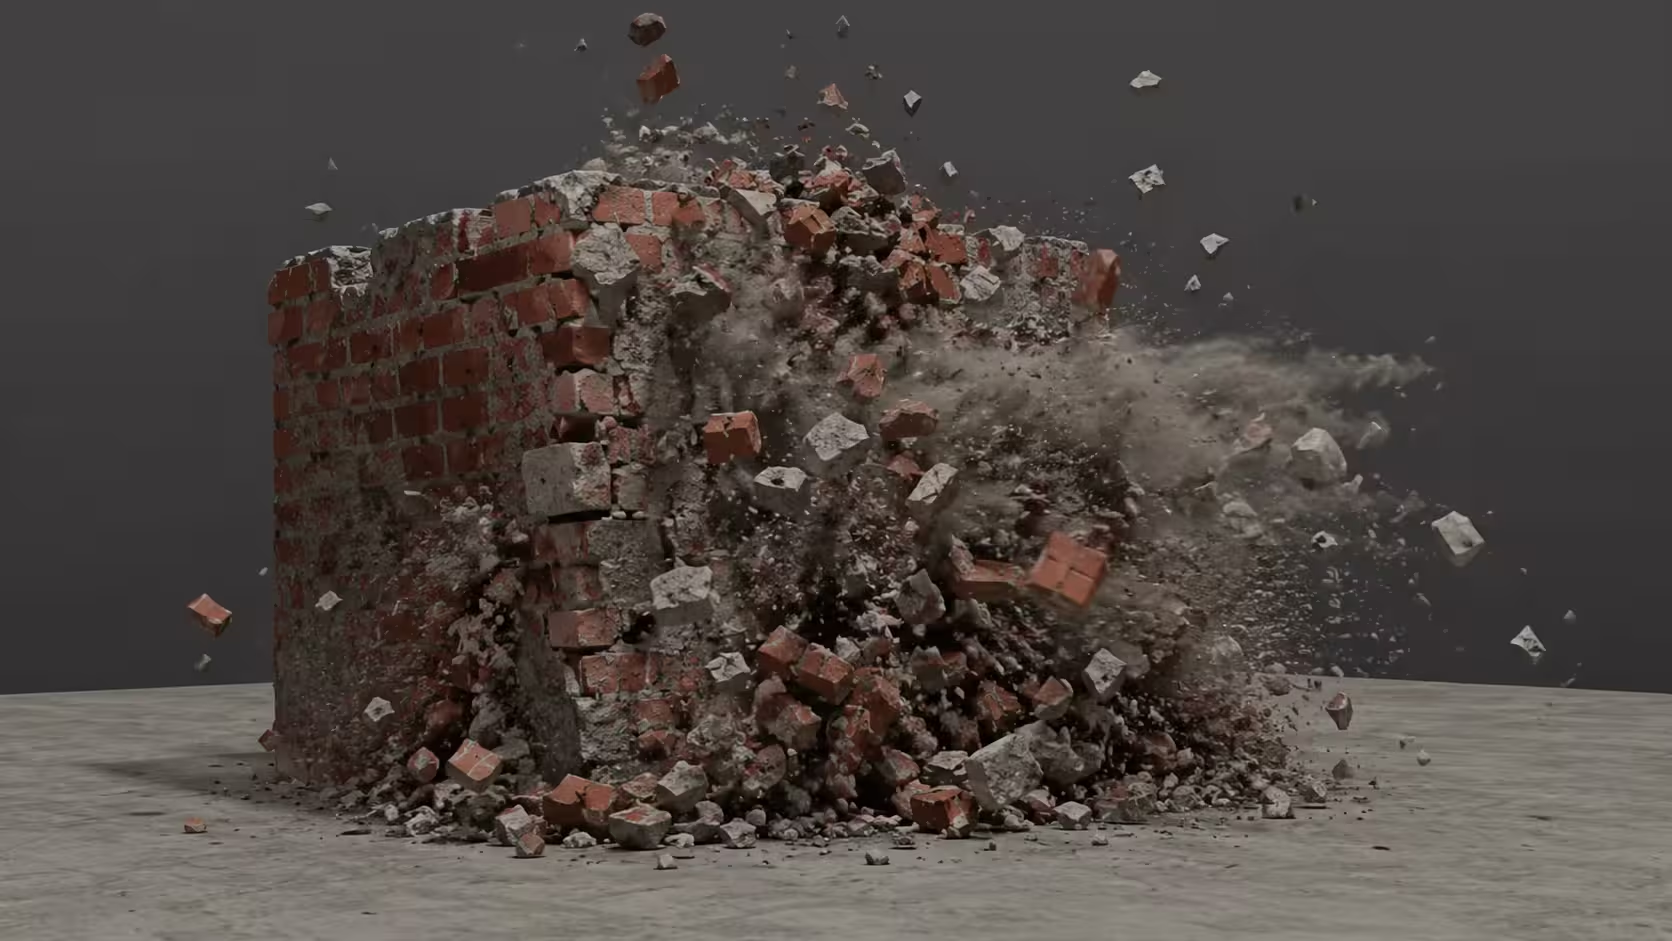
Do not only test the first render frame. Pick a frame where the simulation is visible, dense, and complex. For fluid, smoke, or destruction, this is often the frame with the most volume, debris, particles, or motion blur.
Upload and test before the full render farm job
The upload is the moment where local assumptions get tested. A scene that works on your local machine may fail once it reaches the farm because paths, software, storage, or plugins are different.
Use the farm checker when available
Many render farm services include project checking tools. Use them before starting final rendering. A good checker can find missing textures, unsupported plugins, invalid paths, missing cache files, wrong frame ranges, and oversized assets. This is especially important for a blender render farm workflow because a blend file can reference external folders that are easy to forget.
Submit a small test
Start with one render frame, then a short range. Check the output for missing cache, incorrect timing, broken materials, black frames, missing volumes, wrong camera, and unexpected render time. For animation, review the motion. For simulation, look for popping, sliding, disappearing elements, or a final frame that does not match the local preview.
Compare local and farm output
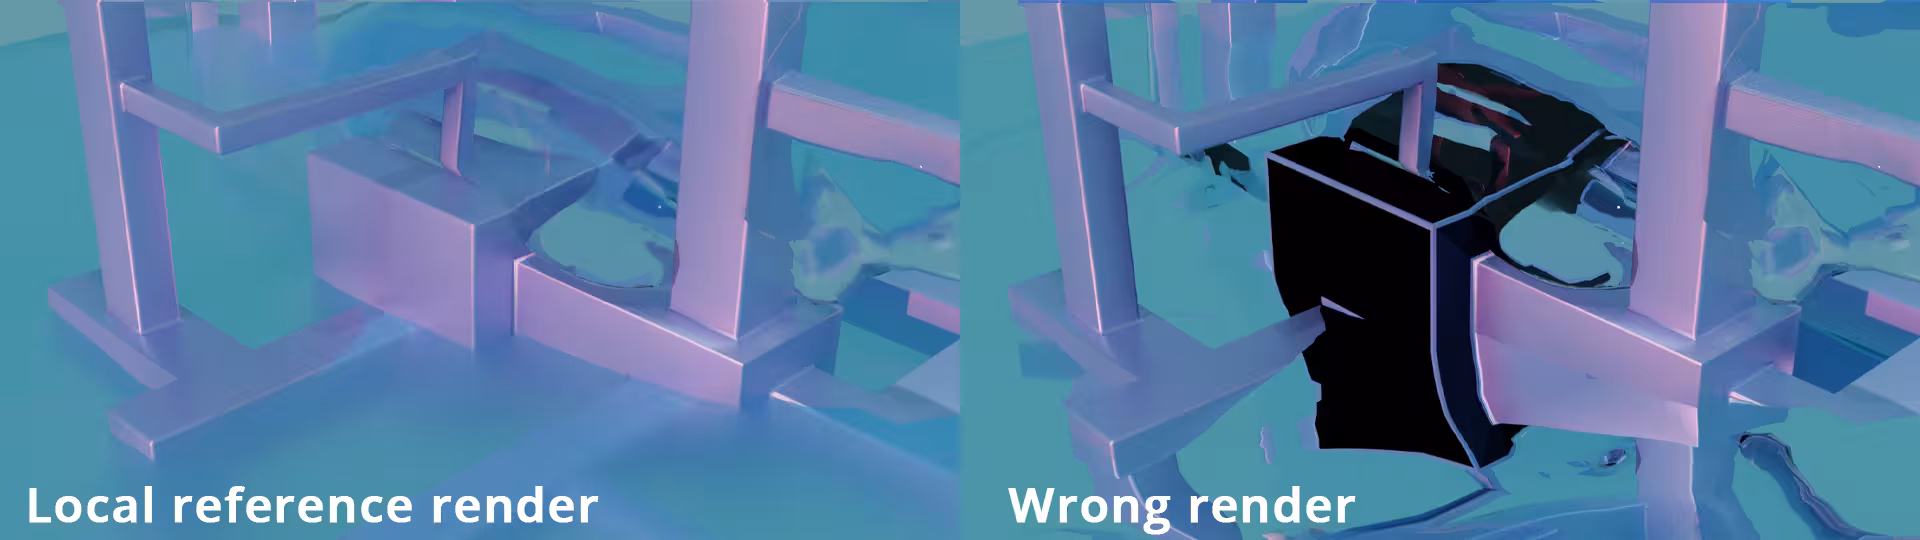
Keep a local reference render. Compare the farm result against it. Differences can come from renderer versions, color management, plugins, missing data, or render settings. If the farm version looks wrong, stop the render queue early. Fix the problem before submitting the full frame range.
Review the final frame and the full sequence
When the farm finishes, do not only download the final frame. Review the full sequence or at least a representative set of frames. Simulations can fail in the middle of the shot even when the first and last frames look fine.
Look for simulation errors
Check for missing caches, frozen particles, volume flicker, cloth popping, rigid body jumps, and frame offset issues. Also look for sudden render time spikes because they may reveal memory or sampling problems.
Check the composite path
If the render includes AOVs or passes for composite work, confirm that the output naming is consistent. The composite stage needs predictable files. If the passes are scattered across different folders, the next part of the workflow slows down.
Archive the successful setup
Once the job is approved, keep the final scene, cache, render settings, and support notes together. This makes revisions easier and protects the team if the client asks for changes later.
Final thoughts
Preparing simulations for a render farm is less about pressing upload and more about making the project portable. The render nodes need clear data, stable cache files, correct plugins, supported render software, and a queue that understands the order of the work.

When the setup is clean, render farm services can give artists more render power without turning the process into a guessing game. For 3D rendering, animation, 3D and visual effects, and complex 3D art, the best farm submission is the one that behaves the same way on the farm as it did on the local machine.
Register Now and Get $50 FREE Credits!