


Whether you're creating a short film, a video game, or a stylized ad spot, character rigging is one of those technical art forms that quietly makes or breaks your animation. It’s the skeleton under the skin, the unseen scaffolding that lets your characters dance, walk, cry, or strike that dramatic pose in the final frame. In this article, we’ll unpack what character rigging is, why it’s vital, how to rig a character for animation, and what tools and tips can help you create more expressive and efficient rigs.
What Is Character Rigging and Why It’s Essential in Animation
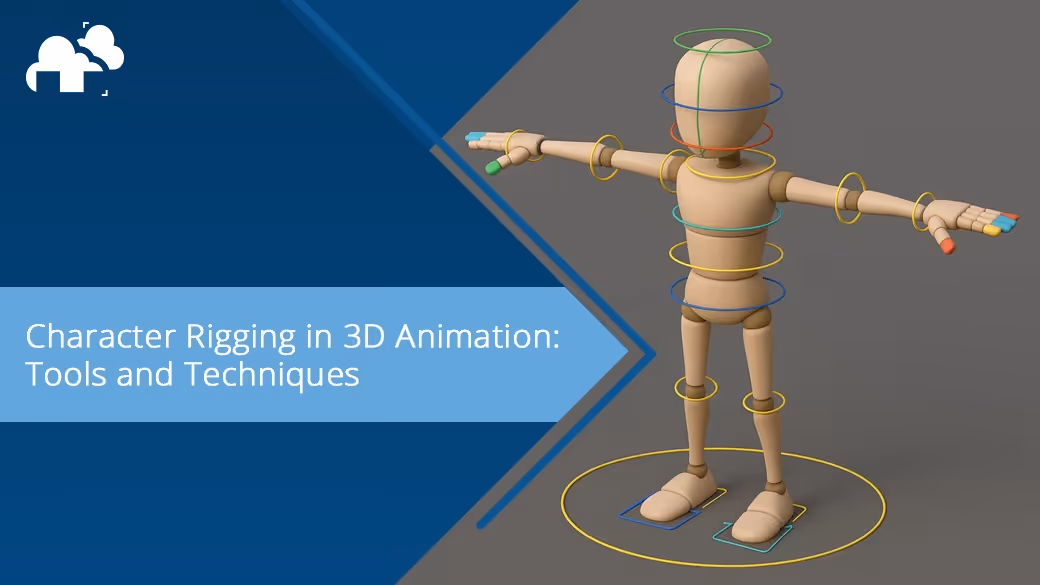
Character rigging is the process of creating a “rig”, essentially a skeleton made up of bones, joints, and controllers to animate a 3D (or 2D) model. Think of the rig as the puppet strings and the animator as the puppeteer. At its core, rigging links a mesh to a hierarchical structure of bones (also called joints), allowing you to animate complex movements like walking, blinking, or dancing. Without rigging, animation would be a painstaking frame-by-frame deformation of vertices. Rigging streamlines the workflow, making motions reusable and editable.
Why is it essential?
- Efficiency: Reusable animations, clean deformers, and organized hierarchies save massive time.
- Control: Riggers can fine-tune movement with constraints, sliders, and inverse kinematics.
- Expression: Facial rigging, blend shapes, and controllers bring life to characters, letting animators express emotion and nuance.
Whether you're animating humanoid characters or stylized puppets, rigging is the step that bridges modeling and animation.
How to Rig a Character for 3D Animation
So how does the process actually work? Here’s a simplified step-by-step workflow, with tips for both beginners and intermediate animators.
Step 1: Prepare Your Mesh
Make sure your 3D model is animation-ready:
- Apply transformations (scale, rotation).
- Use quads, not triangles, where possible for smoother deformations.
- Create edge loops around joints (like elbows and knees).
- Ensure a clean topology, especially around areas that will bend.
Step 2: Build the Skeleton
Using your 3D software (Maya, Blender, 3ds Max, etc.), start placing bones and joints. Typically, you'd build a central spine, arms, legs, and a head. For humanoid characters, place joints at anatomical pivot points like shoulders, hips, elbows, and knees. Use mirror bone tools to speed up symmetrical rigging for limbs. You can also test the joint orientation in this step.
Step 3: Skinning and Weight Painting
This step binds your mesh to the skeleton. Tools like automatic skinning (Mixamo, Maya’s Bind Skin, Blender’s Armature Modifier) can get you started, but you’ll almost always need to fine-tune with weight painting. Weight painting controls how much influence each bone has on the surrounding mesh. Think of it like a gradient: the elbow joint might have 100% influence on nearby vertices and 50% on those a bit farther away.
Step 4: Add Controllers
Controllers are user-friendly handles that make animating easier. Instead of rotating bones directly, you manipulate these NURBS curves or shapes, which then drive the skeleton.
Controllers can be:
- FK (Forward Kinematics) – Animates from the top of the hierarchy down. For example, we can go from the shoulder, to the elbow, then to the hand.
- IK (Inverse Kinematics) – Lets you move the end of a limb (like a hand or foot) and the rest follows naturally. It’s great for grounding feet or reaching targets.
Step 5: Test Deformation
Bend those knees, rotate the shoulders, twist the spine. Look for pinching, stretching, or collapsing. Use deformers, corrective shape keys, or adjust weights as needed.
Step 6: Add Facial Rigging (Optional but Powerful)
Facial rigging can involve:
- Bones for jaw, eyelids, and eyebrows.
- Blend shapes for expressions (smile, frown, blink).
- Sliders or GUI controls for animators to quickly access common expressions.
Skeletal Animation and Humanoid Characters Explained
When we talk about skeletal animation, we’re referring to the method of using a hierarchy of bones to animate a character. It’s used across video games, films, and TV, and it’s the standard for both 2D (Adobe Animate, After Effects) and 3D workflows (Maya, Blender, 3ds Max, Cinema 4D).
Hierarchies and Parenting
At the heart of skeletal animation is the hierarchy. Bones are parented to each other so moving the hip affects the whole leg. This hierarchy lets us manage complexity: animating a walk cycle becomes manageable because the movement of bones cascades down.
Joints, Constraints, and Kinematics
- Joints are the pivot points such as the elbows, knees, and neck.
- Constraints limit movement (e.g., preventing a leg from bending backward).
- Inverse Kinematics (IK) is great for grounded motions.
- Forward Kinematics (FK) is great for expressive, flowing movement.
Best Character Rigging Tools: From Adobe to Cinema 4D
Here's a look at some popular rigging tools across the industry:
Blender
- Free and open-source.
- Easy and seamless plug-ins to make rigging even easier.
- Great for game-ready assets and stylized animation.
Maya
- Industry standard for animation.
- Advanced rigging tools, including HumanIK.
- Strong integration with MotionBuilder and game engines.
3ds Max
- CAT (Character Animation Toolkit) for quick setups.
- Biped system and custom bone tools.
- Popular in game asset production pipelines.
Cinema 4D
- Intuitive interface.
- Good deformers and weighting tools
- Used frequently for motion graphics and stylized character work.
Mixamo
- Free auto-rigging service.
- Upload a mesh, download a rigged model.
- Works best for humanoid characters, but offers limited customization.
Character Rigging in Adobe Animate and After Effects
Not every animation requires full 3D rigs. For 2D characters and web content, tools like Adobe Animate and After Effects are indispensable.
Adobe Animate
- Good for vector-based puppets.
- Layer parenting, basic bones, and motion tweens.
- Lightweight for web animations.
After Effects with Duik Bassel
- Full-body IK/FK rigging.
Controllers, nulls, and sliders for expressive animation. - Facial rigging via Puppet Pin Tool or layered expressions.
3D Character Rigging Tips for the World of Animation
Here are some hard-earned tips to help streamline your rigging workflow:
Use Proxy Meshes First
Work with simplified versions of your model to test rigs. You’ll get faster playback and fewer headaches.
Stick to Naming Conventions
Keep bone names consistent. Animation software relies on names for exporting and retargeting, and it can be a huge help in the long run and avoid confusion when working together with other people.
Modular Rigs
Create rigs in parts (spine, arms, legs) and assemble them later. Easier to debug and customize. This is most prevalent in Unreal Engine.
Use Layers and Visibility Toggles
Organize controllers and bones into layers for easier animation. Hide what’s not necessary.
Don't Skip Manual Weight Painting
Auto-rigging is great, but fine-tuned weight painting is what makes bends and twists believable.
Use Shape Keys or Corrective Blend Shapes
Deformations like shoulders or knees often look weird. Use corrective deformers to sculpt them back into place during animation.
Export Test Animations Early
Before finalizing the rig, apply basic animations like walk cycles or turns. Look for collapsing or sliding geometry.
Optimize for Your Output
- Low poly rigs for games.
- High detail rigs for film.
- Use virtual bones sparingly to improve performance.
Final Thoughts: Bringing Your Characters to Life
Character rigging is both a science and an art. It requires a technical understanding of joints, kinematics, and deformation, but also an eye for motion, silhouette, and believability. The right rig can make your character emote, act, and perform with clarity and style. Whether you’re working in Maya, Blender, or Adobe’s suite, the fundamentals remain the same: bones, weights, controllers, and passion. And if you ever feel overwhelmed by the complexity, remember that even the most advanced rigs start with a single joint.
Register Now and Get $50 FREE Credits!