


One of the more ubiquitous statements about 3D rendering is that lighting can make or break your image. This is almost always true. Previewing your scene's lighting in any 3D software will inevitably mean spending minutes doing preview renders on your viewport, rendering some test frames and rinsing and repeating the process (at least if you're using an offline render engine).
Renderers like V-Ray and Corona mitigate this using a concept called "Light Mixing", where you can render a pass for each light in your scene and adjust its influence on your image after the render. This saves time by allowing you to quickly add a level of proceduralism to an important and, to a certain extent, destructive stage of 3D production.
As of this writing, Blender 3.2 has just reached the Beta stage and has introduced Light Groups for Cycles - a long-awaited counterpart to the aforementioned feature in V-Ray and Corona renderer. It isn't as sophisticated, but it certainly does the job! This article will go over how to set up Light Groups in the Beta version of Blender 3.2 and look at some practical use cases for the feature.
If you're keen to test this feature out before the official Blender 3.2 release, why not give our Blender render farm a try? You get $50 worth of starting credit, which is more than enough for an elaborate animated scene, AND you can contact our 24/7 support team, who would be more than happy to set up the latest Beta build on the farm just for you!
Let’s get to it!
Using Beta Builds
If you’ve never played with any experimental build, simply head over to Blender.org and scroll down to where you see this:

Take due note of the warnings and then hit “Download Blender Experimental” to access the available builds on the page.

You’ll notice Blender 3.2.0 - Beta is updated almost every day. Suppose this is your first time tinkering with an experimental build. In that case, you can rest easy knowing a version of Blender in Beta status is a version that has all the features of the current release in working order and is relatively stable. You should always make a backup of your project before opening it on these builds. It might be more beneficial to you to download the current daily build since, theoretically, it would have addressed any issues in previous ones. Also, keep in mind that you’d be doing Blender and its community a favor by reporting any bugs you come across.
Once you have the .zip downloaded, extract it and run the Blender.exe file to launch the 3.2 Beta!
Setting up Light Groups
Once you have a project open in the Beta build, take note of the new “Light Groups” tab in the View Layer Properties panel. This will only appear in scenes set to render in Cycles.
Light Groups will allow you to create as many groups as you need. Hit the “+” icon on the upper right. Each group can be assigned to lights in your scene. The idea is to assign lights to a group so that you can isolate each group in compositing later.


In this scene I’m using, you’ll see that I have one of my lights selected. On the middle panel is the Object Properties panel of this particular light. On the Shading drop-down, you can see a Light Group field that enables me to assign this light to any one of the light groups I have previously created. This light is set to the group “Lightgroup_002”. On the rightmost panel are the light groups I created for this scene.
I’ve made similar assignments for the other lights in my scene, including my environmental light driven by an HDR map. You can assign your environment light to a light group in the World tab in the Settings > Light Group drop-down.\

Once you have your lights assigned to light groups, render out a test image to access the groups for compositing.
Light Groups in the Compositor

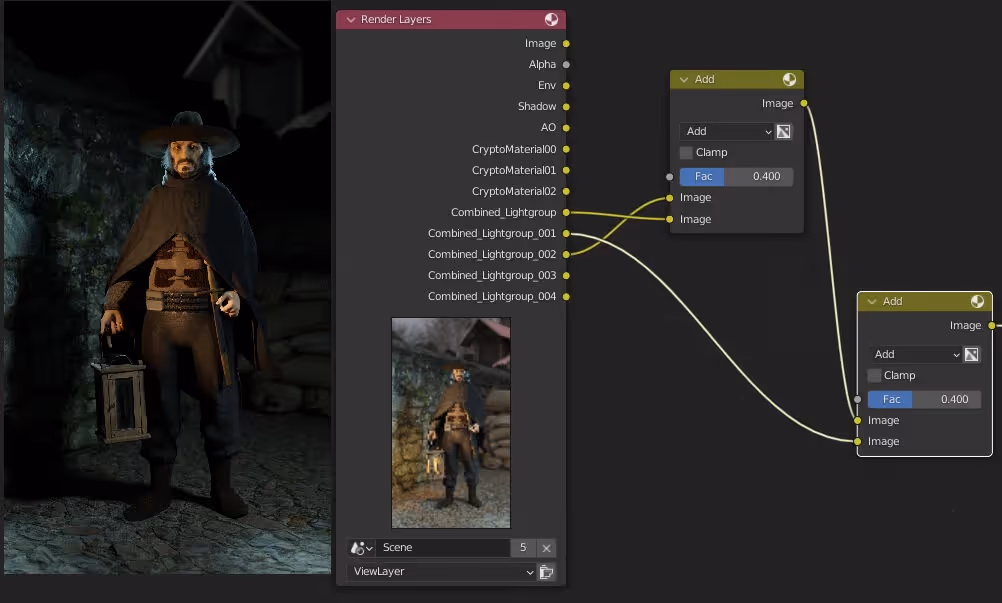
At this point, there seems to be no other way to preview the light groups other than in Blender’s Compositor. Be sure “use nodes” is enabled to access your Render Layers node. There you’ll find your Light Groups listed along with any other Render Pass you enabled.
In my scene, my Fill light is assigned to “_Lightgroup”. My Key light is assigned to “_Lightgroup_001”, my Rim light is assigned to “_Lightgroup_002”, the light from the lantern the character is holding is set to “_Lightgroup_003” and my Environment light is assigned to “_Lightgroup_004”.

As you can see, each light is isolated into its own pass in the Compositor.
Combining Light Groups
Two common ways to combine and adjust Light Group Passes are the use of Mix and Add blending modes. Mixing between Light Group Passes puts each pass on an end of a spectrum and allows us to lean to one end or the other as we see fit.

On the left is a snap of the Rim Light pass, and in the middle is the Fill Light Pass. On the right is a snap of both Passes blended together using a Mix node with a factor value at .4 (which leans towards more of the Rim Pass than the Fill (a value of zero shows only the Rim pass, and a value of 1 shows only the Fill).

Now here is the additional Key Pass on a new Mix node. Here, the Key Pass is on one end of the spectrum, and the combined Fill and Rim are on the other end.
Here is the same node setup but with the blending modes on both nodes set to Add instead of Mix.
Using Add is less like leaning on the side of a spectrum and more of literally adding together the pixel values of the two passes. This is why you may notice that less detail is obscured in shadow using the Add blending mode as compared to Mix.
Adjusting Passes
Let’s add in our Light Group Pass for the lantern our guy is holding.

Let’s say we wanted this light to be a little tighter or bleed less into the subject from the source. With our Light Groups we can do this quickly by adding a Brightness/ Contrast node (just as an example) to our Key Pass.

I set the contrast value to 5 to exaggerate the effect, but as you can see, the light from the lantern features much less into our subject and the adjacent wall.
Note that the rightmost image above is still set to the Add blending mode. If we were to change it to Lighten, we would preserve the shadow values on the previous layer.

Night to day
The aforementioned use cases demonstrate the most immediate use for Light Groups: making subtle changes to a light setup we arranged in our scene. Let’s pretend we were sending this image to a client, and we were asked to show what the scene would look like in the daytime. We could start by adding our HDR/Environment light pass to our node network.

Let’s disable all other light passes by deleting all other nodes, Then add an Exposure node to that pass and crank up the value before it leads to the viewer output.

Et Voila! Now we can reincorporate our other light passes and add some colour grading to refine the look.
We can use the Exposure node on any of our Light Group Passes to change the role of our lights. Using Mix nodes set to Color will allow us to quickly change the hue of our scene lights to better match our now day-lit scene.


This is all well and good, you might think, but how would we leverage Light Groups on an animation? Stay tuned! We’ll break that down for you soon enough!
In the meantime, I hope this was useful! The best part is that now we can take advantage of different colour blending modes, colour shifters or contrast adjusters inside of Blender to fine-tune the lighting for a scene instead of setting up more elaborate node networks with the Diffuse and Glossy passes, for example.
This also means we won’t need to rely on render previewing on the viewport as much to get an accurate read on what our light set-up will look like. If we wanted to, we could create alternate light setups and assign those to even more groups! All this to say, many more possibilities have opened up for us thanks to the introduction of Blender Light Groups in version 3.2. This means more time and opportunity for us to experiment with lighting and elevate our renders.
Register Now and Get $50 FREE Credits!